Grinding hull for new stringers

Joined
Nov 30, 2016
Messages
58
Hey everyone. This forum is incredible and giving me so much information. I got my first boat last week. Beautiful Sportcraft. Beautiful everywhere except the floor. I am starting the process of replacing the stringers and the deck. Have been doing my research for a few months on what to do and how to do it (most of that research on this forum). But I do have a question I would love to hear opinions on.

I am wondering about the grinding process of the hull before bedding in new stringers. How much do I need to grind? How deep? And finally, what is your preferred grinding/sanding pad to use for this process?

Thanks for the help!
 

gm280

Supreme Mariner
Joined
Jun 26, 2011
Messages
14,605
First of all, :welcome: aboard ImJonnyKelley to iboats.....

Most folks use an angle grinder. Some use cheap ones from HF while other use brand name types. However, whatever works for you is the best. And I used 80 grit flapper disks while others use 36 grit or 40 grit. Again whatever works well for you is the best. The object is to remove all the old fiberglass until you see good pinkish material. That is good fiberglass to work with. Basically grind everything nice and smooth so the new stringers, transom, floor material will adhere to it well. I also will tell you, do use a tyvek coverall suit with a very good respirator and eye and hand protection. That fiberglass dust will get into anything not covered. And it both itches and jags pretty badly. I am not joking about that either. You will be grinding up more fiberglass dust then you ever thought you would. And it goes everywhere.

Post up a few pictures of your new-to-you-boat so we can see what you are dealing with. We do love pictures on these forums.
 

JASinIL2006

Vice Admiral
Joined
Feb 10, 2012
Messages
5,716
I'd add to gm280's good suggestions that a 4" angle grinder is much easier to use than a full-sized grinder. I tried using my big Dewalt and found it was just too heavy for long grinding sessions holding the grinder at the various angles to clean the hull and transom. Also, I liked the flat grinding disks better than the flapper disks. I think I used 24 and 40 grit most.

In addition to the cautions about person protection equipment, the fiberglass dust can also do a number on your power tools. I bought cheapo 4" grinders; the first one died about 3/4 of the way through the project.

Good luck with the project, and if you haven't already, give the transom a thorough look. If the floors/stringers are that bad, the transom is a candidate for rot, too.

I'll be following along to see how you're doing!
 

Scott Danforth

Grumpy Vintage Moderator still playing with boats
Staff member
Joined
Jul 23, 2011
Messages
50,282
Welcome aboard

I use a 4.5" grinder with 24 grit wheels. sometimes 36" usually a Harbor Freight unit as the dust will kill the grinder after about 30 hours of grinding.

I use a 5hp shop vac with a dust bag with the hose positioned to catch the dust

I wear a full face mask, goggles, gloves and a tyvek suit

I still spent 2 months cleaning the boat of fiberglass dust.

you basically need to grind thru the gel coat, thru the 3 layers of old tabbing to the good hull layup (its a lot more grinding than you think you need)

At the top of the forum you posted in, there are stickies. look at the 3rd sticky. read #14 in its entirety, then go back to 1, 2, 3, 4a, and 4b
 

tpenfield

Moderator
Staff member
Joined
Jul 18, 2011
Messages
18,148
50, 36, and even 20 grit if I can get it. Don't take too much off, just need a clean rough surface free of oil and wax and any other contaminants. Grinding down into the hull too much can just make the hull weaker in that area unless you add back layers of glass.
 

gomopar440

Petty Officer 1st Class
Joined
Nov 27, 2007
Messages
281
At the top of the forum you posted in, there are stickies. look at the 3rd sticky. read #14 in its entirety, then go back to 1, 2, 3, 4a, and 4b


Just a heads up. With the 2 new stickies that were recently posted at the top of the page yesterday, it's now the 5th sticky posted. It's titled "How To's and Other Great Information".
 
Joined
Nov 30, 2016
Messages
58
Thanks so much guys. I have a couple of the grinders already ready to go. Just needed to know what to use on it. Seems like anything abrasive but not cutting can work. I'll give it a shot. Also gonna start posting pics of the resto. Should I just add them in this thread or start a new one?
 

gomopar440

Petty Officer 1st Class
Joined
Nov 27, 2007
Messages
281
Here works fine since you've already introduced yourself and your boat in this thread, as well as brought up your concerns with it. You can always ask a mod to change the title to something that reflects your project better if you want. If not you can just as easily start a new thread. Your choice.
 
Joined
Nov 30, 2016
Messages
58
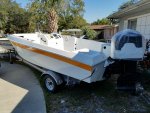
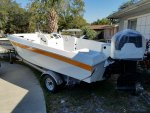
So I had been looking for a boat for a while. Had a fairly limited budget, but knew what I wanted to do with the boat. Fish. Living in Florida I wanted to be able to fish in the bay, flats, and on calm days a little off-shore. Also wanted the ability to use it in the lakes we have too. So a bay style boat fit the bill. After looking for a few months I finally found this one. Had a soft deck, and some rot in the stringers (I am discovering it isn't nearly as bad as the last owner suspected....transom is great!). Well it was too big of a job for the last owner, so he sold it to me for a steal. So now I begin the job of ripping it apart and putting it back together. I am going to change some of the looks and make it more useful for fishing (add live well and bait well all plumbed in). It has never been named that I can see, so that makes it easy to make my own. Anyways, I'll post pics of my journey and definitely be asking advise along the way. She is a 1975 18' Sportcraft. That is all the info I have so far on the boat. Trying to find more out. For now, here are some of the pics from the day I got her:

IMG_7520.JPG

IMG_7521.JPG

IMG_7522.JPG
 

Attachments

  • IMG_7520.JPG
    IMG_7520.JPG
    183.8 KB · Views: 3

Baylinerchuck

Commander
Joined
Jul 29, 2016
Messages
2,737
Very nice boat!! Welcome to the forum, I'll be tagging along for your restoration. Good luck!!!
 

Scott Danforth

Grumpy Vintage Moderator still playing with boats
Staff member
Joined
Jul 23, 2011
Messages
50,282
Thanks so much guys. I have a couple of the grinders already ready to go. Just needed to know what to use on it. Seems like anything abrasive but not cutting can work. I'll give it a shot. Also gonna start posting pics of the resto. Should I just add them in this thread or start a new one?

make sure you have the proper PPE. if you breath in fiberglass dust, it stays permanently in your lungs.
 

kcassells

Fleet Admiral
Joined
Oct 16, 2012
Messages
8,738
Hi JK,
Welcome aboard. Nice boat and good luck with her! Nice project so I'd like to tag along. Like everyone said above.
Take lots of pics and measurements. You will need them later for reassembly. Believe me!
Yes you will need a cutting wheel at somepoints, flat/skinny 4.5" for cutting steel. It will go thru glass like butter and definitely be PPE all the way. The wheel can be nasty so be careful and safe. Alternately there are other tools that handle safer but a little slower BUT do the same job. It's all about your comfort level. There is a tool for everything.
Oh yea.....ask away, bunch of great guys here, someone will always chime in.
KC
 

mickyryan

Rear Admiral
Joined
Apr 18, 2016
Messages
4,216
do not use a suicide grinder! those are the ones with a locking button and never remove the safety cover as fingers will and can be lost :)
 

kcassells

Fleet Admiral
Joined
Oct 16, 2012
Messages
8,738
do not use a suicide grinder! those are the ones with a locking button and never remove the safety cover as fingers will and can be lost

Concur!!! Stitches and scars to prove it. Like Micky said.
 
Joined
Nov 30, 2016
Messages
58
Does that thing have a V8 motor on it? :eek:

Sort of. It is a 225 Johnson V6 top, but at some point someone put a V8 lower unit on it. Haven't taken it up to speed yet, and won't till it is done, but it should scream. I have been playing with the idea of actually selling it, buying a smaller one, and using the money I make to pay for the resto.
 
Joined
Nov 30, 2016
Messages
58
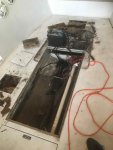
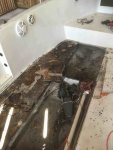
So this morning I decided to go up and diagram and take tons of measurements. After I was done, I couldn't help but start tearing into the floor. Man that is nasty stuff. I'll post some pics at the bottom.

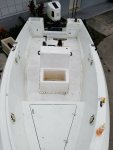
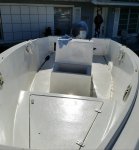
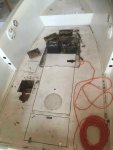
But first I have a question. The boat has a hatch for the bilge (which I am keeping), but also has a giant hatch for the entire fuel tank and cable pass through for the center console. This thing is almost 6 feet long and over 2 feet wide. I have seen lots of boats with a small pressure hatch over the fuel fittings, but not seen this before. Is there any reason to keep it? I would rather make the whole floor more stable than having such a giant section of it be a hatch that will let in water. The other thing is, it is directly under the center console and the leaning post I am installing, so to even access it I would have to remove both of those items. Seems like a waste of time, and not a good idea to me. I would rather put a small hatch under the center console that I can open for the wiring cable run anytime I want and another small hatch over the fuel tank fittings. I am going to get the tank pressure tested and gonna clean it good, so I don't see a real reason to keep the giant hatch. Tell me guys, am I on the right track or should I keep it? The first two pics below show the hatch that I am talking about now that I have removed the center console. Thanks.

IMG_7530.jpg

IMG_7531.jpg

IMG_7533.jpg


IMG_7532.jpg
 

gm280

Supreme Mariner
Joined
Jun 26, 2011
Messages
14,605
ImJK, Good to ask for opinions, but it is your boat and if you like removing or installing anything, then that is what you do. Allowing access to fittings and things is a good idea and if you want to cover over that hatch, go for it. Depending what you are going to use as a floor covering, you could fit it as a optional hatch cover with screws counter sunk so if you want to open it up for any reason, you still could. But I would make the hatch so that water would channel around it and drain into the bilge area for the pump to remove. JMHO
 
Joined
Nov 30, 2016
Messages
58
ImJK, Good to ask for opinions, but it is your boat and if you like removing or installing anything, then that is what you do. Allowing access to fittings and things is a good idea and if you want to cover over that hatch, go for it. Depending what you are going to use as a floor covering, you could fit it as a optional hatch cover with screws counter sunk so if you want to open it up for any reason, you still could. But I would make the hatch so that water would channel around it and drain into the bilge area for the pump to remove. JMHO

Thanks for that. I would still have access to the fittings and the cable run. I would just use smaller individual ones instead of a giant one. I don't have enough faith in my abilities to build a hatch like you would yet. I will one day, but not yet. So for now on this boat I would just purchase a gasket hatch that would keep water out. So really just wondering if there is a reason I would need to have access to the whole tank, or are the fittings enough to be able to access?
 
Top