Here I go again!! 1995 Sea Ray 220 Signature Deck and Stringer Restoration SPLASHED!

Friscoboater

Captain
Joined
Jul 3, 2009
Messages
3,095
Re: Here I go again!! 1995 Sea Ray 220 Signature Deck and Stringer Restoration

Re: Here I go again!! 1995 Sea Ray 220 Signature Deck and Stringer Restoration

Here are a couple of new Videos for you guys. I will be taking more pictures as we move forward. The progress has not been picture worthy as of late.

PART 1


PART 2


Woodonglass

Supreme Mariner
Joined
Dec 29, 2009
Messages
25,929
Re: Here I go again!! 1995 Sea Ray 220 Signature Deck and Stringer Restoration

Re: Here I go again!! 1995 Sea Ray 220 Signature Deck and Stringer Restoration

IF you are going to but 1708 on the Deck, and I suggest you do, then I'd say the 1/2" would be just fine. IF not then I'd go 3/4". Again you're talking less than 50lbs in additional weight.
 

Friscoboater

Captain
Joined
Jul 3, 2009
Messages
3,095
Re: Here I go again!! 1995 Sea Ray 220 Signature Deck and Stringer Restoration

Re: Here I go again!! 1995 Sea Ray 220 Signature Deck and Stringer Restoration

IF you are going to but 1708 on the Deck, and I suggest you do, then I'd say the 1/2" would be just fine. IF not then I'd go 3/4". Again you're talking less than 50lbs in additional weight.

Yeah, the weight is not a big deal at all. Here is something that I thought of. The swim deck lays on top of the engine cowl, and if I raise the deck a 1/4 inch, that might mess up the height. Maybe find 5/8"?
 

Woodonglass

Supreme Mariner
Joined
Dec 29, 2009
Messages
25,929
Re: Here I go again!! 1995 Sea Ray 220 Signature Deck and Stringer Restoration

Re: Here I go again!! 1995 Sea Ray 220 Signature Deck and Stringer Restoration

Sounds like a good compromise
 

DanielR

Petty Officer 3rd Class
Joined
Mar 31, 2010
Messages
80
Re: Here I go again!! 1995 Sea Ray 220 Signature Deck and Stringer Restoration

Re: Here I go again!! 1995 Sea Ray 220 Signature Deck and Stringer Restoration

IF you are going to but 1708 on the Deck, and I suggest you do, then I'd say the 1/2" would be just fine. IF not then I'd go 3/4". Again you're talking less than 50lbs in additional weight.

Remember that once you break into 1708 (or any cloth), you can easily tear off any exposed fibers, say due to wear on the deck which will make it worse in the longer run.
You wont have that problem with CSM.
 

scoutboater

Petty Officer 3rd Class
Joined
Jun 7, 2010
Messages
78
Re: Here I go again!! 1995 Sea Ray 220 Signature Deck and Stringer Restoration

Re: Here I go again!! 1995 Sea Ray 220 Signature Deck and Stringer Restoration

Hey Jay, first off I want to say that the Sea Ray is looking great, and I'm another one of the junkies waiting for updates and videos every week!:D I just don't know what we're gonna do when you finish....:cool:

On a side note, I have been looking at your Glastron on ebay, and it looks great too. Not that I expected anything else. I would love to own her, but I also have to admit that $3000 is a touch outside my current budget, and I don't even know what your reserve is...:redface:

Keep up the good work, and I'm sure somebody will give your Glastron the home she deserves!
 

Friscoboater

Captain
Joined
Jul 3, 2009
Messages
3,095
Re: Here I go again!! 1995 Sea Ray 220 Signature Deck and Stringer Restoration

Re: Here I go again!! 1995 Sea Ray 220 Signature Deck and Stringer Restoration

Remember that once you break into 1708 (or any cloth), you can easily tear off any exposed fibers, say due to wear on the deck which will make it worse in the longer run.
You wont have that problem with CSM.

Very true. Did not think of that. I will use 1708 on the bottom side and the do a layer of CSM and then a layer of Woven.
 

Friscoboater

Captain
Joined
Jul 3, 2009
Messages
3,095
Re: Here I go again!! 1995 Sea Ray 220 Signature Deck and Stringer Restoration

Re: Here I go again!! 1995 Sea Ray 220 Signature Deck and Stringer Restoration

Hey Jay, first off I want to say that the Sea Ray is looking great, and I'm another one of the junkies waiting for updates and videos every week!:D I just don't know what we're gonna do when you finish....:cool:

On a side note, I have been looking at your Glastron on ebay, and it looks great too. Not that I expected anything else. I would love to own her, but I also have to admit that $3000 is a touch outside my current budget, and I don't even know what your reserve is...:redface:


If it does not sell this time around I will just list it for a buy it now for what I would take and then just wait. I really do not have to sell it, and it will eventually find the right owner.
Keep up the good work, and I'm sure somebody will give your Glastron the home she deserves!


I am sure I will figure out more stuff to do. The $3,000 for the Glastron is actually just a starting point. I would hope I could sell it for more than that. Ebay is not the best venue for that sort of thing, and I did not expect much at all. It was cheap to list it, and I figured what the heck. I have alot of PMs on youtube that said they wanted it and would pay top dollar once I listed it on Ebay. Well I guess we saw that was not true.
 

Woodonglass

Supreme Mariner
Joined
Dec 29, 2009
Messages
25,929
Re: Here I go again!! 1995 Sea Ray 220 Signature Deck and Stringer Restoration

Re: Here I go again!! 1995 Sea Ray 220 Signature Deck and Stringer Restoration

Hey Jay, I got some OCEAN FRONT property here in Oklahoma I'll trade you for the Glastron:eek:
 

Friscoboater

Captain
Joined
Jul 3, 2009
Messages
3,095
Re: Here I go again!! 1995 Sea Ray 220 Signature Deck and Stringer Restoration

Re: Here I go again!! 1995 Sea Ray 220 Signature Deck and Stringer Restoration

hey jay, i got some ocean front property here in oklahoma i'll trade you for the glastron:eek:

lmao!
 

superpop

Master Chief Petty Officer
Joined
Mar 5, 2006
Messages
869
Re: Here I go again!! 1995 Sea Ray 220 Signature Deck and Stringer Restoration

Re: Here I go again!! 1995 Sea Ray 220 Signature Deck and Stringer Restoration

May want to try a plumbers torch, heat it up and then scrape the hot glue out with a putty knife. Just want to have a gentle touch with the torch and not hold it in one place to long, maybe a heat gun as well.
 

merlin696

Seaman
Joined
Mar 28, 2011
Messages
51
Re: Here I go again!! 1995 Sea Ray 220 Signature Deck and Stringer Restoration

Re: Here I go again!! 1995 Sea Ray 220 Signature Deck and Stringer Restoration

could try 3M Adhesive remover, it works pretty well and shouldn't harm the fiberglass, its basically acetone with an additive to make it not evaporate, ironically enough they also make a fingernail polish removed that is the exact same stuff but they call it a gel but its still just thick acetone
 

BigLee324

Petty Officer 3rd Class
Joined
May 13, 2011
Messages
89
Re: Here I go again!! 1995 Sea Ray 220 Signature Deck and Stringer Restoration

Re: Here I go again!! 1995 Sea Ray 220 Signature Deck and Stringer Restoration


that is not the ocean Wood, it's called lake Broken Bow
 

Friscoboater

Captain
Joined
Jul 3, 2009
Messages
3,095
Re: Here I go again!! 1995 Sea Ray 220 Signature Deck and Stringer Restoration

Re: Here I go again!! 1995 Sea Ray 220 Signature Deck and Stringer Restoration

All I know is that there were a whole bunch of people that said they were really interested. Now I have some jerkoff on CL that keeps flagging my post. I have done nothing wrong, and I have only one posting up compared to the other idiots that have five and six for one boat. WTF?
 

clockwatcher

Petty Officer 1st Class
Joined
Nov 8, 2009
Messages
289
Re: Here I go again!! 1995 Sea Ray 220 Signature Deck and Stringer Restoration

Re: Here I go again!! 1995 Sea Ray 220 Signature Deck and Stringer Restoration

Broken Bow! What an awesome vacation place. We rented a tri-tune there last summer, fantastic. We also did the river trip and had a A+ cabin. What a cool place. Oklahoma parks rock.

Jay,
I used 6 oz. woven with epoxy to finish the top of my deck/soul/floor or whatever people call it. Even after 3 coats of primer and 3 coats of paint, the weave was noticeable. Not a dirt trap, bet there. Maybe something to think about being that you plan to gelcoat. Also, I used 1/2" marine ply and I feel flex over the the fuel tank. Sealed up 3/4" may be the ticket with poly and a removable fuel tank hatch. If you CSM the top, you may want to cover it with something smoother to finish with gel. Will we hear some Jimmy Buffet in the background with this weekends videos? Lots of folks headed that way from work this weekend.

By the way, what is your cure to sanding times with poly? Just wondering.
 

Friscoboater

Captain
Joined
Jul 3, 2009
Messages
3,095
Re: Here I go again!! 1995 Sea Ray 220 Signature Deck and Stringer Restoration

Re: Here I go again!! 1995 Sea Ray 220 Signature Deck and Stringer Restoration

I plan on using 6oz for sure. The company said the time the longest you can wait and not sand is 5 days. I sand anyway if it has been a couple of days.
 

kpiazzisi

Petty Officer 2nd Class
Joined
Jun 19, 2005
Messages
164
Re: Here I go again!! 1995 Sea Ray 220 Signature Deck and Stringer Restoration

Re: Here I go again!! 1995 Sea Ray 220 Signature Deck and Stringer Restoration

Nice job tabbing in the stringers and bulkheads! I can't believe you used up that much resin. That CSM really sucks up a lot of resin. It will be a super strong boat. Is there a reason you don't want to put a small radius on the tops of your stringers before caping them? I have had a really hard time getting fiberglass to make 90 degree bends. I haven't tried the staple technique, I interested to see how that works. I've found just sanding a slight radius on a square edge makes a huge difference.

Good luck.
 

Decker83

Commander
Joined
Apr 5, 2011
Messages
2,593
Re: Here I go again!! 1995 Sea Ray 220 Signature Deck and Stringer Restoration

Re: Here I go again!! 1995 Sea Ray 220 Signature Deck and Stringer Restoration

Jay
When you foam your boat, will you fill it up to the bottom of the sole. If so this will give you alot of support. I seam to recall you said you were going to use the 4 lb foam. From what I have read, that should work great. On my boat the sole was only 1/2" and it was really solid before it started to get the soft spots.
Even then it still had alot of support from the foam. And believe me it had alot of foam. LOL
 

jayboy73

Seaman Apprentice
Joined
Mar 25, 2008
Messages
30
Re: Here I go again!! 1995 Sea Ray 220 Signature Deck and Stringer Restoration

Re: Here I go again!! 1995 Sea Ray 220 Signature Deck and Stringer Restoration

Wilh all the glass and resin weight you are adding do you think it will float? May have to give up the ski locker to fill with foam to add the extra flotation. Ha! Ha! Seriously you are doing a great job and sevice to us Noobies that need all the help we can get. I like your teaching approach solisitating inputs as you go.

I watched you take your clogged shop vac apart and find the filter was copletedly clogged. That cuts the air flow down and thus you are not as efficient with the vac as you were when you first turned on the vac, Better suction means better pickup of the fine dust, Of course the time opening the vac and cleaning it and possible filter replacement cost becomes signigicant over a whole project.

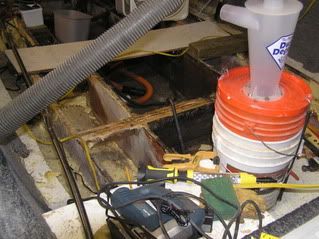
Last year a manufacturer of wood shop dust collection systems came out with a system geared to the small shops using shop vacs what they call Dust Deputy. The most effective way to separate dust and debris is to pass it through a cyclone dust collector. My first has really worked well, worked like snot on glass. I have demonstrated it to my neighbors and they were wowed. One of my restore pictures had my Dust Deputy shown in the background, I received my second one Thrusday. Onieda recommended putting 2 in series to help separarate the finer sanding dust from fine dust projects. Seems like this is the system we need. My first one last year cost $59 + 12 +for shipping.Last week there is a sale for $39.00. Then it takes a home depot bucket, I stacked the top bucket into a bottom one that I weighted wth bricks in the bottom to keep the small stack stable. I need to go ahead and put the series configuration together and test it .

P5020005.jpg
:redface:

One last idea i'd like to pass on concerning how you form passages to bring the water out to the bildge. I acquired an electrician's drill for drilling down through plates in finished wall. For that prupose it works great, I took one that i alrady had and it drilled through the foam like butter. I is about 3 1/2 feet long with a 3/4 inch drill bit on the end. It is very flexible and I was able to more or less guide it along the corner between the hull and the stringers. Drying a varible drill at slowest speed is the safest way. Cut throug like butter and left a nice round hole. The debris is pulled out by working the bit back and forth. I feel that there is little risk to the joint between the hull and stringers. Of course it does leave the top foam cells damaged around the and the will problably hold a small amount of water.
P5040008-1.jpg


This shows the flexibility of the shaft.

P5040007-1.jpg

This the working end of drill. Overall length is 53 1/2 and the working drill bit is about 5 1/2 inches x 3/4".

P5040011.jpg

The drill was in tight quarters so I had to angle it into the intersections of the hull and the stringers. I know I didn't have a fillet formed by peanutbutter so there was no smooth transition to guide the drill. I just flexed it as it got in to make the hole follow the corner formed by the stringer. The hole was round and there didn't seem to any drag or grabbing of the bit. I ran the drill on real slow speed and it still cut my foam like butter. Also if you need shorter sharts you could cut the sfat to what ever size you need. Also can add short extensions to make the shaft longer.

P5040013.jpg


This shows the hole drilled along the stringer/hull intersection.

If this works it would be a lot simpler that all the other approaches, swim noodles. PVC pipe and baloons. Good luck on what ever approach you choose.
 
Top