How do you disconnect OMC style 400cables at the box?

MokiCruiser

Seaman Apprentice
Joined
Sep 19, 2009
Messages
47
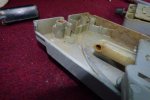
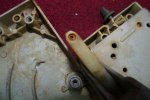
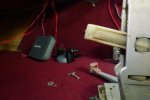
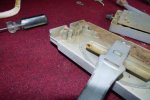
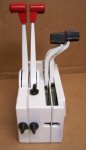
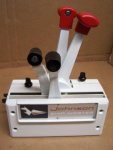
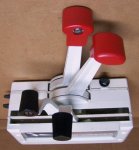
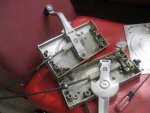
I have a 1975 70 HP Johnson that is connected to a Johnson Ship-master control. I also have a 1997 Evinrude 15 HP kicker motor with a tiller. I already have another set of controls just like the Johnson Ship-master except it is an Evinrude Simplex (same control, different label), and I already bought an OMC conversion kit to convert my tiller control to front controls. I need to buy different length cables for my control box and I know that they have to be the older pre 1979 cables (style 400). OK, so good, I know what I need, but here's where my problem is. It's easy enough to get the engine ends off the cables with just the two screws that clamp the engine connection end to the cable, but on the box side I can't figure out how to get them off. The plastic end seems to be pressed onto the cable somehow. At first I thought it was set screws, so I cleaned out the holes real good and they're not rounded set screws at all like I thought, not even rounded set screws, they look pressed in. So does anybody know what gives and what I need to do or buy to get new cables installed? I've added some pictures, maybe they will help somebody help me!
 

Attachments

  • photo248271.JPG
    photo248271.JPG
    31.8 KB · Views: 0
  • photo248272.JPG
    photo248272.JPG
    39 KB · Views: 0
  • photo248273.JPG
    photo248273.JPG
    44.1 KB · Views: 0
  • photo248274.JPG
    photo248274.JPG
    30.1 KB · Views: 0
  • photo248275.JPG
    photo248275.JPG
    48.5 KB · Views: 0
  • photo248276.JPG
    photo248276.JPG
    73.9 KB · Views: 0

gm280

Supreme Mariner
Joined
Jun 26, 2011
Messages
14,605
There should be some set screws at the control box ends. Once you loosen them up, just pull the cable out. I have the exact same setup and removed mine really easy.
 

MokiCruiser

Seaman Apprentice
Joined
Sep 19, 2009
Messages
47
Well, they didn't look like set screws, they were so rusty they had no hexagon shape at all ................... any allen wrench would either spin or not fit. I sprayed them with liquid wrench, then drilled out just enough to get to clean metal, then jammed a tight fitting star drive in and managed to back them out, and replaced with new set screws. Great, thanks for confirming they were set screws, now I'll buy the cables.
 

gm280

Supreme Mariner
Joined
Jun 26, 2011
Messages
14,605
Well, they didn't look like set screws, they were so rusty they had no hexagon shape at all ................... any allen wrench would either spin or not fit. I sprayed them with liquid wrench, then drilled out just enough to get to clean metal, then jammed a tight fitting star drive in and managed to back them out, and replaced with new set screws. Great, thanks for confirming they were set screws, now I'll buy the cables.

You could easily use a standard screw being how there should be two for each cable end, one from each side to hold the cable in place. On some of my ends there were regular screws tighten against the inter cable to hold them in place. So most any thing would work for those ends. And on my control section, those screws were screwed into a brass insert to hold the inter cable but allow movement when the handle was moved. Sort of like a brass barrel insert in the nylon rod/sleeve. The screws would tighten against the internal cable but turn as the nylon rod that is attached to the handle section is moved. Hope that doesn't confuse you more. Oh, and there are still parts available for that control unit as well. I bought a few new parts for mine.

I am posting a break down of that control unit so you can see how everything fits together.
Remote-resized.png
 
Last edited:

MokiCruiser

Seaman Apprentice
Joined
Sep 19, 2009
Messages
47
No Title

As a matter of fact on the same plastic piece that the throttle has, there are regular screws like on the engine end of the cables, only the shifter had set screws, and as I said, they were so badly rusted away I couldn't recognize them as set screws............... probably original to the control box that I assume is somewhere around 1970ish. Anyway, all is good now, the new set screws were 24 cents apiece, the cables are on the way. My next idea/challenge is to see if I can make these two boxes into a dual box like in this one in the picture. This one I believe was actually made as a dual control. I think I can do it since since all the interior pieces of these boxes are mirror images front to back. I assume they were made that way so that you could mount the boxes on either the port or starboard side just by reversing all the interior parts. Seems like the only thing in the way would be the raised design on the outside of the control boxes that had either the Shipmaster or Evinrude simplex logo on the face plate, and that only on the piece not on the outside. Either grinding it off or making a plywood piece to fit in between would work I think I'll let you know how it goes, unless you've seen this done, then you can let me know how it went.
 

Attachments

  • photo248318.jpg
    photo248318.jpg
    17.8 KB · Views: 0
  • photo248319.jpg
    photo248319.jpg
    20.9 KB · Views: 0
  • photo248320.jpg
    photo248320.jpg
    28.8 KB · Views: 0
  • photo248321.jpg
    photo248321.jpg
    45.6 KB · Views: 0

MokiCruiser

Seaman Apprentice
Joined
Sep 19, 2009
Messages
47
Poking around I found an old comment to a post (2008) by Jay_Merrill where he describes a control box he made out to two older style Johnson Evinrude boxes ....... exactly what I was thinking I could do, and here's the link.
 
Top