How I made my boat cover

ajgraz

Lieutenant Commander
Joined
Mar 1, 2010
Messages
1,858
A lot of posts lately about covering boats, and particularly making your own to save a few bucks.

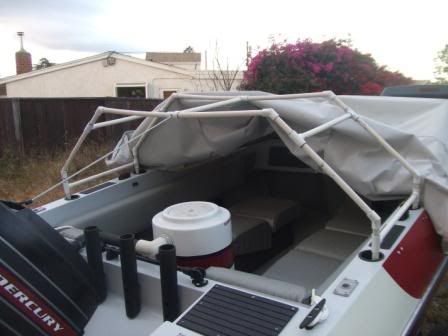
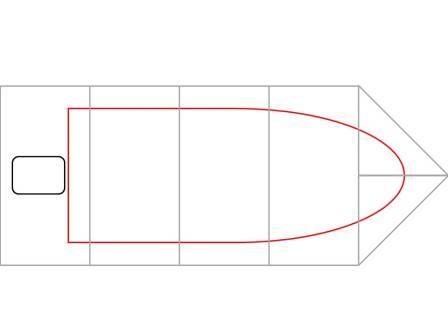
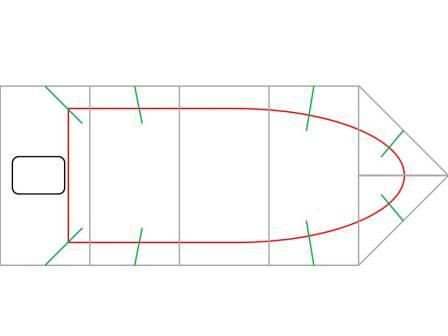
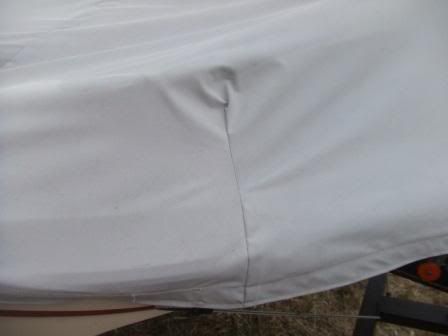
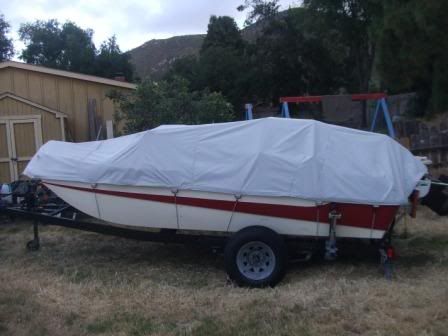
Here's the less-than-professional but fully functional cover I made about a year ago for my 15' tri-hull:
Cover01.jpg

Cover02.jpg

Cover03.jpg


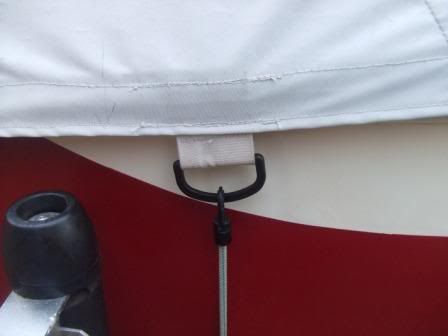
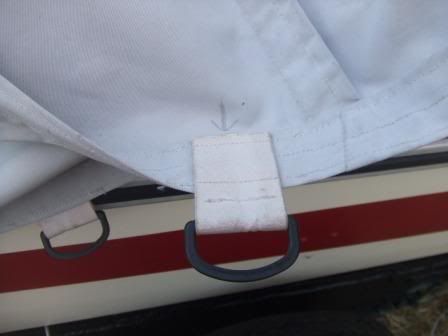
(Note the "gaps" to either side of the outboard, this allows airflow under the cover so it doesn't get stale and moldy inside the boat)

Done entirely with my basic Kenmore home machine:
Cover04.jpg


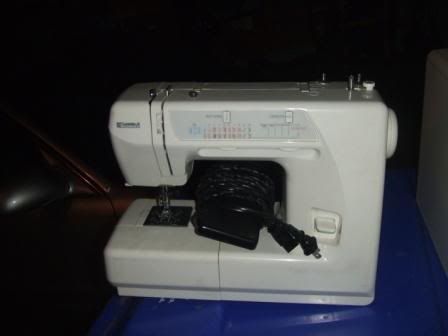
Admittedly, that machine does not make as pretty a stitch as a pro machine in these heavy materials, but I'm not entering any beauty contests here.

(More to come)
 

ajgraz

Lieutenant Commander
Joined
Mar 1, 2010
Messages
1,858
Re: How I made my boat cover

First you have to decide what to make the cover from; you want something UV resistant, cut and abrasion resistant, water repellant and breathable. Also you need to decide how much you want to spend and how long it wants to last. Some examples:

12+ years, $$$, An engineered multi-layer fabric like Stamoid or Top Gun (very high-end, baby!)
8-10 years, $$, A solution dyed synthetic like Sunbrella (typical pricey custom cover material) or WeatherMax 80 (<==that's what I used)
3-5 years, $, A coated, moderate-denier polyester like SurLast (this is comparable to what your "typical" store-bought semi-custom cover will be made of)

Use only heavy-duty UV and rot-resistant polyester thread, like v92 or Tenara. A #20 needle on your home machine will handle that. You can also get pre-wound bobbins (in white v92, anyway) for your home machine, or wind your own.

Next you have to decide how it will be held down. Many use snaps, but a good snap setter is pricey and snaps leave very little margin for error in placement, and in covering the boat when you are tired after a long day on the water. Others use a full-length drawstring (only for a very small boat, though, like a non-trailered rowboat). I used nylon D-rings and little home-made bungees that hook to the trailer frame, about every 2 to 3 feet around the perimeter:
Cover06.jpg


This cover can be placed with about 2 or 3 inches of "margin of error" front-to-back and an inch side-to-side and still cover (can't do that with snaps). Bungees and D-rings also allow me to use the OB's foot as an anchoring point. Another nice thing about not using snaps, you do not need to sew a layer of binding into the hem for the snaps to anchor in...home machines have trouble with that many layers of such thick material. I did use strips of Sunbrella binding to attach my D-rings, though.

Finally you need to come up with a framework to tent the cover. I have never had luck with those hoop slat thingys, so I made this out of PVC pipe, fits down into my cup holders; between that, the windshield, and a center bungee that goes the length of the boat, it makes the rain run right off and gives me a shade cover to work on the interior on hot sunny days:
Cover05.jpg


(More to come)
 

ajgraz

Lieutenant Commander
Joined
Mar 1, 2010
Messages
1,858
Re: How I made my boat cover

OK so you got your materials, your fabric is probably 54", 60", 72" or 80" wide. You must seam together panels to cover the length of the boat, plus some extra all the way around, like this for example:
CoverDiagram.jpg


Seams want to go across so that rain runs down a seam instead of across it, but it's OK if the bow section has a front-to-back seam to save on material (plus that seam will have a slope if you have a windshield or make a framework).

All seams want to be double-stitched (in case one row of stitching gives way), and have no cut edges showing to fray. The best seam is a flat-felled seam, like what's on the side of the leg of your jeans (or the lid of a tuna can!). But that's like 6 layers of material and your home machine cannot handle that with such thick material, especially since you also have to fold and hem later. So a French seam fits the bill:
http://en.wikipedia.org/wiki/Seam_(sewing)
(There are also videos on this, look it up)

Now you lay the cover over your hull and whatever framing you made up, and let it drape. You are going to have to put some darts (look it up) in certain locations to make sure it wraps well, likely in these areas (green lines):
CoverDiagram2.jpg


Pencil in your dart lines, and use pins (or a stapler) to temporarily make the darts until you are happy with the fitment. Then sew and cut the darts. Darts can be French seamed also to conceal cut edges. Here's a pic of a dart on the outside of my finished cover:
Cover07.jpg


It does have a little "pucker" at the top, but again I'm not entering any contests here.

(More to come)
 

ajgraz

Lieutenant Commander
Joined
Mar 1, 2010
Messages
1,858
Re: How I made my boat cover

So then you pencil in a cut line around the entire perimeter, leaving yourself enough extra material (3 to 6 inches) all the way around for a doubled-over hem. I used my rubrail as the marker, and left IIRC 5" or 6" extra so I could double-roll 2" of hem.

More details...

Anyplace where the cover rests on a sharp edge (like the corners of the windshield), be sure to sew in a patch of an extra layer or two of material on the inside as wear layer(s):
Cover08.jpg


Here's a pic of the underside at the hem, showing how the French seam lies flat, and the doubled-over hem folds over, concealing all cut edges:
Cover09.jpg


Also shows how I added the D-rings with two rows of stitching.

So in a nutshell, that's one way to make a boat cover. Practice first with some scrap materials, different tension settings on the machine, etc.

I'm sure I left out a lot of details, so please ask. I also have tons of D-rings, binding, extra needles and thread and wound bobbins, material scraps etc. if anyone wants some for their own testing.
 

BuzzStPoint

Lieutenant Junior Grade
Joined
May 27, 2009
Messages
1,003
Re: How I made my boat cover

This might be something I would try.

But with the cost of fabric, thread and D-rings.
How much did your cost for making this cover?
 

ajgraz

Lieutenant Commander
Joined
Mar 1, 2010
Messages
1,858
Re: How I made my boat cover

EBAY rocks. I paid a total of $108.16 shipped for all the materials, (fabric, thread, rings, shock cord, hooks, etc.) and tools (needles, bobbins, etc.) that I used making the cover. $70 worth of that was a 10-yard roll of the 60" wide fabric (which is how much it took to do a 4-panel cover for my 15'6" boat). I already had the sewing machine and the Sunbrella binding material (I used maybe $3 worth of that off a big roll).

Did take some hours of labor, of course.

I would easily compare the material quality (if perhaps not the "finish") of my cover with a Sharkskin Supreme SD or Sunbella cover, which at similar size in "semi-custom" fit would be about $250-$300 before any shipping, and not including any hold-down straps. So I think I made out on a custom-fitted cover that I expect to last maybe 8-10 years. Well worth it to protect the vinyl upholstery I did on the interior; indeed the cover was the first thing I did on the resto.

EDIT: The PVC tent frame doohickey cost about $30 in materials from the local hardware store, but that doesn't come with a store-bought cover either.
 

boats3po

Seaman Apprentice
Joined
Nov 26, 2010
Messages
45
Re: How I made my boat cover

IMAG0042.jpg[this is what i did, i searched the internet and found 2 boat covers that were on closeout, paid $30 dollars each measured the cuts and restitched the 2 together all together it cost about $90, it worked out fine
 

oldjeep

Admiral
Joined
May 17, 2010
Messages
6,455
Re: How I made my boat cover

Did you do anything to seal the stitching on the backside?
 

bruceb58

Supreme Mariner
Joined
Mar 5, 2006
Messages
30,581
Re: How I made my boat cover

I would always suggest putting a rope drawstring around the edge of your cover. Unfortunately, that would be tough with a home machine since you may be going through 4 layers of fabric. The main problem with a home machine is that you end up having a stitch width that is way to narrow and thus have punched way too many holes in the fabric which weakens it and allows water to enter easier.

For reinforcements over rub spots, I always use vinyl of some sort.

I wouldn't use plastic D rings. I make a triangle by taking a square of fabric and folding twice into a triangle and putting in a brass grommet.

I can post a picture if anyone is interested. The grommet is in one flap of the triangle so it doesn't touch the hull. You don't want anything but fabric touching the hull on tiedowns.
 

Stachi

Lieutenant Commander
Joined
Jul 14, 2009
Messages
1,671
Re: How I made my boat cover

I paid $165.00 for an Attwood cover for a 23' boat. It fits over my outboard and covers to just under the rubrail on the 20' boat in the pic in my sig. It has cinch pull straps that are EASY to use...not bungees. The seams are stitched to the same material the straps are made of. It handled over 40" of snowfall this winter and was supported by beach balls over the cuddy...From the windshield back , the outboard supported it. It also has an elastic drawstring around the bottom edge. It took me ten minutes to order it online,shipped to my local walmart. NICE :cool:

http://www.attwoodmarine.com/store/product01
 

bellhop

Seaman Apprentice
Joined
May 1, 2011
Messages
48
Re: How I made my boat cover

ajgraz,

Most would not go through the effort that you did to cover and protect your boat.

Even less would take the time that you did to share how another may be able to do the same thing for themeselves if they choose. You, I think, are the type of person that makes this such a great forum. You Rock.
 

Sixmark

Master Chief Petty Officer
Joined
Jul 11, 2010
Messages
890
Re: How I made my boat cover

I would always suggest putting a rope drawstring around the edge of your cover. Unfortunately, that would be tough with a home machine since you may be going through 4 layers of fabric. The main problem with a home machine is that you end up having a stitch width that is way to narrow and thus have punched way too many holes in the fabric which weakens it and allows water to enter easier.

For reinforcements over rub spots, I always use vinyl of some sort.

I wouldn't use plastic D rings. I make a triangle by taking a square of fabric and folding twice into a triangle and putting in a brass grommet.

I can post a picture if anyone is interested. The grommet is in one flap of the triangle so it doesn't touch the hull. You don't want anything but fabric touching the hull on tiedowns.

Older quality home machines work well from back in the late 60's/early 70's however they were made far better and will sew almost anything, please don't confuse these with the new Walmart specials
 

bruceb58

Supreme Mariner
Joined
Mar 5, 2006
Messages
30,581
Re: How I made my boat cover

Older quality home machines work well from back in the late 60's/early 70's however they were made far better and will sew almost anything, please don't confuse these with the new Walmart specials
I agree but they have their limitations. Hard to go through a lot of layers of fabric without a walking foot machine.
 

ajgraz

Lieutenant Commander
Joined
Mar 1, 2010
Messages
1,858
Re: How I made my boat cover

Some good points made, I will try to address them.

I did not do anything to seal the stitching (some kind of goop, I guess you mean?). Hasn't been a problem, but then it doesn't rain all that heavily here and I do not have to worry about snow melt.

I did set the machine to do the longest possible stitch, on average 6 to 8 stitches per inch. A professional machine would surely do more consistent stitch length. Go slow and make sure the material keeps moving.

I did use a vinyl-encapsulated polyester material for the reinforcement at rub points, it was a bit of leftover something or other from Bruin Plastics, can't remember the name but they don't make it anymore. Rochford supply has a similar material, can't recall the name of that one either. It's like the stuff that those soft-sided big rig trailers or circus tents are made from.

EDIT: I think the Bruin stuff was called "Atlantis."

I do not believe the plastic D-rings will be a problem (as far as scratching up the hull?). If they were metal, sure. There is only one (on each side) near the bow that does touch the hull, I could move those a few inches forward--or retrofit some "buckle pads" behind those and prevent the touching, not a bad idea, thanks.

I did consider a drawstring or shockcord around the whole thing, would have been no more difficult than the hem I did sew up. But I find it much easier to put the cover on without a drawstring "puckering" the cover, as I can just "roll" it on and off. Also it is simply not needed with such a custom-cut fit. I will say that I have NOT tested the trailerability of this cover, a drawstring could help there and I could add it if needed simply by putting a few grommets in the hem.

Finally, my point was not that this is the best or only way to make a cover, or that store-bought covers suck. My point is that this was by far the cheapest--if not the most effortless--way I found to have a custom-fitted, functional cover made from long-lasting, high-quality material. You can do whatever you want; use all, some, or none of these ideas, add your own ideas. Or, for some, you can come in here and crap on my thread :rolleyes: I mean really, why would someone come into a thread about making your own cover and talk about the pre-made cover they bought? Do you also go into restoration threads and say "just buy a new boat"? :facepalm:
 

bruceb58

Supreme Mariner
Joined
Mar 5, 2006
Messages
30,581
Re: How I made my boat cover

With the french seam that was described here, there is no need for sealing.

You did a good job. Sorry, did not mean to offend.
 
Top