How to get return spring back in place? 1975 20HP Johnson

Joolz

Petty Officer 1st Class
Joined
Aug 13, 2015
Messages
211
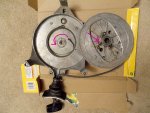
Return spring arrived today and just now attempted to put it back. Bought the motor knowing that the return spring was broken and figured it wouldn't be a bad fix. Only cost $20 for the spring and after a bit of hassle and a nearly lost eye, I managed to get the spring wound up enough to fit inside the case. However getting the pin on the cover (arrow on right side of pic) to fit inside the second eyelet is no easy task. In fact I can't see how it's even possible as the eyelet rests almost opposite to where the pin would sit, once in place. So what's the trick to getting this spring in place? If some special tool is required I sure hope the shop I got it from (closed now) would be able to handle this task as this is one heck of a puzzle. Has anyone done this before and can share the trick?
 

Attachments

  • return-spring.jpg
    return-spring.jpg
    121.3 KB · Views: 0

Joolz

Petty Officer 1st Class
Joined
Aug 13, 2015
Messages
211
it would if you could post the rest of the instructions. Thanks, this is a good lead!
Edit: I'm assuming you're taking pics from your service manual - if so and these are too big to be posted here, please email them to me. I will then optimize the images and will add them here so others can benefit from it (even if I must host them myself). mxracinguyATgmail.com (replace AT with @)
 
Last edited:

flyingscott

Fleet Admiral
Joined
Apr 8, 2014
Messages
8,151
First take the handle off the rope and wind it around the rope sheave. Then take a screwdriver and pry the eyelet up just enough until you can see it from the side. Then line up the pin and slowly set the sheave down and slowly pull the screwdriver out at the same time. Now you wind the sheave until there is enough tension to hold the handle in place. Then line up the rope with the opening and pull it back through and put the handle back on. Now don't go crazy with the spring tension you only need enough to smoothly pull the rope back in, Because every time you pull it the spring gets tighter to much tension and you shorten the lifespan considerably.
 
Last edited:

flyingscott

Fleet Admiral
Joined
Apr 8, 2014
Messages
8,151
To take the handle off the rope pry out the center metal/plastic piece in the handle should be a knot or a labyrinth. Be careful prying it out the old rubber or plastic can break or tear.
 

Joolz

Petty Officer 1st Class
Joined
Aug 13, 2015
Messages
211
Ohhhh so that's the trick: removing the cord from the handle. Well, this was also a good opportunity to replace the old hardened cord, so I slapped 6' of new rope in it. It went well and I strongly recommend using a nail through the small holes to lock the spool in place once it's wound a couple of turns. Works great and that's what those tiny holes are there for.
BUT -- something may be wrong. Please take a listen to the video I just took. Should the return sound this way? There seems to be a bit of metal grinding where it shouldn't. And not to worry, I had unplugged the plugs before attempting this.
Please view the short video here: http://tinyurl.com/njm4f4q

Edit: just had to say big thanks to flyinscott for the instructions.
 
Last edited:

flyingscott

Fleet Admiral
Joined
Apr 8, 2014
Messages
8,151
That may be the spring unwinding you can put a little lube on the spring also i would wind it a little tighter. It could also be the starter pawls not retracting all the way my money is on the spring
 

Joolz

Petty Officer 1st Class
Joined
Aug 13, 2015
Messages
211
I sprayed some teflon lube on the case (from Dupont, doesn't attract dust like wd40) but should I have used grease instead? If so do I apply just to the sides of the cases or to the actual spring?

As for making it tighter (winding the spring more). Funny you should say that as I initially had 3 turns on it. It felt too tight and I was afraid it'd prematurely wreck the spring. So I backed off a turn and it still felt too tight. So I backed up yet another turn to a single turn (and a bit). Seems OK but do you think there's a consequence to having it this loose? The cord seems to retract just fine. I'm very new to this, I'm not contesting your opinion, just trying to better understand the mechanics involved so that I can learn from those that have been there/done that.

Another possible issue: should the bolt that holds the spool in place look like this? Doesn't seem right being all chewed up like that. Should I smooth it out with a file or possibly looking at replacing it with a new one?
 

Attachments

  • retaining-bolt.jpg
    retaining-bolt.jpg
    121.9 KB · Views: 0

flyingscott

Fleet Admiral
Joined
Apr 8, 2014
Messages
8,151
Hello I think the spring should be a little tighter because you have slack in it when you bring your arm back. I like to set mine so it can keep up and then some. Put some lube on that bolt so that the sheave turns smooth. I wouldn't file the bolt.
 

Joolz

Petty Officer 1st Class
Joined
Aug 13, 2015
Messages
211
Flyingscott, good spotting there, I hadn't even realized the slack. And great advice too on tightening it more, which I promptly did and it improved things greatly. Lubed the spring a bit more and now works flawlessly, without that suspicious grinding sound. It truly feels like it's new from factory now. All of this for a mere $25 fix ($5 for the cord, $20 spring). Thanks so much for all your valuable advice.
 
Top