Impeller Job - Mating Surface Corrosion

gsbarry

Petty Officer 2nd Class
Joined
Dec 23, 2024
Messages
125
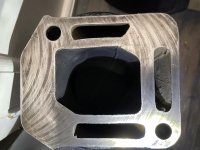
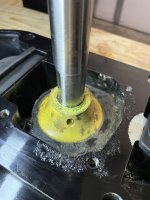
First time doing an impeller job. How would y’all address the pitting/corrosion on the mating surface of the outdrive case in the picture below? Would you:
1) just put the new gasket on and don’t worry about it
2) apply RTV to the new gasket
3) sand the surface down as smooth as possible
4) something else?

Thanks for any advice.

IMG_7845.jpeg
 

muc

"Retired" Association of Marine Technicians...
Joined
Jul 7, 2004
Messages
2,170
Yes there is a gasket there.

1. replace yellow seal carrier, it's melted and a weak point. Clean driveshaft with sandpaper before installing new one. Pack the area between the seals with 2-4-C.
2. scrape loose paint with gasket scraper or razor blade.
3. paint that surface with perfect seal.
4. follow the manual MCM #14 8M0065951

Follow the manual! This is an job that's easy to screw up.

Merry Christmas
 

gsbarry

Petty Officer 2nd Class
Joined
Dec 23, 2024
Messages
125
Yes there is a gasket there.

1. replace yellow seal carrier, it's melted and a weak point. Clean driveshaft with sandpaper before installing new one. Pack the area between the seals with 2-4-C.
2. scrape loose paint with gasket scraper or razor blade.
3. paint that surface with perfect seal.
4. follow the manual MCM #14 8M0065951

Follow the manual! This is an job that's easy to screw up.

Merry Christmas

Thanks. I lightly wet sanded the surface smooth and will use perfect seal/permatex #3. I ordered the oil seal carrier as well and will replace. Hopefully it comes with the seals pre-installed (821759A2 - CARRIER ASSEMBLY). I have manual #14 and have read the relevant directions, but i also find it helpful to get input/advice from others with experience, so thanks for that! The manual indicates that perfect seal should be applied to the lower most (small hole) gasket, but doesn't specify if that's both sides or just the bottom side. Do y'all apply perfect seal to both sides of the lower gasket? And then not apply perfect seal to the upper (large hole) gasket at all?

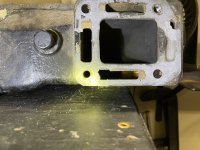
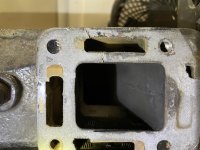
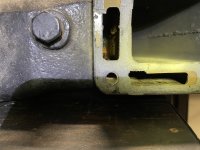
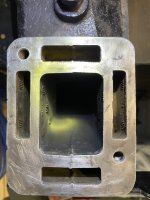
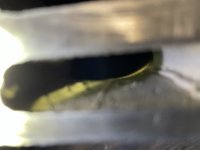
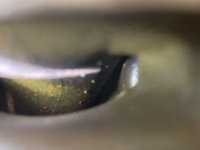
The upper water guide tube was also melted around the lower water tube, so ordered one of those as well and did some further inspection of the exhaust. I found that the exhaust shutter/flapper was also melted (ordered one of those as well). I pulled the exhaust manifold (pics below) as well. I noticed some minor corrosion in the water jackets, but it doesn't look too bad to me. What do y'all think about the condition of the exhaust manifold? Is there something I should do other than a visual inspection on the manifold? What else do y'all think I should check given the multiple melted parts? Perhaps replace thermostat while I'm at it? FWIW, prior to disassembly the engine did not show any signs of overheating while running on the hose (steady temp at ~170*). IMG_7848.jpgIMG_7847.jpgIMG_7846.jpg?
 

a70eliminator

Captain
Joined
Sep 9, 2007
Messages
3,762
I would carefully restore it, wire wheel & flat file, smear liquid steel file some more till smooth & flat.
 

Chris1956

Supreme Mariner
Joined
Mar 25, 2004
Messages
28,073
Gee, scrape off the old gasket material on the exhaust manifold and riser. Now, glue a sheet of new, fine sandpaper on a piece of plate glass and sand (in a figure 8) the mating surface's of the manifolds and risers smooth and flat. Now reinstall with MerCruiser gaskets that match the water passages.
 

muc

"Retired" Association of Marine Technicians...
Joined
Jul 7, 2004
Messages
2,170
821759A2 is a very old part number, Yellow ones had problems, you want the black one with 8 feet on the bottom --- it's covered in the manual. It will come with seal and O-ring installed.
Just paint the bottom of the bottom gasket and the gear case where you removed the paint. Top gasket already has sealer applied.
You need to clean the gasket surfaces of the exhaust manifold and elbow to inspect them, scraper or razor blade followed with long file to check flatness. Use perfect seal on both sides of new gasket. What I can see of the water passages looks very good.
Melted water shutter? Check the 2 rubber exhaust tubes, they need to be fairly flexible. Make sure the rubber plug just aft of the water pump is still flexible and tight fitting. Make sure the water dam just above it in the upper is still there and tight fitting. I didn't work on many 3.0L so I don't know if this applies to you, but after a overheat I always liked to pull the top cap on the upper and check the rubber plug to make sure it's still tight. It only costs one O-ring, found more then a few bad, so worth it. Replace the seals at both ends of the water tube. Paint a light coat of perfect seal on all bolts that go into aluminum.
Thermostat has nothing to do with exhaust or drive overheat, it just controls engine temp.
I like to put the impeller in the housing first and then slide it down the shaft, I find I'm less likely to tear the upper gasket, but that's just me. If you do, keep a close eye on the impeller key. Either way a little Glycerin or dish soap in the housing helps. Don't use grease unless your going to run it in soon.
Don't worry about that little bit of paint flaking off, almost every drive I see is worse.

Remember to pull up on the drive shaft when setting the face seal/slinger, most common mistake I see.
 

gsbarry

Petty Officer 2nd Class
Joined
Dec 23, 2024
Messages
125
821759A2 is a very old part number, Yellow ones had problems, you want the black one with 8 feet on the bottom --- it's covered in the manual. It will come with seal and O-ring installed.
Just paint the bottom of the bottom gasket and the gear case where you removed the paint. Top gasket already has sealer applied.
You need to clean the gasket surfaces of the exhaust manifold and elbow to inspect them, scraper or razor blade followed with long file to check flatness. Use perfect seal on both sides of new gasket. What I can see of the water passages looks very good.
Melted water shutter? Check the 2 rubber exhaust tubes, they need to be fairly flexible. Make sure the rubber plug just aft of the water pump is still flexible and tight fitting. Make sure the water dam just above it in the upper is still there and tight fitting. I didn't work on many 3.0L so I don't know if this applies to you, but after a overheat I always liked to pull the top cap on the upper and check the rubber plug to make sure it's still tight. It only costs one O-ring, found more then a few bad, so worth it. Replace the seals at both ends of the water tube. Paint a light coat of perfect seal on all bolts that go into aluminum.
Thermostat has nothing to do with exhaust or drive overheat, it just controls engine temp.
I like to put the impeller in the housing first and then slide it down the shaft, I find I'm less likely to tear the upper gasket, but that's just me. If you do, keep a close eye on the impeller key. Either way a little Glycerin or dish soap in the housing helps. Don't use grease unless your going to run it in soon.
Don't worry about that little bit of paint flaking off, almost every drive I see is worse.

Remember to pull up on the drive shaft when setting the face seal/slinger, most common mistake I see.

Thanks a lot MUC for the advice! I think the site i ordered from has the old carrier PN listed, but ships the updated part design - pics of it show it as yellow, but with 8 feet on the bottom, will confirm once received. I'll report back on the mating surface of the exhaust manifold once i get it cleaned up. The rubber exhaust tube elbows look good and are flexible. Back on the outdrive, the rubber plug (lower) and plastic dam (upper) look to be in good shape and fit tight. Same goes for the rubber plug in the upper under the cap.

What resource do y'all use for part numbers? The service manual doesn't have them, and it seems i'm struggling a bit to verify that I'm ordering the correct part numbers.
 
Last edited:

muc

"Retired" Association of Marine Technicians...
Joined
Jul 7, 2004
Messages
2,170
Last edited:

Scott06

Admiral
Joined
Apr 20, 2014
Messages
6,724
Thanks a lot MUC for the advice! I think the site i ordered from has the old carrier PN listed, but ships the updated part design - pics of it show it as yellow, but with 8 feet on the bottom, will confirm once received. I'll report back on the mating surface of the exhaust manifold once i get it cleaned up. The rubber exhaust tube elbows look good and are flexible. Back on the outdrive, the rubber plug (lower) and plastic dam (upper) look to be in good shape and fit tight. Same goes for the rubber plug in the upper under the cap.

What resource do y'all use for part numbers? The service manual doesn't have them, and it seems i'm struggling a bit to verify that I'm ordering the correct part numbers.
These guys have very good parts breakdown


can search by serial number here


cyclops222

Lieutenant Commander
Joined
Mar 21, 2024
Messages
1,962
I wipe off oils and other stuff with alcohol or Acetone. Then use a fat tipped Magic Marker or Sharpie pen to coat the surface. It dries almost instantly. Start the first light filing to see how flat the surfaces are. Repeat as needed.
 

alldodge

Moderator
Staff member
Joined
Mar 8, 2009
Messages
42,535
Agree, post 11 has best link to find parts, the others don't always have all updates. Heck the other sites still don't have my motors showing up because they are to new I guess
 

gsbarry

Petty Officer 2nd Class
Joined
Dec 23, 2024
Messages
125
Below are pics of the exhaust manifold cleaned up. I did my best not to scratch the surface with the gasket scraper but that gasket was REALLY stuck on there, probably the worst one i've dealt with. The scratches are pretty shallow though. Pics 2 through 5 are the inside of each of the 4 water jackets. Doesn't seem too bad to me. The service manual does not mention using perfect seal on the any of the gaskets (manifold to block, manifold to riser, manifold to carb). Muc, I noticed you suggested to use perfect seal on both sides of the gasket. Is that your suggestion for all 3 gaskets? Also, is there any method/suggestion to make the gaskets easier to remove in the future? The block and the carb weren't too bad, but the riser was really tough.
IMG_7856.jpg


IMG_7855.jpgIMG_7854.jpgIMG_7853.jpgIMG_7852.jpg
 

gsbarry

Petty Officer 2nd Class
Joined
Dec 23, 2024
Messages
125
I’m guessing that perhaps the perfect seal should only be applied to the riser gasket, and not the block or carb gasket, since only the riser gasket is exposed to water, whereas the other 2 are only air.
 

muc

"Retired" Association of Marine Technicians...
Joined
Jul 7, 2004
Messages
2,170
I’m guessing that perhaps the perfect seal should only be applied to the riser gasket, and not the block or carb gasket, since only the riser gasket is exposed to water, whereas the other 2 are only air.
Yes, very light coat on elbow gasket both sides and light coat on those 2 bolt threads. Will help next time you have to do this job.
Nothing on carb and manifold to head. Clean bolt threads and the holes they go into, install dry.
Torque wrench is useful, none of these get tightened as much as you would think.
And don't get me started on hose clamps, I find soo many over tightened!

You have a lot of life left in that manifold. Looks great! Don't see any pics of the elbow, but if it looks like the manifold --- you're good.
 

gsbarry

Petty Officer 2nd Class
Joined
Dec 23, 2024
Messages
125
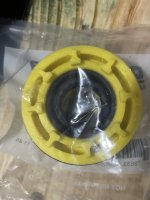
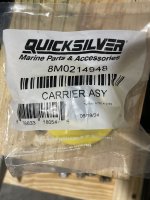
image.jpgThe oil seal carrier for the outdrive arrived today as well p/n 8M0214948. I checked the Mercruiser site you linked above and this is listed as an alternate part if you expand the plus icon. It has 8 feet, and a manufacture date from 6 months ago. It appears to be an exact match of melted one I pulled. Any reason I should not use this version?
 

Attachments

  • image.jpg
    image.jpg
    1.6 MB · Views: 3

muc

"Retired" Association of Marine Technicians...
Joined
Jul 7, 2004
Messages
2,170
Yes with that date code, I would use it and disregard everything I said about color! It's probably been over 10 years since I did a Gen2 impeller. Now you got me second guessing myself. Maybe it was the blue ones that were garbage? ---- sucks getting old.

Make sure you clean the drive shaft really well, use some sandpaper.
 
Top