Load resistor - how used

daselbee

Commander
Joined
Jan 20, 2009
Messages
2,765
Re: Load resistor - how used

Lots of questions...

Yes I meant that good we are finding something.
Yes, I would move the coil and see if the voltages follow.
What is interesting is that you have weak/bad spark now on #1 with the combination of new CDI pack and new coil..!!!
Are you sure this pack is new? Not a used one that he put on saying it was new? Did you see him buy it, and open the box?

Yes the brown pairs feed the packs and their source is from the stator which is under the flywheel. Get those voltages measured as soon as you can, and post. These voltages are measured as I described in post #15 above. Measure them connected and disconnected.
The low voltages following the CDI pack are a big question in my mind right now. I Just looked at my CDI published voltage specs and you should get 150+ volts DVA on the two pairs of brown wires feeding the packs with the packs connected.


All this can be intermittent.
 

OldPcGuy

Seaman
Joined
Feb 21, 2011
Messages
58
Re: Load resistor - how used

Sorry for all the questions... my mind fills up with them... and I happen to type very fast... sometimes they just "come out"...

No, I didn't actually 'see' the CDI PP come out of a box... the mechanic told me it was new, and I believed him. His price was consistent with what the local 'trade' parts house charges... to me. I figured he got a 'trade' discount with his account, so it 'made sense'. He checked with me first about the price, and I agreed. But... it wouldn't be the first time someone sold me a used part as "new"...

Should I contact CDI to see what they say about the measurements..?? CDI trouble-shooting says the DVA readings should be 150+, and up to 300-400 when throttled up. The CDI "side" right now, doesn't get above 250 when throttled up to around 4,000 rpm...(???) I seem to recall that with the 'old' pack, the DVA test DID get up to 300+ when throttled up.

I'm beginning to wonder about that CDI pack myself...

That #1 cylinder was 'weakest' with the 'old' PP as well... while not as weak as with the CDI pack. Looking at the measurements on the "old" PP, they look pretty similar from side to side (except that #1 cylinder)... as does the CDI pack... with the exception of the top cylinder #1. CDI pack was 'low' but consistent cylinder-to-cylinder on port side... but, on starboard side the #1 reading was inconsistent... I'm thinking coil... which is odd... since it's 'new' (and THAT, I bought myself, and it came in a new 'blister pack')

Anyway... I'll swap the coil first.. and measure. Then I'll get the readings from the "brown pairs"... from your post #15 looks like it's "AC" coming from the stator. I suspect, with one PP disconnected the engine will still run...(yikes..!!) Because the DVA 'adaptor' I made doesn't have "shrouded" banana jacks, I can't use the probes I have with the DVA (easily) so I'll remove the DVA and just use the probes.

Thanks again..!!
 

OldPcGuy

Seaman
Joined
Feb 21, 2011
Messages
58
Re: Load resistor - how used

Well... maybe what I need is advice on an 'exorcism' ...

Swapped the 'suspect' coil from cylinder #1 (starboard top) down one cylinder... and measured with DVA...

Starboard bank @ 1000rpm...

Top - 250v

Middle - 240v

Bottom - 241v

And all go over 300 with throttle...(??!?!?!!!) Yesterday they wouldn't... I'm quite sure.

It's just after 11am local, and partly cloudy.. so the heat isn't 'blazing'... The motor is 'cold', not near operating temps.. I've heard of PP that are 'heat' susceptible.. or for that matter MANY electronic parts can be/become heat sensitive.

Now I'm thinking of pulling all the coils, cleaning the contact surfaces, and putting them back on...

Quick cup of coffee, help the twin grandkids set up a race course for their bikes and I'll measure the brown pairs... then pull/clean coil contacts...
 

daselbee

Commander
Joined
Jan 20, 2009
Messages
2,765
Re: Load resistor - how used

well...you have to start getting consistent readings for us to zoom in on a defective component.

Great thought...cleaning the mounting bosses of the coils....must have good grounds everywhere.

You have been plugging and unplugging the black rubber boot connectors, look in each one for possible corrosion as well as pushed back contact pins. That is common.

Have you re-done the spark gap test the correct way? Plug wire to tester to ground?

Vegas bet says they all spark 7/16" when done correctly.

I am now wondering if you have an ignition problem at all.....
 

OldPcGuy

Seaman
Joined
Feb 21, 2011
Messages
58
Re: Load resistor - how used

Posted findings.. but the post somehow got 'lost'... so here goes again...

As you can imagine... I'm wondering about everything... and your help is greatly appreciated.

Figured out a 'proper lead' for connecting to prongs inside plug holding the 'brown pair' from the stator, made them up, connected them, and got some readings

Brown pair - Starboard bank... @ ~ 1000rpm (bank that has 'new' CDI pack )

ACvolts - 250 - 300+ varying greatly with up/down of rpms.. (idled pretty good running on port bank (strong pack)... )


Brown pair - Port bank @~1000 rpm (side with 'old' pack )

ACvolts - 250 - 300+ varied greatly with rpm... ( idled POORLY/stalled running on starboard bank... with CDI pack..)

I'm now rather suspicious of the CDI pack... is it 'weaker' by design..?? Yet, it seemed to 'test' good at the coil leads this morning.

I'll pull all coils, clean where connections are made, and check all wire fittings. I don't think and orange wire connectors are 'bad' because I scrutinized them when taking them off/on to test with pigtail... but I'll look them over again. Then I'll do the orange wire DVA test, and the spark test again. See if anything is different. Also, I'll let the motor warm up and do the orange lead DVA test again... maybe the CDI pack weak when heated..(???)

Mulling it over... again, it wouldn't be the first time I've found simple corrosion to be causing me grief. What I hope is that with all the help you've given me, I can hopefully ELIMINATE the electrical system as a 'problem'.

Thanks again for all the help...
 

OldPcGuy

Seaman
Joined
Feb 21, 2011
Messages
58
Re: Load resistor - how used

Ok. This is good.. and not so good. But, overall, encouraging at minimum. With a taste of worry tossed in to keep me on the look out.

As I buttoned the PPs back in, I wiped, cleaned, and brushed every electrical connection, bolt, washer, thread, etc... Then fired it up just to verify it still "ran"... yep... but, as mentioned before, after swapping the power packs ('old' PP originally on port side, swapped with 'new' CDI) it seems to idle a tad 'rougher' but slower...(??) I 'like' the slower part, because I felt it was idling on the fast side (certainly faster than I 'remember' from decades ago )

Then I thought... why not take it for a 'spin'... and did. I'm in a HUGE 'no wake' zone but there is one spot about 200 yds long that I can get a hole-shot, and 5 seconds of WOT. I 'hit it' and it 'came up' fast(er) and stronger than before I started all this 'testing'... then half way onto plane (2 seconds??) VOOM..!!! Like a 'light switch' (or 'afterburner') POW..!!! It went FULL POWER in the way I remember it. Good thing I was hanging on... (gotta get a new clip for the safety cut-off lanyard!!)

THAT... is why I've been thinking it's "electrical"... that "instant", "switch" sort of jolt in performance... as if you could put a switch on a coil. Turn it off... sluggish, dogged down... flip the switch and POW.. instant full power. I've experienced 'fuel' issues cause a surge/cut. While it can be radical, it always "seems" (at least in my limited experience) to be a 'smoother' blast/cut in power. (Unless the engine blows up... Yikes..!!!) In the last 5 weeks that I've been 'working' on this motor, I've had a "hint" of this on 1-2 occasions... that 'momentary' jolt of power...

I then slowed to idle, turned and took another run... this time, full power out of the hole and it was flying. Great news...!! But, is it something 'intermittent' that will disappear as quickly as it appeared..?? Can there be a short/broken/corroded wire(s) in the stator/timer that could be on/off depending on the humidity..?? Is that 'rare'..?? common..??

I've still got plans to pull the coils, inspect them closely while off, and clean the contact surfaces/plug connectors.

Lastly, and maybe I should start a new thread about this. The "heat horn".... Yesterday morning with 'cold motor', it came on and stayed on every time I turned the key, or cranked/started the motor. After lunch, it only 'chirped' at key-turn and never came on again, nor today. I'm thinking about pulling the control 'box' at the helm (single handle side controls) and looking inside for corrosion/loose wires/connectors/etc. Any suggestions on how to trouble shoot this item..???

Thanks DASELBEE and others for all the help... it was/is INVALUABLE to those like me with little insight/real-knowledge of trouble shooting and fixing these motors. Hopefully in some way I'll be able to help others on this forum...
 

daselbee

Commander
Joined
Jan 20, 2009
Messages
2,765
Re: Load resistor - how used

I think you should look at your link and sync, particularly the throttle/timing pickup point. Make doubly sure the timer base is completely free to rotate it's full travel, is not gummed up with old grease, and that the throttle pickup roller is intact. It should have the clear/amber colored sheath around the black center roller hub, and be about 7/16" in diameter. The sheath ages and breaks off, leaving just the black center hub.

If you watch the throttle mechanism as it moves, you want the timing (timer base) to start to advance before the throttle butterflies move. That is the basic concept. Proper link and sync will set it perfectly.
If your throttle butterflies start to open BEFORE the timer base starts to move...incorrect and will cause bogging.

When you re-did the spark gap test properly, all plugs out, tester to ground...what did you find?
 

OldPcGuy

Seaman
Joined
Feb 21, 2011
Messages
58
Re: Load resistor - how used

While cleaning coil connections... (what else would I be doing on Easter..!!)

I was looking at hoses and stuff... and decided to replace the fuel supply hose from the in-line filter (under cowling) to the primer bulb with new ethanol 'safe' 3/8" hose (the bulb to the tank is new). While at it, I decided to remove the VRO oil supply hose that is 'outside' the motor compartment, so I could get rid of the 'double' hose splice and un-needed oil hose. The hose is not connected to the fuel/oil pump, and like old rubber hose, makes everything filthy black if touched. I cut it leaving about 2" protruding from the hose/wire 'bundle' gasket, stuck a SS bolt into it, and zip-tied it. The remaining small piece of hose inside keeps that gasket hole blocked.

The VRO was disabled around 1990-91... premix used thereafter. The VRO tank remains in the boat (I'd like to remove it) and actually STILL has oil in it from ~15 yrs ago.

This brought me to the electric 'wire' (looks like lamp cord) that goes from the VRO tank into the cowling, one wire to ground (battery lead at starter?) the other wire disappears into a bundle of wires. Can I cut this wire(s)..?? Will I get a 'low oil' horn alarm..??

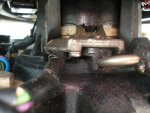
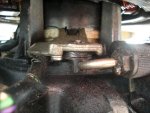
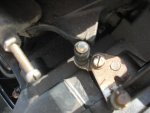
I just looked at the timer base.. and it seems to me to move freely, I can push it with my finger, it travels to a 'stop', and it's spring loaded to come back (counterclockwise) The linkage to it seems intact and snug, a little play at one connection that seems designed that way. The only 'roller' I see is actually attached to the carb butterfly linkage..?? And it is a piece of black plastic on a pin, that has about 1/16" gap between the 'roller' and a curved part of the spark advancer (?) closest to the carbs. The connection of the spark advance 'tube' to the timer seems 'tight', not sloppy... I've attached a few pics of both ends of the 'spark advance' tube.

CIMG2575.jpgCIMG2573.jpg
CIMG2570.jpgCIMG2571.jpg


To my 'eye'.. the timer base begins to move before the 'butterfly' linkage...

After a cup of coffee, I'll get back to it... I've cleaned one side of coils (port side) then got distracted with the fuel line and oil line... so after cleaning the coil connections on other side will report on spark test. After strong run this morning, I expect strong spark all the way around... but, I've been wrong too often to bet on it.

Is consistent spark across 3/8"-7/16" a 'good' result..??

Thanks..!!
 

daselbee

Commander
Joined
Jan 20, 2009
Messages
2,765
Re: Load resistor - how used

Ok..I see you need a new roller. The outer sheath is gone. Clean off the end of the cigar tube mechanism that the timer base is linked to also...I see crud there.

I swear you are doing all the right things.

Still waiting on a new report on the spark test. If done correctly.

No, if you cut the lamp cord looking wire from the oil tank, the low oil warning will be disabled. You will get NO warning if low oil occurs.
The KEY is that all warnings are triggered by the associated wire being shunted to ground if the warning condition exists.

The low oil sender in the oil tank...if it goes down due to low oil, it shunts (shorts) the wire to ground, triggering the warning.

If the temp sensors in the heads get too hot, boom, they switch the tan wires to ground, causing the alarm.

Same with "no oil", the function which is in the electronics of the fuel pump. No oil detected there...boom, switch that tan wire to ground, and trigger the no oil alarm.

So, if you cut the wire, no way it can be shunted (shorted) to ground.

Get it? Simple.
 

OldPcGuy

Seaman
Joined
Feb 21, 2011
Messages
58
Re: Load resistor - how used

Ok..I see you need a new roller. The outer sheath is gone. Clean off the end of the cigar tube mechanism that the timer base is linked to also...I see crud there.

I hate crud... ;-)

I noticed that the 'roller'... or what's "left" of it (black plastic) is 'worn' where it contacts the linkage... meaning to 'me' that it's been that way for awhile.

QUESTION... Could it be that the motor has been 'tuned'/adjusted with that roller 'missing', and will need to be re-adjusted after installing new roller..?? Just wondering....


I swear you are doing all the right things.

I am often 'slow'... but, I do eventually get the job done.


Still waiting on a new report on the spark test. If done correctly.

Sorry... didn't get to it yet... three reasons... #1 - pulling the coils I found SERIOUS corrosion on 3 coils... on the 'strip' that wraps over both sides of the bolt hole and makes the connection to the block. I wire brushed the dickens out of them, the bolts, the washers, the 'posts', as well as the surface of the bolt hole on the block, cleaning them up for good connection. #2 - I found two coils that appear to be 'different' that the other coils (replacements at some time, but not by me. Or originals, with the OTHERS replaced) and they looked sketchy... Most of the coils on the motor have 'hard' epoxy type material on the bottom sealing in the coil... these two coils had a 'rubbery' material that showed signs of deterioration/separation and generally looked leaky/shot.

I had one 'new' coil in reserve so I replaced one of these crappy looking coils... I'll pick up a couple of coils tomorrow, replace the other crappy looking coil, and have another in 'reserve'.

#3 - My wife said "It's Easter... let's have a nice dinner and watch the sunset.


No, if you cut the lamp cord looking wire from the oil tank, the low oil warning will be disabled. You will get NO warning if low oil occurs.

But... the oil tank is 'disconnected' from the motor... has been since about '93... I want to REMOVE the oil reservoir. The motor has run on pre-mix since I've owned it.

The KEY is that all warnings are triggered by the associated wire being shunted to ground if the warning condition exists.

The low oil sender in the oil tank...if it goes down due to low oil, it shunts (shorts) the wire to ground, triggering the warning.

If the temp sensors in the heads get too hot, boom, they switch the tan wires to ground, causing the alarm.

Same with "no oil", the function which is in the electronics of the fuel pump. No oil detected there...boom, switch that tan wire to ground, and trigger the no oil alarm.

So, if you cut the wire, no way it can be shunted (shorted) to ground.

Get it? Simple.

Got it. So... if I cut the wires and put heat shrink on the ends so they don't 'ground' out... I'm ok..???

And..... this maddening 'overheat sensor' horn that comes and goes is a 'short' to ground somewhere in the 'overheat' sensor circuit.... do you have a trouble shooting procedure to hunt down THAT short...???
 

daselbee

Commander
Joined
Jan 20, 2009
Messages
2,765
Re: Load resistor - how used

Well, it could have been linked and synced with the roller defective. I see it lines up perfectly with the mark. I really do not think that the roller is the root of the problem tho. I feel that the roller only plays a part in poor running if the link and sync is wrong in the first place, somewhere else in the linkage. for example, if the roller was touching the cam, and the idle stop screw was used to set the idle speed, then the carbs would open before the timing was sufficiently advanced as the whole linkage began to move. Something like that.

Finding corrosion on the coil mounting bosses is a great find, and will degrade your ignition performance. Glad you found that.

It sounds as if this motor has a few problems, and they are all compounding.

Where do we stand?

First, do you have valid 200v DVA measurements on the brown stator pairs? Measurements that are repeatable?
Second, do you now have 200v DVA on all six orange coil primaries? I remember those were "gremlined".

If so, you now have what I call a "hot ignition". This is very good.
You can have great DVA readings at the coils primaries, and the whole thing will degrade if the coils have corrosion under them.

That lamp cord oil tank wire should go to the harness and terminate with a plug that you can disconnect without cutting anything.
It will be located low in the cowl, on the port side, below the electrical panel area, and will have a round rubber two conductor plug similar to those pesky stator plugs.

Hunting down shorts is tough. First, I would disconnect the tan sensor wires up at the top of each head. Just disconnect and leave them. See if the intermittent problem returns. If it does, the short is in the harness. If not, one of the sensors has a problem. Those are hard to get out. That's why just disconnect first, don't disturb them unless you absolutely have to dig in there.
 

OldPcGuy

Seaman
Joined
Feb 21, 2011
Messages
58
Re: Load resistor - how used

Well, it could have been linked and synced with the roller defective. I see it lines up perfectly with the mark. I really do not think that the roller is the root of the problem tho. I feel that the roller only plays a part in poor running if the link and sync is wrong in the first place, somewhere else in the linkage. for example, if the roller was touching the cam, and the idle stop screw was used to set the idle speed, then the carbs would open before the timing was sufficiently advanced as the whole linkage began to move. Something like that.

I've ordered a new roller, will pick it up this afternoon... along with 2 coils, new plug wires, and a 'boot' for one of the wires from the CDI coil. It didn't come with one, and the mechanic didn't swap it off the old PP...

There IS 'room' between the roller 'black' plastic and the 'arm'... so the new one may just fill that 'gap' and no further adjustment needed. We'll see.

Finding corrosion on the coil mounting bosses is a great find, and will degrade your ignition performance. Glad you found that.

Actually, even "I" should have thought of that one before. It's amazing how corrosion can happen between to surfaces pressed so closely together. For anyone lurking and learning, remember... "galvanic corrosion"... two dissimilar metals touching will 'cause' corrosion. The contacts on the coil are SS, and they're pressed (bolted) to an aluminum block, in damp conditions. It's easy to say "It LOOKS ok..." . Learn from my oversight...

It sounds as if this motor has a few problems, and they are all compounding.

Agreed.

Where do we stand?

First, do you have valid 200v DVA measurements on the brown stator pairs? Measurements that are repeatable?

I believe so. I measured them, both sides, repeatedly over an afternoon, and the next morning. I seem to remember you saying I could skip the DVA and just use ACvolt testing... which I did. I suppose the DVA would have given me a more 'even' readout.. but, the readings were in the 250v-350+ constantly, as the engine was running. The only time the reading went below 200 was as it stalled. I would say the readings are good.

Second, do you now have 200v DVA on all six orange coil primaries? I remember those were "gremlined".

Yes. I have measured them a couple times since the motor began running 'full power', and will again as I'm working... I'd like to "know" the readings are consistent. I was sort of distressed that I'd gotten totally different readings and so I'm checking them all the time. It's easy enough. I'm hoping that there isn't corrosion in the stator/timer area.

If so, you now have what I call a "hot ignition". This is very good.

Agreed. And relieved...


You can have great DVA readings at the coils primaries, and the whole thing will degrade if the coils have corrosion under them.

And.. I've had corrosion issues that seemed to 'cause' intermittent problems... the arcing in the tiny spaces can re-connect the circuit temporarily.

That lamp cord oil tank wire should go to the harness and terminate with a plug that you can disconnect without cutting anything. It will be located low in the cowl, on the port side, below the electrical panel area, and will have a round rubber two conductor plug similar to those pesky stator plugs.

Ok... I did look.. but knowing what type of plug will help a lot. I'm figuring if I can disconnect the wires, they can be removed from the motor and stored intact with the VRO reservoir. Maybe when my Grand-kids inherit the boat they'll want to put the VRO back on...!! Ha..!!

Hunting down shorts is tough. First, I would disconnect the tan sensor wires up at the top of each head. Just disconnect and leave them. See if the intermittent problem returns. If it does, the short is in the harness. If not, one of the sensors has a problem. Those are hard to get out. That's why just disconnect first, don't disturb them unless you absolutely have to dig in there.

Agreed.. probably my least favorite task... finding shorts or interruptions in wiring. Thinking about where the short may be, I'm hoping that I don't have to pull apart the remote control box.

I REALLY hope the sensors are not the problem... they look like a royal PITA to deal with. Rubbery threaded inserts..???

Thanks for all the help and insight...
 

daselbee

Commander
Joined
Jan 20, 2009
Messages
2,765
Re: Load resistor - how used

I must say you are making great progress. I will wait for the next report on a sea trial.
 

OldPcGuy

Seaman
Joined
Feb 21, 2011
Messages
58
Re: Load resistor - how used

Got the oil sensor wires removed. Turns out on this motor, the 'hot' wire goes into a 'bundle' beneath the 'electrical box' low on port side, like you said. But instead of a 'plug' connection, it has a 'scissor-latch' style connection, with a rubber sleeve. Quick work to get the VRO wires disconnected. Managed to drop a SS washer overboard... washer from the neg battery lead on the starter. That's what I get for talking about dropping stuff in the water...!! So, the oil sensor wires are gone from the motor and will be stored with the VRO oil tank for future generations.

After reconnecting neg battery cable to starter ground location... had to start it up to see if connections were good. No hot horn. Well... OK..!!! I know it's going to come 'on' again... but, it was nice to hear the 'quiet', only the motor idling.

I ordered the roller, coils, wires, etc online from a 'local' store... they said it'd be pulled, bagged, and ready... and cost less than if I came into the store to order it. Said they'd "Call when the order was ready.." The order went in before noon... and no stinkin call all afternoon..!!! WTF..?!?!?!!! Four items..!!! I called at 5:15pm and they said "The parts desk is closed, you'll have to call after 8am tomorrow.." Sheesh..!!!

Oh well... I had the afternoon off....

Meanwhile, after dinner I tried the key again, and no horn, so I suggested the wife and I take a night cruise.... NICE....

In the three short areas I can 'run it up'... I gave it WOT and it takes off like a shot..!!! I'm suspecting the roller might just make it better. So... six hole shots, each one wicked fast... winding up over 5,000 rpm but couldn't let it run up all the way and trim up for speed....not enough room. No matter... I'm thrilled it is running with power.

From here, I've still got plenty to do.... hoses to change, some clean up... and on to the trim/tilt unit... but, at least I can use it for the rest of my 'season'. It could idle a bit smoother. Replacing some hoses that may have air leaks.. the two new coils going on (hopefully tomorrow) , etc. may help that. Next season, I'll be painting the cowling.. and "buffing" it up a bit more.

Maybe I'll finish up this thread tomorrow, with a short video...

Daselbee... thanks again, so much, for all your help, advice, knowledge and patience... It saved my sanity, made a possible nightmare into something do-able, saved me serious money, and gave me usable knowledge for the future.
 
Top