Loose Motor Mount

sr54x4

Seaman
Joined
Nov 7, 2013
Messages
62
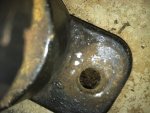
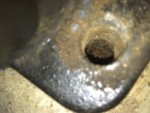
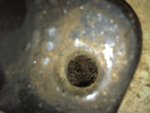
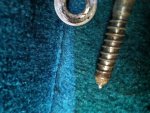
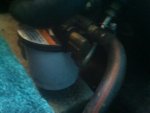
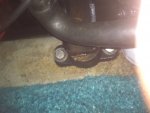
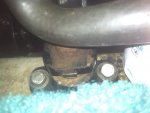
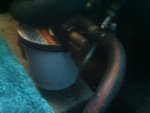
I have a 1995 Regal Valanti 182SE with a 4.3 Merc in it. I was greasing it over the weekend and happened to notice an issue with this motor mount. The bolt on the left, towards the stern is pretty loose. Loose enough that I can spin the washer by hand. I can not get it any tighter. The front bolt I can't get the washer to spin by hand, but when I try and tighten the bolt it will spin somewhat easy and does not seem to get any tighter. The motor mount on the other side seems fine. Does anyone have an idea of what is going on here or how to fix it? I really hope its not rot, this part is up real high out of the bilge so I am not sure how it could rot there. ( I am aware that there is a similar thread someone else started, but every boat and situation is different and also did not want to hijack that thread as someone else already started to do)
 

Attachments

  • photo200185.jpeg
    photo200185.jpeg
    69.8 KB · Views: 3
  • photo200186.jpeg
    photo200186.jpeg
    91.4 KB · Views: 3
  • photo200187.jpeg
    photo200187.jpeg
    76.6 KB · Views: 3
Last edited:

JASinIL2006

Vice Admiral
Joined
Feb 10, 2012
Messages
5,716
Easy to check for rot... just drill some test holes with a small bit. Dry, light-colored shavings are good. Wet, dark shavings are not so good.

Could just be stripped holes from the lag screws getting tightened too much, but I'd definitely be drilling some holes. If the shavings look OK, fill the test holes with 5200 or epoxy.
 

dozerII

Admiral
Joined
Oct 25, 2009
Messages
6,527
Easy pull the bolts out and look at the wood inside the hole, poke around with an awl and you will know whats up pretty quick.
 

sr54x4

Seaman
Joined
Nov 7, 2013
Messages
62
Easy to check for rot... just drill some test holes with a small bit. Dry, light-colored shavings are good. Wet, dark shavings are not so good.

Could just be stripped holes from the lag screws getting tightened too much, but I'd definitely be drilling some holes. If the shavings look OK, fill the test holes with 5200 or epoxy.


So just drill a small hole or two in the same area? What is 5200? This may sound stupid, but I have some surfboard ding repair, can I put a drop of that over the holes I drilled?
 

JASinIL2006

Vice Admiral
Joined
Feb 10, 2012
Messages
5,716
3M 5200 Marine Sealant. It's really good for sealing fittings below the waterline, so filling a few holes from a small drill bit in a mostly dry area would be an easy task for it.

Probably not a bad idea to pull the bolts and check the holes first, though.
 

sr54x4

Seaman
Joined
Nov 7, 2013
Messages
62
No Title

Well, I pulled the lag bolt and this is what I found. Poked around with a screwdriver and i would say its soft, but not completely mushy. I did not drill the fiberglass, I think this is evidence enough. The other bolt which is under the fuel filter in the previously posted pictures is a little crooked but feels tight so I think that one may start doing the same thing soon. How can this be fixed? Is there some sort of epoxy I can fill this hole with then put the bolts back in? This is my starboard side mount, port side is just fine.
 

Attachments

  • photo200490.jpg
    photo200490.jpg
    98.9 KB · Views: 1
  • photo200491.jpg
    photo200491.jpg
    74.8 KB · Views: 1
  • photo200492.jpg
    photo200492.jpg
    66.5 KB · Views: 1
  • photo200493.jpg
    photo200493.jpg
    129.8 KB · Views: 1

sr54x4

Seaman
Joined
Nov 7, 2013
Messages
62
No Title

Well, I pulled the lag bolt and this is what I found. Poked around with a screwdriver and i would say its soft, but not completely mushy. I did not drill the fiberglass, I think this is evidence enough. The other bolt which is under the fuel filter in the previously posted pictures is a little crooked but feels tight so I think that one may start doing the same thing soon. How can this be fixed? Is there some sort of epoxy I can fill this hole with then put the bolts back in? This is my starboard side mount, port side is just fine. Are these considered stringers that the mounts are in?
 

Attachments

  • photo200490.jpg
    photo200490.jpg
    98.9 KB · Views: 2
  • photo200491.jpg
    photo200491.jpg
    74.8 KB · Views: 2
  • photo200492.jpg
    photo200492.jpg
    66.5 KB · Views: 2
  • photo200493.jpg
    photo200493.jpg
    129.8 KB · Views: 2

sr54x4

Seaman
Joined
Nov 7, 2013
Messages
62
No Title

Well, did some research today. Looks like it is the stringer that's rotten. I ended up drilling a couple holes and pulled up wet shavings. Drilled the other side and got nice dry wood. Looks like my options are pull the motor and do a full stringer replacement. I would have to have this done professionaly. Option 2 is to try and have some plates fabricated in over the glass. Third would be to use the products and process outlined here in this link from rot doctor. I am leaning towards trying this first. http://www.rotdoctor.com/glass/GLrotrepair.html if you scroll about 1/2 way down there is detailed instructions on how to do this repair on an I/O motor mount stringer My only concern is I took a coat hanger and it went at least 10" down, probably to the top side of the hull. That means the wood is rotten thru. I would get enough of the resin to fill the whole "box" for lack of a better term the mount sits on. However, is the box enclosed so I can fill it or will everything just end up draining to other parts of the hull? I attached a photo of the front side of the "box" or platform i am referring to. It ends shortly after the mount just like it does under the fuel filter with a 90 degree turn and ties into the hull. The front side going down to the hull floor is probably 10" or so and there is a ledge that is 2-3" where the carpet ends and it drops down to the top of the mounting platform. Sorry if this makes no sense, I couldn't get a good picture to show it.
 

Attachments

  • photo200512.jpg
    photo200512.jpg
    77.7 KB · Views: 1
  • photo200513.jpg
    photo200513.jpg
    76.2 KB · Views: 0

sr54x4

Seaman
Joined
Nov 7, 2013
Messages
62
No Title

Well, did some research today. Looks like it is the stringer that's rotten. I ended up drilling a couple holes and pulled up wet shavings. Drilled the other side and got nice dry wood. Looks like my options are pull the motor and do a full stringer replacement. I would have to have this done professionaly. Option 2 is to try and have some plates fabricated in over the glass. Third would be to use the products and process outlined here in this link from rot doctor. I am leaning towards trying this first. http://www.rotdoctor.com/glass/GLrotrepair.html if you scroll about 1/2 way down there is detailed instructions on how to do this repair on an I/O motor mount stringer My only concern is I took a coat hanger and it went at least 10" down, probably to the top side of the hull. That means the wood is rotten thru. I would get enough of the resin to fill the whole "box" for lack of a better term the mount sits on. However, is the box enclosed so I can fill it or will everything just end up draining to other parts of the hull? I attached a photo of the front side of the "box" or platform i am referring to. It ends shortly after the mount just like it does under the fuel filter with a 90 degree turn and ties into the hull. The front side going down to the hull floor is probably 10" or so and there is a ledge that is 2-3" where the carpet ends and it drops down to the top of the mounting platform. Sorry if this makes no sense, I couldn't get a good picture to show it.
 

Watermann

Starmada Splash of the Year 2014
Joined
Jan 12, 2013
Messages
13,822
The possible really bad news is that boats rot from the bottom up and most likely the stringer for the port motor mount is rotten too but hasn't reached the level of the mount lag bolts. Then what about the rest of the boat and the transom? Most of the guys I've seen that found rot ended up finding a whole bunch. I would be amazed if all that was rotted was just one motor mount stringer.

I don't know about using the Dr Fix it in a can stuff being a permanent solution to the rot problem but if it does work out for you be sure to let us know. Good luck!
 

sr54x4

Seaman
Joined
Nov 7, 2013
Messages
62
Sorry for all the multiple posts, I keep getting error messages when I hit post. Then they all show up. Not sure if its the site or my ipad
 

sr54x4

Seaman
Joined
Nov 7, 2013
Messages
62
Update, I cut a hole in the top of the mounting platform. Pulled out a plastic shopping bag worth of rotted wood and about an inch of water in the bottom. I cleaned it all out and pulled out all the rotted wood with just the sides being still wood. They are pretty wet, but plan to dry for a week then soak with rot doctors cpes. The part that completely rotted away was the top part where the bolts actually get screwed into that wood. I think the water worked its way in from the top thru the bolts or the screws holding the gas filler hose in place. After repair i will 5200 everything. From there I plan to fill the entire mount/box with their layup and laminate resin. Let it it cure, drill new holes and bolt it back down.
 

81 Checkmate

Lieutenant
Joined
Jul 20, 2010
Messages
1,360
This site is still in a fubar......thats why some of the experts havent chimed in......but to further note i would pull the outdrive and check the alignment. If you have a soft motor mount most likley the engine is out of alignment and it will wear out your engine coupler in no time......Then you will be pulling the motor for sure.

Good Luck...hope your fix is a good one!
 

sr54x4

Seaman
Joined
Nov 7, 2013
Messages
62
This site is still in a fubar......thats why some of the experts havent chimed in......but to further note i would pull the outdrive and check the alignment. If you have a soft motor mount most likley the engine is out of alignment and it will wear out your engine coupler in no time......Then you will be pulling the motor for sure.

Good Luck...hope your fix is a good one!


I was hoping to not have to do this since the mount on the other side is fine and only 1 of 2 bolts were really loose on the bad side. I have never done this before, is it relatively simple? Are there any write ups on how to do it? I have an Alpha LX outdrive tied to this 4.3 Merc engine.Or will it need to be done professionaly?
 
Last edited:

sr54x4

Seaman
Joined
Nov 7, 2013
Messages
62
Just watched some you tube videos. Not too bad, I think I will give it a try, it can't hurt. Seems I can get the tool from Heartland on Amazon for $50 or so.
 
Last edited:

JASinIL2006

Vice Admiral
Joined
Feb 10, 2012
Messages
5,716
Update, I cut a hole in the top of the mounting platform. Pulled out a plastic shopping bag worth of rotted wood and about an inch of water in the bottom. I cleaned it all out and pulled out all the rotted wood with just the sides being still wood. They are pretty wet, but plan to dry for a week then soak with rot doctors cpes. The part that completely rotted away was the top part where the bolts actually get screwed into that wood. I think the water worked its way in from the top thru the bolts or the screws holding the gas filler hose in place. After repair i will 5200 everything. From there I plan to fill the entire mount/box with their layup and laminate resin. Let it it cure, drill new holes and bolt it back down.

How do you think that much water got in there, and besides the mount and stringer, what else do you think is wet? Have you core-sampled the transom and/or floatation foam on that side? I'm not trying to be downer, but I'm trying to understand how you could have that much water and rot in just the mount. Are you thinking all that water entered via the holes with the lag bolts? That seems improbable...
 

sr54x4

Seaman
Joined
Nov 7, 2013
Messages
62
No Title

I really don't know how that much water could have gotten in there. The top of the fiberglass where the bolts come through could have always had a slight depression in it allowing water to collect on top and seep down through the lag bolts. The boat is 20 years old and was used for a lot of water sports so there was always people coming in and over the engine bay cover. Another possibility is that the brass screws you pull out of the block when you flush it are near here. Possible that after 20 years of cleaning the block out every season enough water worked its way through the lags or the screws for the gas fill line. This of course is just all speculation. I do not know how water could have gotten in there outside of that. The inside seems to be a sealed unit. A wood frame, all glassed in on the sides, top and bottom. I found this picture on line of the type of mounting blocks I have. I do not believe this is considered to be a stringer, so if someone could please let me know the correct term that would be great. The only difference between this photo and what I have is that these have an open face to them, the front side which would be the side facing the bilge, making an upside down U basically. Mine are fully enclosed, in that the front side that faces the bilge is glassed over as well making more of a box or an enclosure.
 
Last edited:
Top