Low Compression #2 Cylinder

walk-on

Petty Officer 2nd Class
Joined
Aug 16, 2006
Messages
112
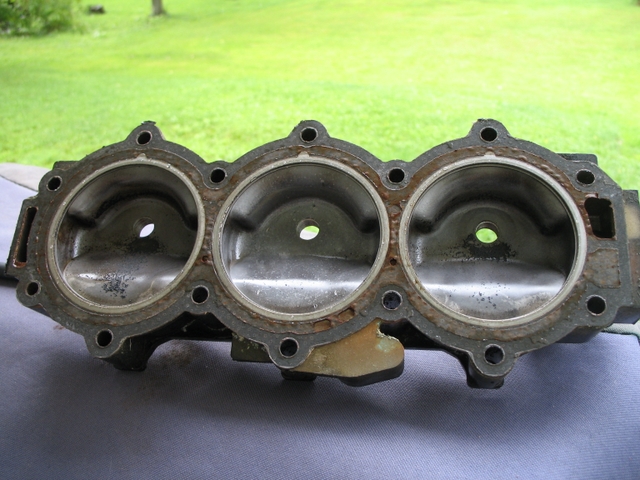
I checked the compression today on my 1995 90hp Force and I found:
#1 - 125 psi
#2 - 70 psi
#3 - 130 psi

As directed by my manual, I sprayed some fogging oil in the #2 cylinder and repeated the compression test. WITH the fogging oil the compression in the #2 cylinder was 120 psi.

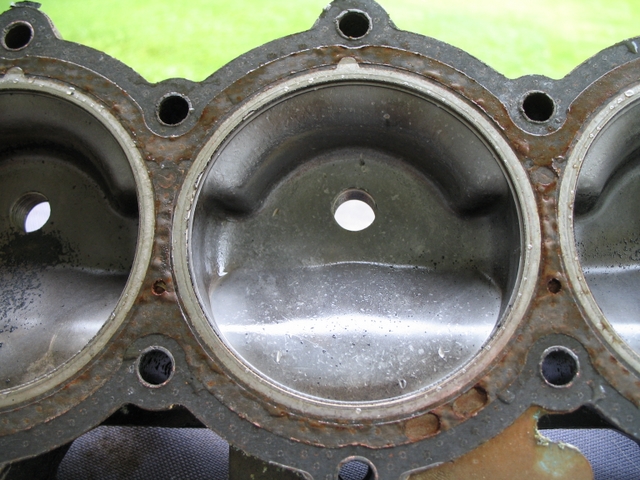
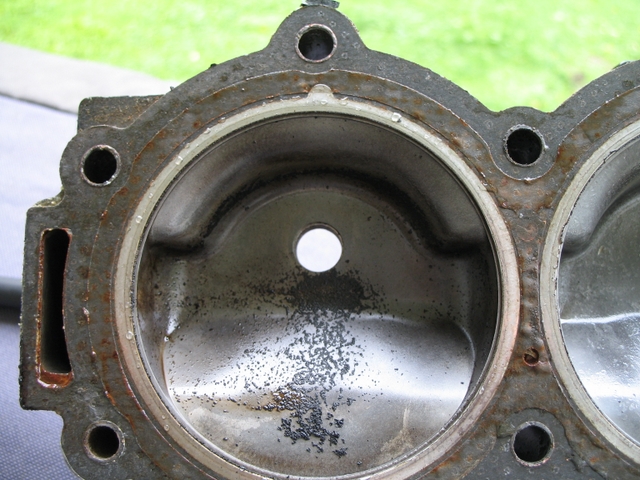
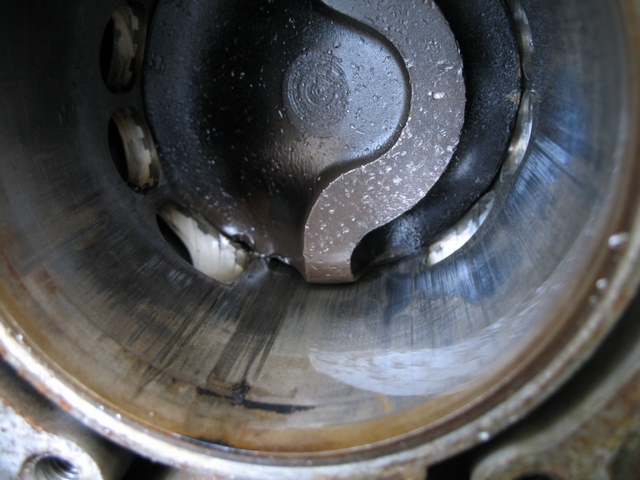
I also noted what appears to be a granular crusty deposit around the head gasket along the starboard side of the #2 cylinder. I believe the head gasket needs to be replaced again. It was replaced in 2005 by the local Mercury mechanic.

My manual also states that the conditions I am seeing are likely due to sticking rings and that a decarb may fix the issue. I just decarbed this motor by spraying Seafoam into the carbs while running.

I have two questions:
1. Should I spray additional Seafoam directly into the cylinder and leave it there for a while in hopes that the rings becomes "unstuck"?
2. Will replacing the head gasket likely fix the low compression on the #2 cylinder?

Thanks!
 

Jeremy90bay

Petty Officer 1st Class
Joined
Jun 3, 2009
Messages
277
Re: Low Compression #2 Cylinder

Replacing the head gasket is the easiest fix. you will probably need to pull the head anyway to check for more damage. if the cylinders look good than put a new gasket on and give it a try.

Im not sure 100% but I dont think its a good idea to spray seafoam into the cylinder directly.


Jeremy
 

walk-on

Petty Officer 2nd Class
Joined
Aug 16, 2006
Messages
112
Re: Low Compression #2 Cylinder

I took some pictures today. Take a look for yourself.

View of the head:
IMG_3212.JPG


View of the middle cylinder head:
IMG_3214.JPG


View of #3 cylinder head. Notice the carbon buildup.
IMG_3215.JPG


View of the cylinders and pistons:
IMG_3217.JPG


View of the #2 piston. I see some pitting. The gouges may be from deformed rings???
IMG_3219.JPG


View of the #2 cylinder. I can feel the scoring about the 7 o'clock position.
IMG_3224.JPG


Well it looks like I'm going to have to replace the piston and rings and have the cylinder(s) worked on. At this point I'm looking at the cost of a new head gasket and piston/rings kit plus whatever the machine shop charges. I'll need to wait until the machine shop tells me the final bore size before I can order the piston/rings.

Any thoughts on redoing all three cylinders vs. just the one? Any other thoughts or ideas I should entertain? Ughhhh...
 

Frank Acampora

Supreme Mariner
Joined
Jan 19, 2007
Messages
12,004
Re: Low Compression #2 Cylinder

The dots in the piston head are from pieces of the ring you broke. The two nicks in the piston perimeter are where the ring came through when it caught in the exhaust port.

Those engines USUALLY had a semi-keystone tapered top ring and a regular square second ring. The semi-keystone rings were more prone to breaking. THUS: the second ring is probably ok and that's why compression came up when wet.

The center piston is too clean, indicating a lean run condition. If the 90 has 3 carbs and not a single one like the 70-75, check that carb for clogging and if it is clean, richen up that carb a little. If it does have a single carb, go a little richer.

The choice is really up to you: You need to disassemble the engine to bore one cylinder, so, do you want to spend the extra 250 in pistons and 100 in boring charges? You can replace only one piston, but if you do all three, I would expect compression to rise to 150 or so on all three. Have the boring shop "mike" all three bores. Don't know about Mercury specs, but originally, Chrysler and Force specified no more than .002 wear, out of round, or tapered cylinders. Let the shop man tell you how many to bore and how much oversized.

Head gasket looks fine. On my personal engines I would re-use it. On a rebuild for someone else, I would replace it. Choice is yours whether you want to spend the extra 30 bucks.
 

walk-on

Petty Officer 2nd Class
Joined
Aug 16, 2006
Messages
112
Re: Low Compression #2 Cylinder

I spoke to the machine shop today and they told me I can just have the middle cylinder bored out and replace the single piston. He will need to look at it first to determine the extent of the damage to the cylinder.

I started the process of removing the powerhead and I have removed all the stuff on the outside of the motor, electronics, solenoids, starter, etc. I cannot figure out how to get the powerhead to lift off. My manual is a Seloc which leaves a lot to be desired in this particular instance. I need some help to identify if there are any more bolts that may still be in there. Also, does the upper adapter place also come off with the powerhead?

According to the manual, I need to remove the six exposed nuts after removing the exhaust cover. I have eight nuts exposed.
 

Frank Acampora

Supreme Mariner
Joined
Jan 19, 2007
Messages
12,004
Re: Low Compression #2 Cylinder

1995 has the Mercury midleg and an adapter plate to mate the Force block to it. The adapter has (I believe) 8 studs while the block bolts to the adapter with 10 studs.

The adapter plate also has four bolts through rubber cushions holding the lower pan to the adapter plate so these need to be removed and the lower pan dropped so you can access the pry-points. The studs tend to corrode a bit in the leg, so the block will usually not come up easily.

I forget, but it may also be necessary to remove part of the upper motor mounts in the front of the adapter.
 

walk-on

Petty Officer 2nd Class
Joined
Aug 16, 2006
Messages
112
Re: Low Compression #2 Cylinder

I removed the powerhead today. It wasn't too bad once I figured out how to do it. In the first picture you'll see where the four studs from the adapter plate become visible after removing the exhaust cover. There are eight nuts to remove in all, three on each side and two on the back side.

IMG_3256.JPG


Next I needed to pry up on the adapter plate. You'll see where I put the pry bar to do this near the front of the engine, below the lower cowl. It did not take much pressure to get the power head to move. After that I lifted it off by hand. It is heavy enough...
IMG_3257.JPG


I took this last picture to show the removed powerhead with the adapter plate attached.
IMG_3258.JPG


I took the powerhead to the shop and the shop owner recommended boring out the bad cylinder to what will probably be 0.020 over std. He also recommended replacing only the bad piston, but also to replace the rings on the other two "good" pistons. All three cylinders will be honed.

I was somewhat surprised when he told me that many of the outboard jobs he does are only for the one bad cylinder. This includes jobs done for marine mechanics.

The pistons have C1 stamped in them. Does anyone know if these are standard size?
 

walk-on

Petty Officer 2nd Class
Joined
Aug 16, 2006
Messages
112
Re: Low Compression #2 Cylinder

I removed the pistons today and I was able to better see the damage to the piston and cylinder. I noticed a little mark on the ring groove on the top piston and I also noticed a bit of scoring on the top cylinder as well. I've decided to replace all three pistons and allow the shop to do whatever needs to be done to make the cylinders right.

The job actually hasn't been that bad up until this point. Of course I haven't had to spend any money yet! Now if I can just get it back together and have everything work, that will make it all worth it.
 
Top