


minuteman62-64
Lieutenant
- Joined
- Apr 12, 2011
- Messages
- 1,350
A year ago I was too intimidated to even attempt to remove my lower unit. Now, with the support of the posts/posters on this forum, I?ve had a great time tearing into it to attempt some repairs.
I was trying to address two problems. First, I was getting water in the lower unit (maybe a teaspoon after a 2 hour run). Second, I was getting intermittent overheating. I had noticed at the local launch ramp that motors similar to mine (1982 30 HP Mariner) had much more forceful streams coming from their tell-tales. So, I decided to replace the impeller and, while things were apart, replace the drive shaft seals and the shift boot (which were original parts).
I dropped the lower unit, took it in the garage and propped it up in my trusty WorkMate. My plan was to do some disassembly, just to make sure I could get things apart, order the necessary parts, and, while waiting for the parts, kludge together a pressure/vacuum testing rig. First mistake: I should have made the testing rig and done preliminary testing before taking things apart, to establish a baseline, so I could determine if I had actually fixed anything.
Pulling the impeller, I noticed that it was really limp and two of the arms were curved in the opposite direction from the remaining arms. That may be attributed to an earlier adventure with overheating and my subsequent disassembly/assembly of the water pump (I didn?t follow the service manual procedures for installing the pump housing ? just tried to stuff the impeller in).
With the help of my trusty slide hammer, with a vice-grip attachment, I easily pulled the pump base. I wanted to try the seal removal technique of inserting sheet metal screws into the seals and using the slide hammer and vice-grips to pop the seals out. A surprise ? unlike the seals in the U-Tube Video, mine were not stainless steel. Instead they were brass and easy to drill with an ordinary HSS drill. The removal technique worked perfectly. This gives me confidence that if I need to replace the prop shaft seals I can use that same technique.
I noticed the old seals were very dry and stiff. I removed the shift shaft clamp and pulled out the shift shaft. The boot was loose in its mounting hole ? any sealant had long ago dried out. Maybe I?d found the source (or one of the sources) of the water in the LU (however, couldn?t be sure ? see first mistake, above).
Once I knew I could get things apart I ordered the new parts. Then, while waiting for the parts, I went out and forced streams of water through every available orifice in my motor to see if anything would pop out that might be clogging the cooling system (a few small chunks of salt did come out). I also began cleaning the lower unit components (alcohol seemed to work best, particularly on gasket removal).
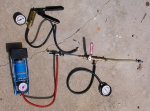
Finally, stealing from a number of posts, I constructed a highly ingenious and complex pressure/vacuum tester. I designed my test rig to accept my 40 year old hand vacuum pump and a hand air pump purchased for $7 at HF. See attachment. Also note second mistake - more on the ingenuity and complexity later.
Once the parts arrived I began putting things back together. A surprise ? the housings for the new seals were plastic instead of metal. I hope they work and stand up as well as the 30 year old factory original seals that I removed. This time I followed the directions in my service manual and greased the impeller and housing and pushed the pump housing down over the impeller while rotating the drive shaft clockwise ? went in easily.
After considerable research of the posts on this forum, I used the NAPA Aviation Gasket Sealant for the seal installation, the shift boot installation, for all the gaskets and on the threads of the water pump housing bolts.
Once assembly was completed it was time for the testing. First, the vacuum test. Applied 7? hg (no particular reason ? just what three squeezes of the pump handle provided) and watched as it slowly bled down to zero over the next few hours. Crap, that didn?t sound like the ??. hold for many hours? results I should be getting based on the posts I?d read. Re-tried a number of times after tinkering with the test equipment ? same results. Arrrg! Were the prop shaft seals leaking or had I screwed up the top end work I?d done?
Finally decided to try the pressure test (I put this off for a day or so, paranoid of seeing bubbles flowing from the upper seals of the shift shaft where I had done the work). OK, let?s do it. I submerged the LU in a barrel and applied 12 psi of pressure (no particular reason ? that?s just what five pump strokes gave me). There was my leak ? at every possible joint/connection in my pressure testing rig. I should have remembered my father?s advice about keeping things simple to minimize chances for problems/mistakes. Also, third mistake ? I should have heeded the advice in a number of posts about making sure your test equipment is valid before running any tests.
It took way more torque than it should have to eliminate the leaks in the brass fittings I had purchased at Home Depot and Ace Hardware ? for which I?ll blame some unknown 10 year old worker at a factory somewhere in China ? but finally got them tightened up. The most difficult leak to stop was the fitting where the air line went into the lower unit. Finally got that fixed with a combo of ?O? rings and gaskets from lower unit drain screws.
Once I finally got the leaks stopped I was able to maintain 10-12 psi on the LU with no bubbles coming out anywhere. Kind of redundant, but I re-did the vacuum test just to see what would happen. Three handle squeezes to 7? hg and it held for 24 hours.
OK, so I think I?ve had a successful repair. Reinstalled the LU and ran it on the muffs till the thermostat opened up. Seemed like a better stream coming out the tell-tale and the cylinder head temperature gauge was reading (at idle) about 3 degrees lower than before. Next step will be a Bay run to see the head temperature at a range of speeds and also see if I pick up any water in the LU. Report to follow.
Thanks to all you posters who provided the information that carried me through this exercise.
I was trying to address two problems. First, I was getting water in the lower unit (maybe a teaspoon after a 2 hour run). Second, I was getting intermittent overheating. I had noticed at the local launch ramp that motors similar to mine (1982 30 HP Mariner) had much more forceful streams coming from their tell-tales. So, I decided to replace the impeller and, while things were apart, replace the drive shaft seals and the shift boot (which were original parts).
I dropped the lower unit, took it in the garage and propped it up in my trusty WorkMate. My plan was to do some disassembly, just to make sure I could get things apart, order the necessary parts, and, while waiting for the parts, kludge together a pressure/vacuum testing rig. First mistake: I should have made the testing rig and done preliminary testing before taking things apart, to establish a baseline, so I could determine if I had actually fixed anything.
Pulling the impeller, I noticed that it was really limp and two of the arms were curved in the opposite direction from the remaining arms. That may be attributed to an earlier adventure with overheating and my subsequent disassembly/assembly of the water pump (I didn?t follow the service manual procedures for installing the pump housing ? just tried to stuff the impeller in).
With the help of my trusty slide hammer, with a vice-grip attachment, I easily pulled the pump base. I wanted to try the seal removal technique of inserting sheet metal screws into the seals and using the slide hammer and vice-grips to pop the seals out. A surprise ? unlike the seals in the U-Tube Video, mine were not stainless steel. Instead they were brass and easy to drill with an ordinary HSS drill. The removal technique worked perfectly. This gives me confidence that if I need to replace the prop shaft seals I can use that same technique.
I noticed the old seals were very dry and stiff. I removed the shift shaft clamp and pulled out the shift shaft. The boot was loose in its mounting hole ? any sealant had long ago dried out. Maybe I?d found the source (or one of the sources) of the water in the LU (however, couldn?t be sure ? see first mistake, above).
Once I knew I could get things apart I ordered the new parts. Then, while waiting for the parts, I went out and forced streams of water through every available orifice in my motor to see if anything would pop out that might be clogging the cooling system (a few small chunks of salt did come out). I also began cleaning the lower unit components (alcohol seemed to work best, particularly on gasket removal).
Finally, stealing from a number of posts, I constructed a highly ingenious and complex pressure/vacuum tester. I designed my test rig to accept my 40 year old hand vacuum pump and a hand air pump purchased for $7 at HF. See attachment. Also note second mistake - more on the ingenuity and complexity later.
Once the parts arrived I began putting things back together. A surprise ? the housings for the new seals were plastic instead of metal. I hope they work and stand up as well as the 30 year old factory original seals that I removed. This time I followed the directions in my service manual and greased the impeller and housing and pushed the pump housing down over the impeller while rotating the drive shaft clockwise ? went in easily.
After considerable research of the posts on this forum, I used the NAPA Aviation Gasket Sealant for the seal installation, the shift boot installation, for all the gaskets and on the threads of the water pump housing bolts.
Once assembly was completed it was time for the testing. First, the vacuum test. Applied 7? hg (no particular reason ? just what three squeezes of the pump handle provided) and watched as it slowly bled down to zero over the next few hours. Crap, that didn?t sound like the ??. hold for many hours? results I should be getting based on the posts I?d read. Re-tried a number of times after tinkering with the test equipment ? same results. Arrrg! Were the prop shaft seals leaking or had I screwed up the top end work I?d done?
Finally decided to try the pressure test (I put this off for a day or so, paranoid of seeing bubbles flowing from the upper seals of the shift shaft where I had done the work). OK, let?s do it. I submerged the LU in a barrel and applied 12 psi of pressure (no particular reason ? that?s just what five pump strokes gave me). There was my leak ? at every possible joint/connection in my pressure testing rig. I should have remembered my father?s advice about keeping things simple to minimize chances for problems/mistakes. Also, third mistake ? I should have heeded the advice in a number of posts about making sure your test equipment is valid before running any tests.
It took way more torque than it should have to eliminate the leaks in the brass fittings I had purchased at Home Depot and Ace Hardware ? for which I?ll blame some unknown 10 year old worker at a factory somewhere in China ? but finally got them tightened up. The most difficult leak to stop was the fitting where the air line went into the lower unit. Finally got that fixed with a combo of ?O? rings and gaskets from lower unit drain screws.
Once I finally got the leaks stopped I was able to maintain 10-12 psi on the LU with no bubbles coming out anywhere. Kind of redundant, but I re-did the vacuum test just to see what would happen. Three handle squeezes to 7? hg and it held for 24 hours.
OK, so I think I?ve had a successful repair. Reinstalled the LU and ran it on the muffs till the thermostat opened up. Seemed like a better stream coming out the tell-tale and the cylinder head temperature gauge was reading (at idle) about 3 degrees lower than before. Next step will be a Bay run to see the head temperature at a range of speeds and also see if I pick up any water in the LU. Report to follow.
Thanks to all you posters who provided the information that carried me through this exercise.
")