Making a custom trailer guide-in - could use advice

Joolz

Petty Officer 1st Class
Joined
Aug 13, 2015
Messages
211
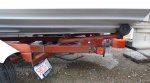
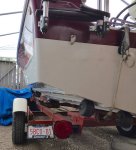
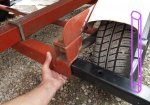
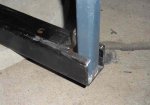
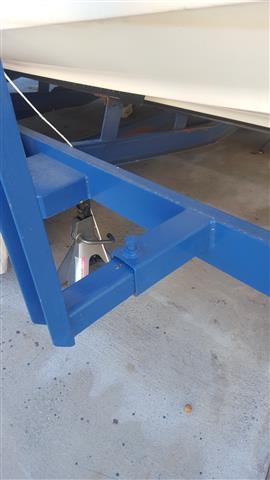
As is the case with many here, loading the boat onto the trailer is often difficult in the best of days, a real chore with even the lightest of breezes, and an exercise that often ends with the wife yelling at me angrily despite my best attempts to speed things up. Can't blame her, our northern lakes can be cold and she's up to her waist at times trying to help me load the thing - there's a short window in which the cold gets to her and we often miss it. Time to install some guide-ins! Problem is, commercial ones won't fit. As seen in the second pic, the frame is far too close to the middle, or some 18" to the boat's rub rail. Add an extra 2" to clear the beam width and even the largest kit you can buy won't fit. Not to mention I'd hope to do this for less than the $150 for a 60" kit at Bass Pro (Canadian price). So this leaves me with the task of rigging something up myself, so here we are.

Boat is a 15' Canaventure on a Caulkins trailer, rollers. As one can imagine getting the boat to centre on the trailer is nearly impossible and if it gets close, it's due to luck. Hope guide-ins will help with the task and also speed things up on our busy ramps. That and the fact it'd help with backing up onto the ramp since the trailer is hard to spot.

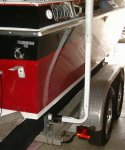
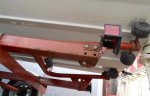
Today I stopped by a metal fabrication shop and was quoted $75 for a pair of 1", 12 gauge (about 1/8" thick) galvanized steel roughly 6' long BENT 90 degrees to more or less resemble the commercial guide-in in the third pic. Or $100 if going with stainless steel. It's my choice to go with square or circular, not sure which but I'd think the square ones would be less prone to moving about once secured.

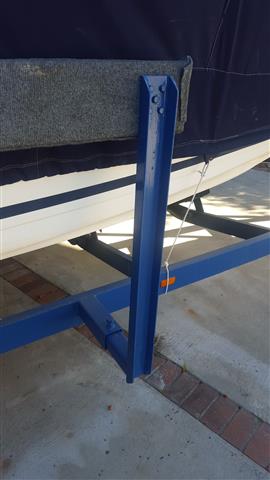
My plan is to attach these to the cross member where the licence plate sits. This is a hefty piece of steel, 3/16" thick (the frame is thinner at 1/8") and was thinking in using U bolts to hold the guide-ins in place. Would this be a good place to mount the guide-ins? It's 3' from the transom. I realize most prefer to install these as close to the end of the trailer as possible but this is the only spot I can think of, other than rigging something else up in order to use the frame.

Questions I'd like answered:
- is this plan sound?
- do I need to go with stainless steel or can I save a few bucks going with galvanized? Doubt metal that thick would rust before I move up to nicer boat in the future.
- if the above checks, should I opt to go with the square or circular bars? Prices are the same for either, just wondering which would work best.
- how high should the vertical portion be?

As for the last question, I do plan to add PVC to these. Not sure what the magic formula here is, if any. As in, do I keep the vertical height shorter (below the rub rail) in order to allow for some flex? The beam is 4" wider than the width of the boat where the guide-ins would go. I'd like to keep these as close to the boat as possible in order to get it as centre as possible. If it can be made so that the front of the boat pushes the guide-ins away a couple of inches that'd be perfect. Currently the rub rail is 36" from the licence plate.

I'm by no means stuck on the plan above, would love to hear suggestions. Would also like to keep costs to a minimum. Looking for practicality more so than fancy. Please do weigh in. I don't want to be yelled at anymore, want it done this week.
 

Attachments

  • photo270528.jpg
    photo270528.jpg
    55.1 KB · Views: 1
  • photo270529.jpg
    photo270529.jpg
    62.5 KB · Views: 1
  • photo270530.jpg
    photo270530.jpg
    49 KB · Views: 1

Joolz

Petty Officer 1st Class
Joined
Aug 13, 2015
Messages
211
Heh, that Fulton GB150 looks to sit on a trailer similar to mine. And the price isn't bad - but it says out of stock.

The description says it only extends to 19". I need a tad more than that.

I like the Fulton one. Anyone knows how I can get a hold of the store to inquire on availability? Failing this (or overall cost once shipping to Canada is added) we may be back at this topic.
 
Last edited by a moderator:

Joolz

Petty Officer 1st Class
Joined
Aug 13, 2015
Messages
211
K, really interested in that Fulton GB150 - especially after getting the wife's blessing, that happened to be walking past and saw it. But before I get too enthused on it, does anyone know how far it extends? As indicated above the distance from the rub rail to the frame is 18", plus I may need an additional 2" per side in order for the wider section of the boat to clear. If anyone has one of these could you please confirm?
 

Joolz

Petty Officer 1st Class
Joined
Aug 13, 2015
Messages
211
Just got off the phone with Fulton. As it turns out their guide-ins aren't wide enough for me, confirming my suspicion.

Back to the questions above, if anyone can please weigh in if the above-mentioned project is a good way to go?
 

oldjeep

Admiral
Joined
May 17, 2010
Messages
6,455
WP_20140703_005s.jpg
In a stock configuration the PVC covers the pipe and the foam/fabric covers over the PVC will cause the PVC to rise if your trailer is in insanely deep. You don't want short steel pipes and longer PVC the steel pipes will flex plenty on their own. These have steel to the top, with a PVC sleeve and then the padded covers

Unless you are in salt, just plain steel will last a long time. The guide bars on my ski boat are just painted/powder coated steel like the rest of the trailer.
 

gm280

Supreme Mariner
Joined
Jun 26, 2011
Messages
14,605
I am certain a lot of iboaters, that have the capabilities, could easily make your boat load perfectly everything with some made sides. However, if you don't have such tools and/or abilities, you are stuck with shop made type setup in your area. But it takes money. And if you don't have the funds presently, I suggest you wait until you do have the adequate funds to do it right the first time. But that is just me and my opinion.
 

Maclin

Admiral
Joined
May 27, 2007
Messages
6,761
You could add a C channel or box tube beside the box tubing that the springs mount to, run it from the front angle iron and on top of the rear angle iron and extend back far enough to where mounting the store bought bracketing would work.
 

89retta

Senior Chief Petty Officer
Joined
Jul 18, 2010
Messages
780
What part of Canada are you in ? Also I'm sure a kit would fit as your set up is similar to my old boat and trailer.
 

Cat nip

Petty Officer 1st Class
Joined
Jul 25, 2015
Messages
288
I made a pair for one of my boats out of 2.5" exhaust pipe that I bent at 90 degrees but a large enough radius not to kink or otherwise warp the pipe (very important for strength ) then welded plates to the ends that went to the trailer and put 2 bolts through each one ,one for and one aft of the pipe. I went about 16" above the gunnel and just put 3" diameter pvc pipe over them . They were strong enough to bounce the hull off them hard when coming in hot in fast water. I never bent one or messed up the boat. It cost about $20 in materials and 1/2 hrs to make. Try a local muffler shop you might be surprised at the price if they are slow. You could use u bolts to secure them if you wanted to do it that way also and then you would just need the pipes bent.
 

Grub54891

Admiral
Joined
Jun 17, 2012
Messages
6,137
How about something like this?
9k=
images
 

Joolz

Petty Officer 1st Class
Joined
Aug 13, 2015
Messages
211
No Title

Some good ideas here but think will try and keep things as basic as possible. Since I couldn't locate any square 1" U bolts anywhere in town, paying $75 to have a couple of 1" tubes bent is now out the window. Found this 3' long black 2x2 x 1/8" tube in the garage and figured the simplest thing to do is to cut it in half and weld a 5' long 1x1 tube onto it. At least this way it will sit nicely inside that L shaped beam and finding U bolts for this wouldn't be a problem.

I'm no welder but do have a welder that frankly I never even used in the 2 years I've had it. Sucks when stores have sales on stuff you don't really need but can't pass on a good deal, ain't it? Just waiting to locate a proper welding helmet, the auto darkening kind, as the crappy one that came with the welder is useless. Figured this would be a great time to finally get to use the thing. If I screw up I can just have a friend fix it for me, since he knows his way around a stick welder.

If this plan works, the materials will be insanely cheap: $10 for the 1x1 x 1/8" square tube and $8 for the U bolts. Plus whatever the PVC pipe ends up costing, and a few what-nots.

As for taking the chance with the commercial stuff: too great a risk to take on something that the factory itself said wouldn't work given the distances that surpass their product's max. If I screw this up, I'm out a grand total of ten bux, compared to the $150 plus tax on a product I likely couldn't return.

Will update this thread once I have gathered all the material and get it done. Any welding tips are certainly welcomed!
 

Attachments

  • photo270709.jpg
    photo270709.jpg
    76.2 KB · Views: 1

Maclin

Admiral
Joined
May 27, 2007
Messages
6,761
Run the new box tubing on top of the angle iron pieces where the spring hangar brackets are now. Have it extend past the rear brackets a foot or so. Mount the poles or store-bought side guides back there on the new box tubing.
 

Fed

Commander
Joined
Apr 1, 2010
Messages
2,457
Winch your boat on to a dry trailer with the rear centre roller out of the water so that way the water you stand in is less than a foot deep.

Edit: It has the added bonus of always making the boat sit properly on the rollers.
 

Joolz

Petty Officer 1st Class
Joined
Aug 13, 2015
Messages
211
Fed, you may be up to something here. Reason being, we are having a hard time loading the boat due I think is a rookie mistake: getting the boat too deep into the water for retrieval.

After reading some posts in this forum this past week I'm now beginning to realize that putting the boat in the water (for retrieval) as far down as when you're unloading the boat to be the wrong thing to do. Example: last week during our last time out I had the rear fenders about 3 or 4" below the water level, which is the sweet spot for launching it. Made pulling the boat in all the way with the rope very easy, and only had a foot or so to winch it in. The rear of the boat was floating and wife was trying to hang on to it to keep it centre as I drove the TV out of the lake. By now all the experienced folks reading this must be shaking their heads. It took us about 4 tries moving the tow vehicle ahead and back into the water in order to get it centred. We finally did it, but it was way too much work. And still, believe it or not, it was one of the easiest retrievals we've had, due to this very steep ramp.

For us boating has been great other than when it's time for retrieval. No fun. I now realize this may be due to my misunderstanding of where to place the trailer. Your reply here pretty much confirms that.

Will try your way next time we're out. But won't this make winching the boat extremely difficult, since it'd have so much of a distance to go up a dry trailer? Or should I winch it in as far as possible then back up the tow vehicle a bit into the lake in order to lighten up the back of the boat?

Watched many videos on loading/unloading but apparently it wasn't enough; or I may have not found a proper video.

But regardless of how poor my current technique is, I still think that having these guide posts to be handy on a windy day, not to mention it'd make life so much easier while backing up down the ramp. Something the wife cannot do at the moment, as she simply cannot see the empty trailer.
 

Fed

Commander
Joined
Apr 1, 2010
Messages
2,457
Assuming you have centre rollers (can't see in the pic) if you grease all the roller shafts the boat will roll off unaided and be easy to winch up dry.
I launch & retrieve on a fairly 'flat' ramp (pic) and this is the typical depth I need, just enough depth so the boat doesn't bonk on the bottom.

Trailer disappearing over the top of the ramp can be a problem, I can judge the straightness by looking at the winch which remains visible.
retrieve1.jpg

Never disconnect the boat until you are over the water as it will roll off by itself.
Having a free rolling trailer is also handy to be able to shove the boat off onto the back lawn for any trailer repairs then simply winch it back on when done.
 

Joolz

Petty Officer 1st Class
Joined
Aug 13, 2015
Messages
211
No Title

Today I secured the 1x1 x 1/8" tubes and proceeded to cut the 2x2 in order for the 1x1 to sit inside. Turned out better than I expected. Really handy to have one of these $4 cutoff blades in a circular saw. Also got a decent auto darkening welding helmet, a decent grinder and all else needed to complete the job. Getting late now but plan to go for it tomorrow. Have a few pieces of scrap metal I plan to practice on for a bit. We intend to take the boat out on Thursday so I'm confident I'll it all in place by then.

Fed I'm also including a couple of pics of the roller in my trailer, fyi. Would these be similar to yours in how it centers the boat upon winching? Surprised to see your trailer so high up. But knowing that it isn't necessary to submerse the trailer virtually entirely inside the lake for retrieval, I'll experiment to see what works.
 

Attachments

  • photo271184.jpg
    photo271184.jpg
    30.1 KB · Views: 0
  • photo271185.jpg
    photo271185.jpg
    39.3 KB · Views: 0
  • photo271186.jpg
    photo271186.jpg
    35.3 KB · Views: 0

gm280

Supreme Mariner
Joined
Jun 26, 2011
Messages
14,605
Once you weld those up, that should work very well.

One thing I noticed looking at you boat sitting on the trailer. You have a tie down rope, or whatever, coming down from the transom and angling in to catch the eyelet there. That constant rubbing on the lower transom corner will eventually wear through. I would either move the hull forward on the trailer, to clear that issue, or weld in a longer piece to attach the transom tie down to. But that is just my opinion. JMHO
 

bruceb58

Supreme Mariner
Joined
Mar 5, 2006
Messages
30,581
If you know how to weld, this is a good style to do. You have the option of adjusting them in and out with the set bolt:

20160215_141917.jpg


20160215_141907.jpg
 

Joolz

Petty Officer 1st Class
Joined
Aug 13, 2015
Messages
211
That constant rubbing on the lower transom corner will eventually wear through.

Great catch, that is not something I was aware of and I totally agree that this should be addressed. Especially when you consider just how old and hardened that rope is. So weathered that it's acting as a file chewing through that part of the hull - glad you saw it and pointed it out.
Don't think I can trust my welding skills to extend that eyelet so for now I'll place something soft in between the rope and the hull to prevent rubbing.

Bruceb58 you're giving my welding ability far too much credit. This here would be my very first attempt at welding. But confident I can pull it off. Like the idea of having these horizontal guides but not as a primary (as part of the advantage of the style I'm working on is the ability to backup an invisible empty trailer). Now that I'm this close to having the vertical guides done, I may very well try something similar to yours in the near future. Since my guides will be about 2" away from either side of the rub rail, I'm still concerned that the boat won't be dead centre on the trailer (in order to clear the front of the boat that's wider by 4"). Your guides would eliminate any doubt about it being spot on.
Do you recall what sizes those tubes are?
Have to say, between my nice cutoff wheel and the huge grinding stone in the grinder, I have been having fun cutting and reshaping metal. Even managing to getting angles spot on since I can fine tune my cuts with the grinder. This could be a good project to expand on my new found fun with metal fabrication.
 
Top