Mercruiser 4.3 Vortec Backfire and no start

Superjetjim

Petty Officer 1st Class
Joined
Jun 5, 2010
Messages
222
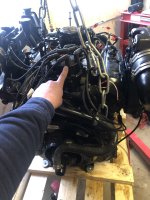
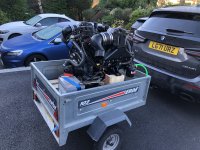
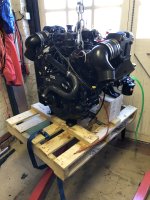
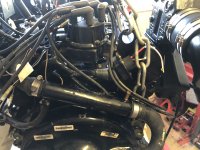
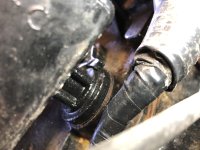
Hi guys, quick update on the testing of my motor this weekend. I built a test rig out of a crate and tried to start it, it turns over but doesn’t sound like it wants to start and then I had a couple of big back fires.
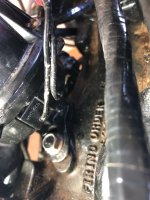
Believe they come out exhaust. I know I took the distributor out whilst working on the engine and put it back in again visually in the position I think it came from (although didn’t mark it, school boy error)

I think the timing is probably miles out?

Is there any way to baseline where this distributor should sit, I.e. is there a notch that should be lined up on the retaining knuckle and the casting? I have a clean bright spark on all cylinders.

Motor is a 1998 4.3 Vortec and SN is in the pics.

Thanks!
 

Attachments

  • 80E3C879-7A21-4030-97A4-443EA81461A9.jpeg
    80E3C879-7A21-4030-97A4-443EA81461A9.jpeg
    4 MB · Views: 10
  • 757AF252-FDE4-455B-823D-2CC666137D44.jpeg
    757AF252-FDE4-455B-823D-2CC666137D44.jpeg
    1.6 MB · Views: 10
  • FF45B11D-90AC-4534-A6F3-4C0A2006EE98.jpeg
    FF45B11D-90AC-4534-A6F3-4C0A2006EE98.jpeg
    1.6 MB · Views: 10
  • 001BF63C-65FC-4231-BF83-8615D15DC391.jpeg
    001BF63C-65FC-4231-BF83-8615D15DC391.jpeg
    1.5 MB · Views: 11
  • EB2E1319-81E7-4002-A37F-07F8B4DF460D.jpeg
    EB2E1319-81E7-4002-A37F-07F8B4DF460D.jpeg
    1.7 MB · Views: 11
  • EA567C8F-AD4D-4D0F-9BA6-23BB04E01C13.jpeg
    EA567C8F-AD4D-4D0F-9BA6-23BB04E01C13.jpeg
    2.4 MB · Views: 11

Bondo

Moderator
Staff member
Joined
Apr 17, 2002
Messages
71,079
Is there any way to baseline where this distributor should sit, I.e. is there a notch that should be lined up on the retaining knuckle and the casting?

Ayuh,..... Gas motors 101,.... Pull the distributor, roll the motor over to Tdc, #1, compression stroke, With the cap off the distributor, drop it in with the rotor pointed at the #1 terminal, put the cap back on, fire it up, 'n set the timin' with a timing light,......
 

Scott06

Admiral
Joined
Apr 20, 2014
Messages
6,724
Ayuh,..... Gas motors 101,.... Pull the distributor, roll the motor over to Tdc, #1, compression stroke, With the cap off the distributor, drop it in with the rotor pointed at the #1 terminal, put the cap back on, fire it up, 'n set the timin' with a timing light,......
What he said … leave the hold down loose if it doesn’t fire twist distributor while cranking to find a spot where it will run enough to set timing
 

Lou C

Supreme Mariner
Joined
Nov 10, 2002
Messages
13,024
That’s how I did my old Chevrolet 4.3 V6 after I replaced the cyl heads but I have the old Prestolite points distributor. That will get the distributor in the right position but I’m wondering if there is a special timing procedure with the Merc electronic ignition since they don’t use a mechanical (centrifugal) advance system like the old units do…
 

todhunter

Canoeist
Joined
Sep 15, 2020
Messages
1,319
That’s how I did my old Chevrolet 4.3 V6 after I replaced the cyl heads but I have the old Prestolite points distributor. That will get the distributor in the right position but I’m wondering if there is a special timing procedure with the Merc electronic ignition since they don’t use a mechanical (centrifugal) advance system like the old units do…
Nah, TB IV is just as Bondo described. Advance won't kick in until around 900 RPM (I think).
 

MichaelBC

Petty Officer 2nd Class
Joined
Feb 28, 2020
Messages
110
The Point is that the camshaft makes 2 turns while the distrubutor does only 1 turn. To be sure you can remove the cap of the cylinder head and make sure that both valves of cylinder #1 are closed when piston #1 is at the highest point. This is the point where distributor finger points to contact of cylinder #1. Fine tuning with engine running as described.
 

Superjetjim

Petty Officer 1st Class
Joined
Jun 5, 2010
Messages
222
Thanks guys, I’m a two-stroke guy and find this highly confusing, sorry.
Is this video exactly correct and what you’re talking about?


Lou C

Supreme Mariner
Joined
Nov 10, 2002
Messages
13,024
Yep he explains it pretty well. You have to make sure that when the line on the harmonic balancer lines up with the zero or TDC mark on the timing chain cover that the #1 cylinder is at TDC of the compression stroke, that is, both the intake and exhaust valves are closed. You can take off the port side valve cover to check. You might need a long large screwdriver to turn the oil pump drive so that the slot in the bottom of the distributor fits into it. And don't forget the gasket. If you turn the crankshaft through a few cycles & watch the valves of #1 cyl you can see when they both close (they will be all the way up, when they move downward is when they are open). It will be easier to turn the engine over if you remove all the spark plugs.
 

Superjetjim

Petty Officer 1st Class
Joined
Jun 5, 2010
Messages
222
Found an American car service specialist a few miles away. Might take it there tomorrow and get them to do it, I’m out my depth here and don’t have a timing light either. 👍🏻
 

Scott06

Admiral
Joined
Apr 20, 2014
Messages
6,724
Thanks guys, I’m a two-stroke guy and find this highly confusing, sorry.
Is this video exactly correct and what you’re talking about?

Yes needs to be on compression stroke . If you cant see your rockers to verify both valves are closed put your thumb over the spark plug hole. It will only build pressure coming up on compression stroke not exhaust.
if you time it on tdc of the exhaust stroke it will back fire as ignition will happen while valve is open…
 

nola mike

Vice Admiral
Joined
Apr 22, 2009
Messages
5,407
Found an American car service specialist a few miles away. Might take it there tomorrow and get them to do it, I’m out my depth here and don’t have a timing light either. 👍🏻
Nah, it's pretty easy, you can't screw anything up too much. You should get a timing light if you plan on doing any of your own work.
 

Lou C

Supreme Mariner
Joined
Nov 10, 2002
Messages
13,024
Yep you can do it. 1970s auto shop 101. Get a timing light & a Mercruiser shop manual.
 

Scott Danforth

Grumpy Vintage Moderator still playing with boats
Staff member
Joined
Jul 23, 2011
Messages
50,230
Agreed, stabbing a dizzy and setting timing is basic stuff.

This is why autos class should still be taught in high school.
 

Lou C

Supreme Mariner
Joined
Nov 10, 2002
Messages
13,024
That engine technology wise is about on the level of a 1977 GM V6. Simple carb, electronic ignition, the only thing this has that GM V6s didn’t have then is the balance shaft. Mark the position of #1 plug wire on the dist cap on the dist body. Then remove the port side valve cover so you can watch the intake & exhaust valves on the #1 cylinder. Then just follow what’s shown in the video. When I did my top end overhaul 5 years ago it was the first time I ever took apart a four stroke engine besides lawnmower engines although I’ve maintained my vehicles since the early 70s. Learned on flat four air cooled VWs and small block Chevrolets.
The beauty of these GM based marine engines is their simplicity low parts cost and cast iron construction. They are much simpler and cheaper to repair than modern outboards.
 

Superjetjim

Petty Officer 1st Class
Joined
Jun 5, 2010
Messages
222
Thanks for the help guys, I’ve just been looking at the motor, this is where the number one HT lead connects to the current distributor, it appears to be exiting the back not the front of the distributor pointing towards number one cylinder where you would expect it to right?
 

Attachments

  • 07F36257-D0A4-4059-821B-C424EFE601FD.jpeg
    07F36257-D0A4-4059-821B-C424EFE601FD.jpeg
    1.5 MB · Views: 5
  • 0A63FAAD-5E94-4234-B416-90EC7E85681B.jpeg
    0A63FAAD-5E94-4234-B416-90EC7E85681B.jpeg
    1.7 MB · Views: 5

Superjetjim

Petty Officer 1st Class
Joined
Jun 5, 2010
Messages
222
That engine technology wise is about on the level of a 1977 GM V6. Simple carb, electronic ignition, the only thing this has that GM V6s didn’t have then is the balance shaft. Mark the position of #1 plug wire on the dist cap on the dist body. Then remove the port side valve cover so you can watch the intake & exhaust valves on the #1 cylinder. Then just follow what’s shown in the video. When I did my top end overhaul 5 years ago it was the first time I ever took apart a four stroke engine besides lawnmower engines although I’ve maintained my vehicles since the early 70s. Learned on flat four air cooled VWs and small block Chevrolets.
The beauty of these GM based marine engines is their simplicity low parts cost and cast iron construction. They are much simpler and cheaper to repair than modern outboards.
Thanks, so when the TDC lines on the flywheel and cases aligned and both valves on No1 are down that’s the TDC I want right?
Then set the disi as per the video?
 

nola mike

Vice Admiral
Joined
Apr 22, 2009
Messages
5,407
Thanks for the help guys, I’ve just been looking at the motor, this is where the number one HT lead connects to the current distributor, it appears to be exiting the back not the front of the distributor pointing towards number one cylinder where you would expect it to right?
Who knows. After messing with the distributor your #1 can be anywhere. At this point you have to start from scratch
 

Scott06

Admiral
Joined
Apr 20, 2014
Messages
6,724
Thanks, so when the TDC lines on the flywheel and cases aligned and both valves on No1 are down that’s the TDC I want right?
Then set the disi as per the video?
Not flywheel on the balancer don’t worry about where dist is now you will be pulling it out to retime anyways

You are 180 degrees out being on exhaust stroke so #1 will have to move
 

todhunter

Canoeist
Joined
Sep 15, 2020
Messages
1,319
Thanks, so when the TDC lines on the flywheel and cases aligned and both valves on No1 are down that’s the TDC I want right?
Then set the disi as per the video?
BLUE TEXT - No, TDC lines on the harmonic balancer (front of the engine), not the flywheel (back of the engine).

RED TEXT - No, you want both valves to be closed (up, not down). You should be able to wiggle the rockers and verify they are not pushing down on either intake or exhaust valve when you are at TDC.
 
Top