cptnmcluvin
Seaman
- Joined
- Jul 29, 2010
- Messages
- 72
Mini project: Installing pop up cleats.
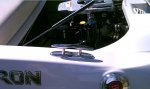
Summary: FYI, View attachment 135645This was an easy and inexpensive hull modification that anyone can do.
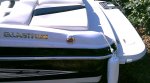
Problem: Glastron installed the rear cleats on my 2011 Glaston GT 205 all the way back on the stern . The cleats are mounted above the swim platform facing inwards towards the center of the boat. I?ve found them difficult to reach from the rear seat. Also, when tying fenders to the rear cleats, the fenders roll away from the sides of the boat and end up on the stern against the swim platform. This leaves the sides of the boat unprotected when tied up to a dock or another boat.
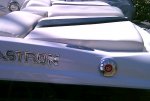
Solution: Install an additional set of pop up cleats on the rear gunwales about 20 inches forward from the original rear cleats.
Tools and materials: I ordered a pair of 6 inch pop up cleats from Attwood. They?re high quality stainless steel and look terrific. The project also required some ? inch scrap plywood, sand paper, poly resin, white spray paint, a small paint brush, a pencil, masking tape, T square, cordless drill, 1 inch hole saw, a ratchet, and 32 mm socket.
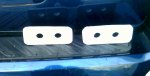
Step 1: cut out two 2.5 X 6 inch plywood backer. Drill two 7/8 inch holes in each backer so that the backer plate fits over the cleat posts. Sand them down and seal them up with poly resin. I painted my backer plates off white to match the color of the fiber glass underneath the gunwales.
Step 2: tape the gunwales where the holes are to be cut. I used a T square to measure 5 inches up from a distinct transition in the rear of the gunwales. Next, measure and mark the holes on the tape. The holes for this project were horizontally centered on the gunwales.
Step 3: Stand the cleats up on top of the hole measurements and make sure everything looks correct. Measure twice just to be sure. NOTE: I had already checked and confirmed there was no wiring underneath the gunwales. I checked again just to be sure.
Step 4: drill small pilot holes through the tape in the center of each hole?s location. Then use the hole saw to cut the 1 inch holes out using the pilot holes as guides. NOTE: The tape protects the gel coat finish on top of the gunwales. So, no blemishes were incurred during this project. The tape was pulled off after the holes were cut.
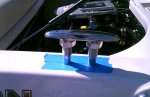
Step 5: Caulked the underside of the cleats with latex caulking and then install the cleats into the holes. The backer plates should be mounted from underneath the gunwales so that the cleat posts go through the holes of the backer plates. The nuts and washer on the cleat posts underneath the gunwales should be tightened up against the backer plates. The backer plates distribute the pressure from the fasteners across a larger area of the gunwales. This makes the solution much sturdier and less likely to damage the fiber glass gunwales.
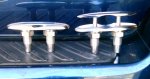
Step 6: Test out the new pop up cleats. They look great and work exactly as planned.
These little projects help me look forward to the coming season!!!
Summary: FYI, View attachment 135645This was an easy and inexpensive hull modification that anyone can do.
Problem: Glastron installed the rear cleats on my 2011 Glaston GT 205 all the way back on the stern . The cleats are mounted above the swim platform facing inwards towards the center of the boat. I?ve found them difficult to reach from the rear seat. Also, when tying fenders to the rear cleats, the fenders roll away from the sides of the boat and end up on the stern against the swim platform. This leaves the sides of the boat unprotected when tied up to a dock or another boat.
Solution: Install an additional set of pop up cleats on the rear gunwales about 20 inches forward from the original rear cleats.
Tools and materials: I ordered a pair of 6 inch pop up cleats from Attwood. They?re high quality stainless steel and look terrific. The project also required some ? inch scrap plywood, sand paper, poly resin, white spray paint, a small paint brush, a pencil, masking tape, T square, cordless drill, 1 inch hole saw, a ratchet, and 32 mm socket.
Step 1: cut out two 2.5 X 6 inch plywood backer. Drill two 7/8 inch holes in each backer so that the backer plate fits over the cleat posts. Sand them down and seal them up with poly resin. I painted my backer plates off white to match the color of the fiber glass underneath the gunwales.
Step 2: tape the gunwales where the holes are to be cut. I used a T square to measure 5 inches up from a distinct transition in the rear of the gunwales. Next, measure and mark the holes on the tape. The holes for this project were horizontally centered on the gunwales.
Step 3: Stand the cleats up on top of the hole measurements and make sure everything looks correct. Measure twice just to be sure. NOTE: I had already checked and confirmed there was no wiring underneath the gunwales. I checked again just to be sure.
Step 4: drill small pilot holes through the tape in the center of each hole?s location. Then use the hole saw to cut the 1 inch holes out using the pilot holes as guides. NOTE: The tape protects the gel coat finish on top of the gunwales. So, no blemishes were incurred during this project. The tape was pulled off after the holes were cut.
Step 5: Caulked the underside of the cleats with latex caulking and then install the cleats into the holes. The backer plates should be mounted from underneath the gunwales so that the cleat posts go through the holes of the backer plates. The nuts and washer on the cleat posts underneath the gunwales should be tightened up against the backer plates. The backer plates distribute the pressure from the fasteners across a larger area of the gunwales. This makes the solution much sturdier and less likely to damage the fiber glass gunwales.
Step 6: Test out the new pop up cleats. They look great and work exactly as planned.
These little projects help me look forward to the coming season!!!