


hkeiner
Lieutenant Junior Grade
- Joined
- Oct 17, 2006
- Messages
- 1,055
I have a 1996 Mercury 150 V6 carbed outboard motor. I pretty much understand the link and sync steps except for the Primary Pickup Timing Adjustment step. I am just not clear on what the idle timing specs mean and figure I may be misunderstanding something. I figure it is better that clear it up before I mess up my motor by setting the idle timing wrong. I do understand what TDC, BTDC, and ATDC mean and how to set timing to a specified degree with a timing light and timing pointer and with engine cranked with starter or running at idle. However, these are my questions:
1) What are the Idle Speed/Pickup Timing specs of 0 degrees to 9 degrees ATDC intended to mean? Is it a range of acceptable idle timing settings or are the 0 degrees and 9 degree ATDC specs discrete and applicable to different timing steps?
2) Should one set the timing to 0 degrees, 9 degrees ATDC, or the midway point between these two settings, when using a timing light in step B below?
3) If the final timing setting (i.e., adjustment of the throttle primary pickup screw in step F below) is based upon RPM with engine running, and not based on a timing light with engine cranked by starter, why don't they just suggest a single timing light spec to start with, rather than a range? It does not seem logical.
4) Finally, if one wants to merely check that the Primary Pickup Timing Adjustment is OK, would one only confirm that the timing is between the range of 0 degrees and 9 degress ATDC usng a timing light with engine idling and that the idle RPM is within the 600 to 700 RPM range using a good tachometer? And if so, leave the throttle primary pickup screw alone and don't mess with it!!
Any insight on this would be very much appreciated.
Regards
---------------------------------------------------------------------------
The Mercury and Seloc manuals provides (in brief) the following relevant guidance:
PRIMARY PICKUP TIMEING ADJUSTMENT
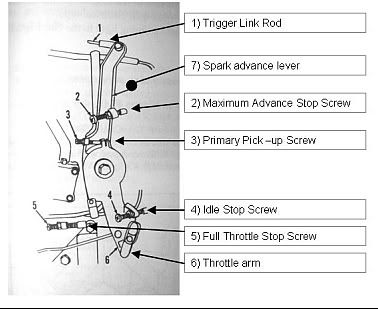
A) Disconnect the idle stabilizer box, remove spark plugs, and connect timing light to number one plug wire.
B) With engine in neutral, hold the throttle arm so that the idle stop screw is against the idle stop. Crank engine with starter motor ands adjust the throttle primary pickup screw to align specified throttle primary pickup mark on the timing decal with the timing pointer. Retighten nut on adjustment screw.
C) All timing adjustments made to the outboard under cranking speed condition should be verified with the outboard running and adjustments made if necessary. This is due to the advance charge characteristics of the individual ignition systems.
IDLE SPEED ADJUSTMENT
D) Reconnect the idle stabilizer box, remove the timing light, and install all spark plugs. With engine in water, start engine and allow it to warm up. Place engine in gear.
F) If engine RPM is above or below the recommended RPM specifications, readjust the throttle primary pickup screw to attain the recommended RPM. Retighten nut on adjustment screw.
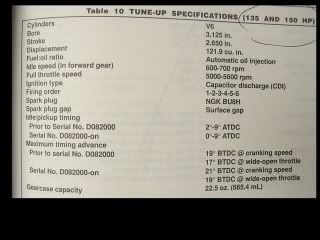
1) What are the Idle Speed/Pickup Timing specs of 0 degrees to 9 degrees ATDC intended to mean? Is it a range of acceptable idle timing settings or are the 0 degrees and 9 degree ATDC specs discrete and applicable to different timing steps?
2) Should one set the timing to 0 degrees, 9 degrees ATDC, or the midway point between these two settings, when using a timing light in step B below?
3) If the final timing setting (i.e., adjustment of the throttle primary pickup screw in step F below) is based upon RPM with engine running, and not based on a timing light with engine cranked by starter, why don't they just suggest a single timing light spec to start with, rather than a range? It does not seem logical.
4) Finally, if one wants to merely check that the Primary Pickup Timing Adjustment is OK, would one only confirm that the timing is between the range of 0 degrees and 9 degress ATDC usng a timing light with engine idling and that the idle RPM is within the 600 to 700 RPM range using a good tachometer? And if so, leave the throttle primary pickup screw alone and don't mess with it!!
Any insight on this would be very much appreciated.
Regards
---------------------------------------------------------------------------
The Mercury and Seloc manuals provides (in brief) the following relevant guidance:
PRIMARY PICKUP TIMEING ADJUSTMENT
A) Disconnect the idle stabilizer box, remove spark plugs, and connect timing light to number one plug wire.
B) With engine in neutral, hold the throttle arm so that the idle stop screw is against the idle stop. Crank engine with starter motor ands adjust the throttle primary pickup screw to align specified throttle primary pickup mark on the timing decal with the timing pointer. Retighten nut on adjustment screw.
C) All timing adjustments made to the outboard under cranking speed condition should be verified with the outboard running and adjustments made if necessary. This is due to the advance charge characteristics of the individual ignition systems.
IDLE SPEED ADJUSTMENT
D) Reconnect the idle stabilizer box, remove the timing light, and install all spark plugs. With engine in water, start engine and allow it to warm up. Place engine in gear.
F) If engine RPM is above or below the recommended RPM specifications, readjust the throttle primary pickup screw to attain the recommended RPM. Retighten nut on adjustment screw.
Last edited: