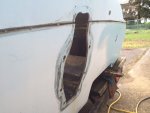
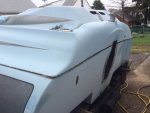
New Project... SleekCraft Aristocrat... Some questions...

Woodonglass

Supreme Mariner
Joined
Dec 29, 2009
Messages
25,929
I did my own upholstery as did several others here on the forum. Let me know if you need some help with vinyl and supply vendors. I've got some good ones. Corjen1 is one of the best along with sphelps, Bruceb, mrdjflores Jimmy Wise and others. If you need any help all of these guys KNOW their way around a sewing machine. Is that a Model 66. I have a 15-91 and love it. Those old Singers will sew just about anything you stick under the foot.

This should help you out with the transom... The manual states Alpah I Gen II thickness is same as all the rest...Maximum of 2 1/4"


http://www.marine-j.com/pdf/alpha1.pd


f
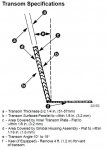
Transom Thickness.JPG
 
Last edited:

bigblock454

Petty Officer 1st Class
Joined
Apr 28, 2008
Messages
206
Thanks WOG! I wonder why original one was so darn thick! Anyway, I will go with "known" specifications, as we know 2 1/4" will work! Funny thing is, I thought I was bidding on a 15–91. That one got sold, I thought the seller was readvertising it, and wound up purchasing this one! No big deal, as it is still up to the taskk.
 

bigblock454

Petty Officer 1st Class
Joined
Apr 28, 2008
Messages
206
I forgot to answer one of your questions. It is a 15?90. Seems to be in great shape, and sows great!
 

harleyman1975

Ensign
Joined
May 12, 2003
Messages
959
That is the Fonzi of the forest dude! Love it! how about a little of Kosmoski's Metal flake buried under 3 coats of clear then sanded and polished?
 

GA_Boater

Honorary Moderator Emeritus
Joined
May 24, 2011
Messages
49,038
One reason for Mecruiser transom thickness requirement is maintaining optimum depth of the splines in the coupler because the splines do move in and out some as the drive is trimmed. A thicker transom will have reduced spline/coupler contact.

That extra 1/2 inch can lead to premature coupler failure. It's good that you are going with the 2" to 2 1/4". The 383 will be stressing the coupler enough. :D
 

Woodonglass

Supreme Mariner
Joined
Dec 29, 2009
Messages
25,929
Let me know if you need any help with that machine. I've learned a LOT about the MODEL 15's in the past 3-4 years. I've torn them down a put em together many times. I can guide you to just about any part, manual, or anything else you might need. Just let me know what you need and I'll be glad to assist. I will tell you right now if you don't have an adjustable zipper foot Get one!!! Use #18 needles and #92 bonded polyester Thread. If you're gunna put welting/piping on your seats a cheap alternate cording to use is vinyl window screen spline. Comes in all sizes and it won't rot.
 

Corjen1

Lieutenant Junior Grade
Joined
Aug 24, 2013
Messages
1,237
Cool Boat BigBlock!! Mind if I tag along for the build? Those old singers are amazing!! I did my boat with a Morse 4300 zig zag and Singer 15-91. Great machines, I have gone thru 8 layers of vinyl and screen door spline with the singer.

This is the best project Ive seen for starting on upholstery....it has just about every skill you will need for marine applications and you will get a good butt pad for your stitching chair when you start your real stuff.

https://www.youtube.com/watch?v=VFt26lYYAkE

Here is mine:


Dont know if you are going to be doing pleats or tuck and roll... but this is my favorite method for them...

http://www.jalopyjournal.com/forum/...nd-rolls-and-pleats-and-a-small-panel.372599/

Anyway, good luck with your build Sir!
 

sphelps

Supreme Mariner
Joined
Nov 16, 2011
Messages
11,475
Aww man I gotta follow along on this one if there's room ! I have an old 70's go fast o/b waiting in the shed that I could use some idea's on ...
Your build has all the kool stuff involved ... Making windshield ,which I hope to do , home made upholstery, and maybe some metal flake paint , another thing on my list of things to try and pull off successfully... :cool: Can't wait to see what ya have in store for it ! :pop2:
 

bigblock454

Petty Officer 1st Class
Joined
Apr 28, 2008
Messages
206
Fonzi of the Forest Harley? I hope that's good! Heeeeyyy... Unfortunately, I'm old enough to remember "The Fonz"! :thumb: Thanks GA... I;m having a "internal battle" about going thinner than factory for the transom, but certainly don't want the trouble that can come from being too thick. Still wondering "why so thick, when she came equipt with a merc I/O" Wondering if because of lack of stringers?? Was sleekcraft compensating for this with a thicker transom?? There was no "routed out" thinner area either. The whole thing was about 2 3/4" thick! That's the first thing that caught my eye when looking at her before acquiring her. BTW... I should say... I got her completely gutted. No seats, no motor/drive... nothing. She does have both of her alum gas tanks (20 gal ea), and most of her trim pieces. I like the "blank slate" and I'm mechanically as well as financially able to get her back into the water. WOG, that was darn decent of you to offer the "stitch assist" as well as mentioning those well respected iboaters. I will certainly continue to tap their all inspiring resources! Speak of (one of the) devils! Welcome Corjen1! I will be leaning on all the awesome info here, and can't wait to "get my feet wet" with some stitching experience just like you've shown! Very fortunate that the "interior" of these boats is very simple. I do intend to create my own seat forms (two buckets and a bench), and do NOT intend to farm that out, so I will keep that all right here! Welcome aboard "spelphs", lets do it! Thank you Kilecho... Thank you all! I spent this weekend (up until now) getting my "Classic" ready for the water, but also sharing time with the little "sleek". Still shaking my head at the thickness of the original transom! Lets see what today brings!! Thanks again!

Norm
 

Bondo

Moderator
Staff member
Joined
Apr 17, 2002
Messages
71,082
Ayuh,.... I donno why the transom was so thick, but it's a rather poor install, all 'round,....

The transom didn't even go to the top of the keyhole like it should,....

Seein's yer startin' over, I suggest ya do it Right, rather than the way ya found it,....

Shoot for 2", true flat, 'n even, All 'round the keyhole, anywhere the transom housin', or transom plate touch the transom,.....
 

GA_Boater

Honorary Moderator Emeritus
Joined
May 24, 2011
Messages
49,038
I'm glad you saw the top of the keyhole too, Bondo. I thought my eyes were playing tricks.
 

bigblock454

Petty Officer 1st Class
Joined
Apr 28, 2008
Messages
206
Alright gents, that's why I'm here. I want to do it right. I believe the transom wood doesn't go all the way up because of the "cap". Looks like the builders installed transom wood before the cap went on. Thing is, I was wanting to remove cap after replacing transom also. I guess if I am to do this "right", I may need to re-plan. I was going to redo all as the builders did, as the boats seemed to do pretty good "as built", but I know that there's always room for improvement. Thanks for the input, and any direction you can point me to. I'm sitting here mulling over coosa or ply, epoxy or poly (the usual thread killers), and it looks like I now have bigger things to consider! Thanks again!

Norm
 

bigblock454

Petty Officer 1st Class
Joined
Apr 28, 2008
Messages
206
Maybe a couple of pics from back of transom will help show what the original builder did.

Transom02.JPG

Transom01.JPG
 

bigblock454

Petty Officer 1st Class
Joined
Apr 28, 2008
Messages
206
It seems that perhaps since this is a "tunnel hull" type of design and the fact that she's not very tall at all (freeboard ?), that maybe some rather unorthodox methods may have been used? Again, I need to stress the desire to do it right. Thanks for your help.

Norm
 

Bondo

Moderator
Staff member
Joined
Apr 17, 2002
Messages
71,082
It seems that perhaps since this is a "tunnel hull" type of design and the fact that she's not very tall at all (freeboard ?), that maybe some rather unorthodox methods may have been used?

Ayuh,..... My guess is, that hull as it came from the mold, was for a Jet-drive,.....

Whether it was built new, or rebuilt as a sterndrive, I donno,....

Who knows what's happened to it over the last 40 years,.....
 

bigblock454

Petty Officer 1st Class
Joined
Apr 28, 2008
Messages
206
She was bought originally as an I/O. I bought it from the original owners buddy. I have the original paperwork for her as well. But that is good thinking! These boats were predominately jets, and the I/O the rarity, so the build may have leaned more toward jet type of construction. These hulls, however were offered with choice of drives, either outboard, jet, or I/O. They looked funny (to me) with the outboard, because the boat is so low, that the motor (usually huge) towered over the rest of her! Anyway, I'm here to right all wrongs and do her properly. Glad I decided to post the project here BEFORE starting the transom! I think I will go with 3/4" ply (laminated to thickness), and epoxy. I like the epoxy's bond characteristics, and am familiar with it. Was considering the coosa board, but don't believe I need to go THAT extreme!

Norm
 

bigblock454

Petty Officer 1st Class
Joined
Apr 28, 2008
Messages
206
Spreading myself a little thin here working on both boats, but enjoying getting the (sanding) muscles moving again after the Winter hibernation! I've decided on epoxy and plywood for my transom rebuild. I will be figuring out what I need to order (yards and gallons), and from whom to order from. My transom is 73" across and 24 inches high. I will be adding a little to the height (26" total) in the center part to give the out drive a nice sturdy surface all around the "keyhole" to mount to (thanks Bondo and GA). My 383 is back from the machine shop! I hired them to also do the assembly, nice to have that done. They had to "clearance" block for the larger stroke of the crank and all that goes along with that. It's a factory "roller" block, so I will be going with a comp cams XM 270 HR. The shop is doing my heads (vortec) now, so I had to give them my valvetrain for assembly. It's a good "low to mid" cam, so I think it will be a good "daily" performer. Back to the transom... I picked up some 3/4" blue foam board to trace it out. Thinking it'll be easiest to just trace around the outside of the hull and subtract a little to account for the hull thickness. She has a lot of odd shapes going on back there with the "tunnels", so I feel this will give me an accurate template. Oh... I did measure the thickness of the transom outer "skin". It is 1/4" thick. I mention this because earlier I stated that it was 3/8" thick. My eyes were out of calibration! So that means my transom total thickness was 2 3/8" thick plus a layer of thin glass cloth, so maybe 2 7/16" thick! I will be shooting for 2" as recommended by the respected experience of fellow iboaters here. Now, to pull up some old treads on how much to purchase and a laminating "schedule"! I see some iboaters are putting a layer of CSM between laminations, while others are just "gluing" the layers together, with some very respected folks even using "PL" glue to bond the layers! Will mull over the best way for me to do it and hit my 2" target. Thanks for any advice!

Norm
 

Bondo

Moderator
Staff member
Joined
Apr 17, 2002
Messages
71,082
. My 383 is back from the machine shop! I hired them to also do the assembly, nice to have that done. They had to "clearance" block for the larger stroke of the crank and all that goes along with that. It's a factory "roller" block, so I will be going with a comp cams XM 270 HR. The shop is doing my heads (vortec) now, so I had to give them my valvetrain for assembly. It's a good "low to mid" cam, so I think it will be a good "daily" performer.

Ayuh,.... Check out the I/Os, Non-repair forum for some Great cam conversations,.....

Ya runnin' stock manifolds,..?? risers,..??
Thru-hull or thru-prop,..??

Whatcha thinkin' for induction,..??
The Edlebrock 1409 carb is the same as the Merc/ Weber 9600 series,...
 

bigblock454

Petty Officer 1st Class
Joined
Apr 28, 2008
Messages
206
Hey Bondo thanks for the Non-repair forum tip. I will mosey over there!

I'm loving the EMI Thunder with through hull (more like "through cap" for me) exhaust! Love the tone my buddy gets with his!

Edlebrock Performer RPM (dual plane)

650 Holley
 
Top