Hi,
I have a 79 lund 19' with a 228 mercruiser I/O engine.
I started this project and of course, the deeper I dig the more I have to do...
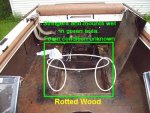
My original plan was to pull and rebuild the engine over the winter and then in the spring fix the soft spot in the floor, install the engine and use it for the summer before I started upholstry and new seats. The soft spot is a hatch for access to the fuel tank and was poorly built.
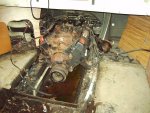
So I've taken most of the components off the engine and all that is holding it in place now are 2 bolts in the rear and the motor mounts. I just need to build a gantry to pull it.
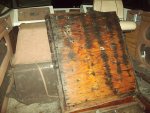
I decided to pull that hatch up and get a peak as to whats below. A lot more work than I expected given how solid the floor feels.
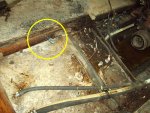
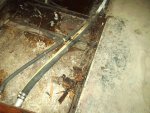
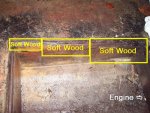
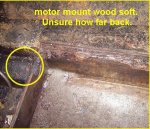
The wood around the area that had the hatch is shot. Upon more digging, I also realized that the stringer part that supports the engine is also soft. I was able to dig my finger in the end and pull out clumps of wet and rotted wood.
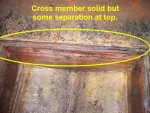
However the wood up front of the hatch that I can see is solid. So is the floor. But if I'm gonna tear up half the floor to redo, I may as well do it all.
So I'll redo the stringers & floor before winter and rebuild the engine for installation in the spring.
I've searched and read a lot of posts on this here and it looks like theres a lot of different ways to do this. Upon checking out materials, I've decided to just use treated plywood. I want to perform the floor repair in the most cost effective manner, yet still have a solid floor that will last a few years.
What I would like to find, and haven't been able to locate, are step by step instructions on how best to perform this task from pulling the old floor and stringers to installing the new. I can get bits and pieces from reading different posts, but trying to put it all together can be difficult. I am getting confused as to the best way to pull the old, dos & donts, what to resin and what to glass, how many coats of glass, the best way to do that, what glass to use, what resins to use, etc.....you get the point.
I love to find something like:
Step 1: do this
Step 2: do this
Step 3: do this
That way I can do one step at a time and when all the steps are done, so am I.....
Can someone who knows all the steps put them on this post. I'll bet I'm not the only one who would benefit from that. Help would be appreciated. I hate doing anything half-right.
I'll include pics of the damage.
What I thought might also help others is if I take a pic of each step so that others can see them as they are completed.
I have a 79 lund 19' with a 228 mercruiser I/O engine.
I started this project and of course, the deeper I dig the more I have to do...
My original plan was to pull and rebuild the engine over the winter and then in the spring fix the soft spot in the floor, install the engine and use it for the summer before I started upholstry and new seats. The soft spot is a hatch for access to the fuel tank and was poorly built.
So I've taken most of the components off the engine and all that is holding it in place now are 2 bolts in the rear and the motor mounts. I just need to build a gantry to pull it.
I decided to pull that hatch up and get a peak as to whats below. A lot more work than I expected given how solid the floor feels.
The wood around the area that had the hatch is shot. Upon more digging, I also realized that the stringer part that supports the engine is also soft. I was able to dig my finger in the end and pull out clumps of wet and rotted wood.
However the wood up front of the hatch that I can see is solid. So is the floor. But if I'm gonna tear up half the floor to redo, I may as well do it all.
So I'll redo the stringers & floor before winter and rebuild the engine for installation in the spring.
I've searched and read a lot of posts on this here and it looks like theres a lot of different ways to do this. Upon checking out materials, I've decided to just use treated plywood. I want to perform the floor repair in the most cost effective manner, yet still have a solid floor that will last a few years.
What I would like to find, and haven't been able to locate, are step by step instructions on how best to perform this task from pulling the old floor and stringers to installing the new. I can get bits and pieces from reading different posts, but trying to put it all together can be difficult. I am getting confused as to the best way to pull the old, dos & donts, what to resin and what to glass, how many coats of glass, the best way to do that, what glass to use, what resins to use, etc.....you get the point.
I love to find something like:
Step 1: do this
Step 2: do this
Step 3: do this
That way I can do one step at a time and when all the steps are done, so am I.....
Can someone who knows all the steps put them on this post. I'll bet I'm not the only one who would benefit from that. Help would be appreciated. I hate doing anything half-right.
I'll include pics of the damage.
What I thought might also help others is if I take a pic of each step so that others can see them as they are completed.