NO Budget Newbie replacing deck...some of it. (pics)

chillin014

Petty Officer 3rd Class
Joined
Jan 14, 2009
Messages
91
Hey all. This is my first post, so I'll give a short intro and continue through to my "issues".

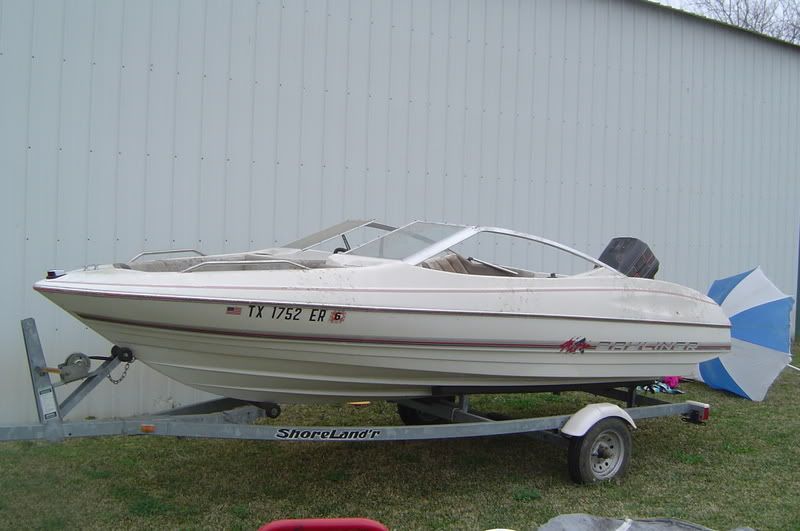
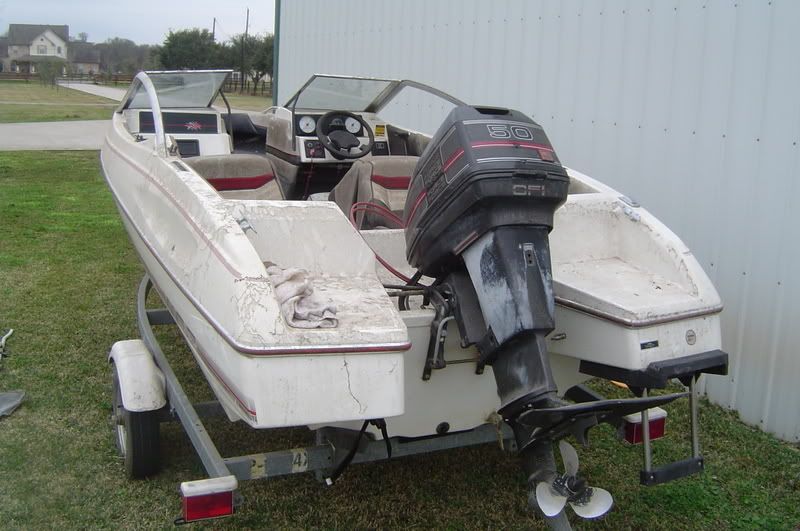
I am almost 20 years old and have recently obtained a '90 Bayliner Capri V-Hull that has been in our family since it was bought brand new. It was stored and garaged until a few years ago when it became a nuisance and was moved outside under a car port, uncovered. To make a long story short, Hurricane Ike came through, the drain plug was still in, and the boat sat for probably a year at least. It was given to me for free since that the value of the boat, as you may know, is poor at best and it wasn't being used.

I know I'm posting this in the "restoration" section but I want to make it very clear that I dont necessarily want to restore this boat. I just want to fix the floor and use it for a few years at most. Other than the holes in the floor it seems to be a solid boat. However, I've been reading over the site and there is some great workmanship and cool resto-projects so I figured I'd ask for advice regardless.

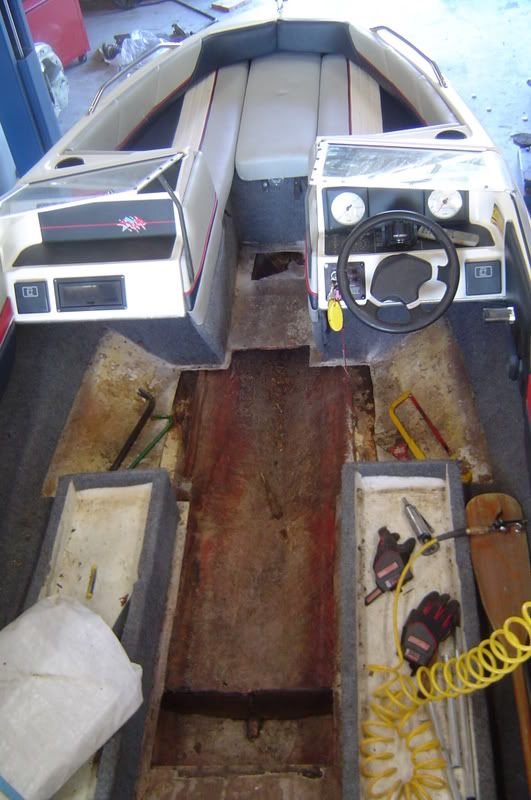
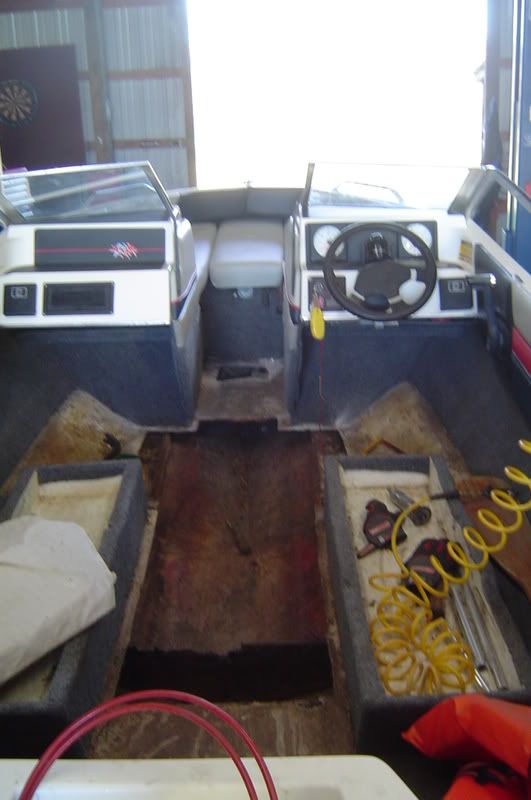
Sorry for the long-windedness. So far I've cut out the rotted wood where it was easiest and most logical to replace it for what I'm trying to accomplish here. The seat mounting boxes seem very solid, I'm not even sure how they are mounted in there but I dont want to pull them up. I thought they were entirely on top of plywood but as I tried to "dig" under them I started hitting the foam as if the ply wood only went under an inch or two. So I'm wondering if I can just ignore than and maybe slide a piece of ply wood under them and have it supported by the fiberglass framing of the boat or if I'm going to have to just lay the wood right down and know that there is an inch of nothing on the perimeters of each seat box.

I have a general idea of how I want to lay down the wood but I am open to advice as well. I also want to know what preparation I should do to the CDX I will be using (already bought) if any, given my very very low-buck project here. I also have to replace a stinger or two (stingers are those support triangular pieces, right? On to the pics...
when purchased-extremely dirty
boat002.jpg

boat003.jpg

what I have cut out
boatfloor002.jpg

boatfloor001.jpg

my other boat:
1231434786855.jpg


I appreciate any advice!
 

F14CRAZY

Ensign
Joined
Aug 12, 2008
Messages
945
Re: NO Budget Newbie replacing deck...some of it. (pics)

Welcome to iBoats. I'm 21 and restoring my Bayliner...

What you'll want to do is take some "core samples" of the stringers and transom. You can search and find plenty of posts on it but basically you drill a hole into them and examine the shavings in several places along the stringers and transom. If they're dry, you lucked out and you can replace just the deck.

If they're moist, mulch-like, etc...then you've got a lot more to do. With wet/rotten stringers the boat loses A LOT of strength and thus isn't safe. It also can weigh a lot more and affect speed/handling.

I've gotta look over your pix again, but how's the foam? If the foam is soaked that all can add a few hundred pounds easily.

Sadly there's no way to dry out wet stringers or foam
 

jcsercsa

Captain
Joined
May 21, 2007
Messages
3,401
Re: NO Budget Newbie replacing deck...some of it. (pics)

Welcome and your in the right place !! we can walk you threw this if you decide to go for it !!

It just like F14Crazy said , if she was sitting with water in her the foam has to come out , it will weigh a ton when it gets water logged !!

So its up to you if you want to go for it but you got some work to do if you want to be safe out there !! John
 

chillin014

Petty Officer 3rd Class
Joined
Jan 14, 2009
Messages
91
Re: NO Budget Newbie replacing deck...some of it. (pics)

hey! yeah I was looking over your thread and decided to start my own haha. I'm not sure about the foam, or where all of it is. I'm a little behind on the terminology, but from what I could tell the foam was dry under where I pulled up the deck in front of the seat boxes. I really really do not want to nor do I plan to tear up the carpet. Its not that I am not competent enough to do the work, I just dont think this boat is worth the time/labor and money at this point in time.

Now you say the safety of the boat could be impaired, can you elaborate on that? The foam under the seat boxes felt dry as well..so I'm not sure where else to check or where water could be retained. What I want to know is...had there not already been a hole in the floor when the hurricane hit, would the water have gotten to the bottom anyway? I dont understand how these boats rot out, and how the water is getting inside. :confused:
 

chillin014

Petty Officer 3rd Class
Joined
Jan 14, 2009
Messages
91
Re: NO Budget Newbie replacing deck...some of it. (pics)

Welcome and your in the right place !! we can walk you threw this if you decide to go for it !!

It just like F14Crazy said , if she was sitting with water in her the foam has to come out , it will weigh a ton when it gets water logged !!

So its up to you if you want to go for it but you got some work to do if you want to be safe out there !! John

where is the foam exactly so I can check it and convince myself that its not water logged.
 

jcsercsa

Captain
Joined
May 21, 2007
Messages
3,401
Re: NO Budget Newbie replacing deck...some of it. (pics)

should be under the deck !! John
 

jcsercsa

Captain
Joined
May 21, 2007
Messages
3,401
Re: NO Budget Newbie replacing deck...some of it. (pics)

there wasnt any under the deck you allready pulled out ?? John
 

chillin014

Petty Officer 3rd Class
Joined
Jan 14, 2009
Messages
91
Re: NO Budget Newbie replacing deck...some of it. (pics)

in the picture where i cut out the wood and its shaped liek a "t". well the two areas where I cut a little wider, there is some foam right there on the surface but it is dry. in fact some of it chipped out in small chunks accidently. I didnt cut any wider because the wood was very hard and seemed fine.
 

jcsercsa

Captain
Joined
May 21, 2007
Messages
3,401
Re: NO Budget Newbie replacing deck...some of it. (pics)

Ok , there should have been ???? lol do like F14crazy said a take some core samples of the stringers and the transom !! John
 

chillin014

Petty Officer 3rd Class
Joined
Jan 14, 2009
Messages
91
Re: NO Budget Newbie replacing deck...some of it. (pics)

lol what? I'm saying there was foam! you can kind of see it in the pictures! I'll do the stringers and transom what not thing next chance I get. Any tips or advice on coating/sealing the wood panel(s) i'm going to put in there? I'm not sure what to use. Fiberglassing it seems like overkill given the nature of what i'm doing here.
 

F14CRAZY

Ensign
Joined
Aug 12, 2008
Messages
945
Re: NO Budget Newbie replacing deck...some of it. (pics)

I believe ya, but from the pix I'm not seeing the foam...there should be tons of it down there...

Water can get into wood through a lot of places. When "we" (on iboats) do something like attach the deck to stringers, the right way to do it is to figure out where the screws will be, then drill holes larger, fill with resin, drill a pilot hole into the epoxy, countersink the screws, and cover over with resin, THEN a layer or two of 1-2 oz fabric over the deck. Water WILL find its way in, eventually, somehow. Consider too, that from the factory, the stringers in my Capri weren't encapsulated/glassed in very well...there was foam between the wood of the stringer itself and the glass over it.

If you wanted to go cheap you would want to at least coat the deck with resin
 

redfury

Commander
Joined
Jul 16, 2006
Messages
2,657
Re: NO Budget Newbie replacing deck...some of it. (pics)

Well, first things first. WE need some clarity before we can give you honest and good help. The pictures honestly are pretty vague as to what was and wasn't there, so you'll need to answer some questions to the best of your ability. If you want to fix the boat up just to use for a little bit and not rebuild what was there, then there are somethings that you'll have to take into account when you do it so that you don't cause further damage by piece mealing the floor back in.

First, when you pulled the center section of wood/deck out...what condition was the wood in? Black, wet with black streaks, still looked like plywood but wet and broken....specifics like that.

Secondly, what exactly did you remove from the boat up to this point? Strictly the plywood that you cut out, or structural wood that formed stringers/braces/etc. Any large sections of foam, or just remnants of foam that were in there.

Third. Where is the foam in the boat. Since the boat had been essentially filled up like a soup bowl from a hurricane, water did get into every nook and cranny. The amount of time the water sat in it determines the extent that it penetrated through capillary action. You can fill a boat up with water and then drain it, doesn't mean that it's water logged. Fill a boat up and leave it for months on end full of water, you are going to be water logged somewhere, no iff's or buts about it.

Fourthly, since we are going to suspect the worst until told otherwise, the transom is going to be a question. Does the motor mount move on the boat ( push and pull the fiberglass where the mount meets the boat ) when you lift up on the motor in the tilted up position, or is it solid? No point in doing anything if the transom is shot and you get out and have the motor fall of in the middle of the lake. It's partly our responsibility to make sure you are thinking of your own safety, regardless of budget, etc.

Now, as far as replacing the wood goes, I can't say CDX is the best choice, but you have what you have to work with.

What were your initial thoughts on attaching it to the boat the way it is? I'd like to gauge what your thought process is, so that we can guide you safely in your repair. ;)
 

chillin014

Petty Officer 3rd Class
Joined
Jan 14, 2009
Messages
91
Re: NO Budget Newbie replacing deck...some of it. (pics)

Sorry for the slow reply, i tried to get on yesterday but couldn't for one reason or another. Anyway, Thank you for your concern! There was originally just a hole in the deck where the wood was black/rotted. As much of it as I could easily remove, I did. Some of it was very soft and just kind of fell apart easily. I took a cut-off wheel and cut a desirable squarish perimeter where it seemed like there was unrotted/"good" solid wood. That is all I have done though-pulled up the carpet, and cut some wood out. Nothing more has been removed by me. However it does look like one of the stringers is missing from a previous "repair". No foam or stringers have been removed by me.

My plan was really just to cut the shape I want/need for the deck and plop that sucker down there. :redface: No but I do want to replace at least one or two of the stringers because they are offering no structural support for the floor I'm about to lay down. I'm not so lazy that I will just put down raw plywood. I'll go through the effort of sealing the wood, but fiberglassing it would be overkill and too expensive. As far as how to attach the wood...thats what I'm unsure of. I dont want to just start screwing into things. I kind of thought I might even make a piece of the deck I'm repairing removable so I can get to that area under the deck if need be.

sorry if I'm still being vague, Im having a hard time visualizing what I want to do exactly, I kind of have to get in there and figure it out as I do it. When I got the boat in my possession there was a good bit of standing water all under the deck.
Well, first things first. WE need some clarity before we can give you honest and good help. The pictures honestly are pretty vague as to what was and wasn't there, so you'll need to answer some questions to the best of your ability. If you want to fix the boat up just to use for a little bit and not rebuild what was there, then there are somethings that you'll have to take into account when you do it so that you don't cause further damage by piece mealing the floor back in.


First, when you pulled the center section of wood/deck out...what condition was the wood in? Black, wet with black streaks, still looked like plywood but wet and broken....specifics like that.

Secondly, what exactly did you remove from the boat up to this point? Strictly the plywood that you cut out, or structural wood that formed stringers/braces/etc. Any large sections of foam, or just remnants of foam that were in there.

Third. Where is the foam in the boat. Since the boat had been essentially filled up like a soup bowl from a hurricane, water did get into every nook and cranny. The amount of time the water sat in it determines the extent that it penetrated through capillary action. You can fill a boat up with water and then drain it, doesn't mean that it's water logged. Fill a boat up and leave it for months on end full of water, you are going to be water logged somewhere, no iff's or buts about it.

Fourthly, since we are going to suspect the worst until told otherwise, the transom is going to be a question. Does the motor mount move on the boat ( push and pull the fiberglass where the mount meets the boat ) when you lift up on the motor in the tilted up position, or is it solid? No point in doing anything if the transom is shot and you get out and have the motor fall of in the middle of the lake. It's partly our responsibility to make sure you are thinking of your own safety, regardless of budget, etc.

Now, as far as replacing the wood goes, I can't say CDX is the best choice, but you have what you have to work with.

What were your initial thoughts on attaching it to the boat the way it is? I'd like to gauge what your thought process is, so that we can guide you safely in your repair. ;)
 

chillin014

Petty Officer 3rd Class
Joined
Jan 14, 2009
Messages
91
Re: NO Budget Newbie replacing deck...some of it. (pics)

oh and i'll get more pics tomorrow. I still have to clean some nasty gunk out below deck towards the back
 

Mark42

Fleet Admiral
Joined
Oct 8, 2003
Messages
9,334
Re: NO Budget Newbie replacing deck...some of it. (pics)

Welcome! I see you are getting lots of good advice. Really great to see younger people getting into boating, and doing it by way of a re-build. Its a great way to learn about boats and boating.

Anyway, thats a great looking Bayliner. Was wondering if the side glass is missing or if it didn't come with any?

After you get the deck and stringers worked out (don't forget the transom!), there are a few things in the way of controls that need reviewing. Like the steering cable and shift cables and shifter. If anything is stiff or seized in this area, you will need to repair or replace it before getting on the water. And we can help with any electric or outboard issues you may have too.

Once the boat is done, give the trailer the once over to ensure the lights work, and the wheel bearings and seals are OK.

And don't forget to take a boating course!

Good luck and keep posting pictures.
 

chillin014

Petty Officer 3rd Class
Joined
Jan 14, 2009
Messages
91
Re: NO Budget Newbie replacing deck...some of it. (pics)

thanks. I dont believe it came with any sideglass, I'm still trying to figure out exactly which model capri I have (the number 1500 etc). I have a vinyl top I cant quite figure out either, and I dont recall ever having a middle piece of glass to join the two in the front.

I will definitely check the transom tomorrow. The mechanical things seem simple enough. This forum has some great info for some very specific things like the force motors and such. I'll really start getting moving on it once it warms up around here.

The trailer is practically brand new, I probably need to grease the wheel bearings but it was like a 1500 dollar trailer purchased a few years ago by my mom. I still can't believe she spent that much...the boat itself...is worth a 3rd of that at best.
 

jcsercsa

Captain
Joined
May 21, 2007
Messages
3,401
Re: NO Budget Newbie replacing deck...some of it. (pics)

HAy chillin014 , You have to glass the deck down , it offers structure to the hole boat , Or it could fold up on you in the water !! John
 

redfury

Commander
Joined
Jul 16, 2006
Messages
2,657
Re: NO Budget Newbie replacing deck...some of it. (pics)

If there isn't physical evidence of there being a stringer in there, you didn't have one. It all depends on how Bayliner built it originally.

However, from the pictures it looked like part of the bow side of the left stringer was rotted. If you are going to replace the stringers though, you'll have to pull out those seat boxes.

You may find yourself doing a temp repair on the cheap for now just to get it on the water to find out if you need to do more work to it later.

However, the caveat to this is that you have to be willing to take the boat out of commission later. I've seen too many people make a "temporary fix" that becomes the permanent solution-until it fails again.
 

F14CRAZY

Ensign
Joined
Aug 12, 2008
Messages
945
Re: NO Budget Newbie replacing deck...some of it. (pics)

Standing water under the deck worries me...
 

F14CRAZY

Ensign
Joined
Aug 12, 2008
Messages
945
Re: NO Budget Newbie replacing deck...some of it. (pics)

If it helps, your stringers look something like these

l_60e153daefb7490b8d2dc37e5e0041e0.jpg
 
Top