NO MOVE GIMBLE BEARING (pic)

ChrisCraftJohnny

Petty Officer 2nd Class
Joined
Oct 7, 2009
Messages
187
Re: NO MOVE GIMBLE BEARING (pic)

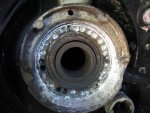
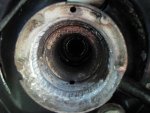
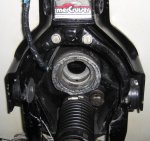
I removed the gimble and all of it's bellows to get full access. I have ground all the JB weld away on the surface. Still no movement! Used the slide hammer and pulling method.

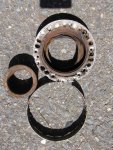
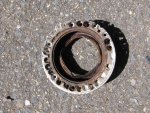
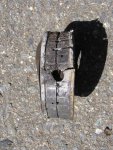
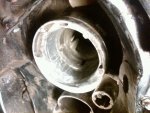
As I can see, the JB is all around the bearing's outer race. What a mess. From all my work the inner race has failed and come apart. All the ball bearings are out along with the inner race. I have drilled 1/8" thru holes with 1/4" c'bores 360 degrees all around the outer race's face.

Still nothing. The JB is inside the bore.

My last resort is to heat the race with a MAP torch. I was told that JB will have to get to 600 Deg. F to release. I hope I can get it hot enough. When hot I will use the slide hammer to bang it out.

When and if the outer race comes out, What I will be left with is anyones guess. I will deal with that after this saga is ended.

I would guess I will have to heat and remove as much of the JB as possible and then re-do the work that was done before. What are my alternatives? You know there is something wrong with the bearing bore if this was done in the first place...... I have more pics coming.

Johnny
 

fishaman

Seaman Apprentice
Joined
Mar 25, 2010
Messages
45
Re: NO MOVE GIMBLE BEARING (pic)

I had greal luck with a tool just like you had, but combined with slide hammer, so that you first tighten the nut to get some tension on the rod, then slide the hammer on the same rod against the nut at the opposite end. I had cases when puller and slide hammer both failed when used separately, but the combination (hammering against tensioned rod) did the job. And, of course, careful heating followed by dry icing should also help.
 

dingdongs

Chief Petty Officer
Joined
May 29, 2009
Messages
649
Re: NO MOVE GIMBLE BEARING (pic)

as u only have the outer race now it may be time to get yourself a dremel with grinding attachments and grind through a small slot until you reach the soft ally.if you can do it on both sides the outer race should collapse in.note there is only a solid part of the race either side of the corrugated spring.good luck and use safety glasses.
 

ChrisCraftJohnny

Petty Officer 2nd Class
Joined
Oct 7, 2009
Messages
187
Re: NO MOVE GIMBLE BEARING (pic)

I got it out!

Heat applied with a MAP torch for a good 10 min. Then blasts of cold water from a 2 liter bottle followed by some serious slide hammering moved the gimble bearing slowly out. I did this for about 6 cycles.

What a bear! This has to take the cake for one of the worst gimble bearing removals ever. Check out the pics. The bore does not even look bad! Maybe they did this because they were getting some slippage of the bearing? I am off to get some wire wheels for my drill. Going to clean out the mess in the bearing bore. Then I will see what I have when I try to test fit the new bearing. I will post again soon to let you fellas know what's up. And thanks to Fishaman for the heating/cooling idea. That's what it took my friend.
 

Attachments

  • inhouse.jpg
    inhouse.jpg
    142.9 KB · Views: 1
  • out.jpg
    out.jpg
    148 KB · Views: 1
  • front.jpg
    front.jpg
    151.1 KB · Views: 1
  • side.jpg
    side.jpg
    151.6 KB · Views: 1
  • bore.jpg
    bore.jpg
    136.5 KB · Views: 1

Bt Doctur

Supreme Mariner
Joined
Aug 29, 2004
Messages
19,344
Re: NO MOVE GIMBLE BEARING (pic)

Inspect carefully where the bellows at attached, make sure there is enough material left.
 

rodbolt

Supreme Mariner
Joined
Sep 1, 2003
Messages
20,066
Re: NO MOVE GIMBLE BEARING (pic)

the tool in the pic is simply junk.
use the correct tool and even the most corroded ones come out.
on the beast bearings I use a two pieces of 1/2" plate,a 1/2"x2ft piece of fine thread ss all thread,a 3 jaw puler from my slide hammer kit a nut,two washers and grease on the washers and all thread.
never had to heat,beat or drill one yet.
its about the same tool mercruiser sells.
and as everything here is saltwater corroded we do get some beast bearings.
 

Doernuth

Petty Officer 1st Class
Joined
Jul 6, 2010
Messages
332
Re: NO MOVE GIMBLE BEARING (pic)

Wow what a saga! The last pic, the one of the housing shows some chips on the edges where the gimbal bellows attaches, this could cause seal problems for you. Hope it doesn't or you will have to replace the transom assembly.
 

rodbolt

Supreme Mariner
Joined
Sep 1, 2003
Messages
20,066
Re: NO MOVE GIMBLE BEARING (pic)

its also why using the correct tool always helps.
most automotive tools are simply not designed or strong enough to deal with corroded stuff.
usually if you can see a picture of the FACTORY tool you can build one.
most times you can build a stronger one if you use better materiels.
 

ChrisCraftJohnny

Petty Officer 2nd Class
Joined
Oct 7, 2009
Messages
187
Re: NO MOVE GIMBLE BEARING (pic)

Rodbolt,

I appreciate your experience, but the bearing puller that I used was far from junk. This gimble bearing was installed using some kind of JB weld. I say some kind because I am not even sure what the hell this stuff is the PO placed in there. My boat had many improper things done to it by the PO. I know some things about tools and quality. The Mercruiser tool would have broken as well.
It took the heat and cooling cycles to help shrink the aluminum carrier enough along wilth relieving the grip that the (JB Weld??) had on the aluminum. There was much creaking and cracking (the JB releasing) when I heated it up. I am glad I did not tow it to the shop and use an OxyAcetalene torch on it. I might have burned it up too much. The MAP gas was just able to release the grip of the (JB??) and made it come loose with serious slide hammering. Anyway, it's out. And I am not convinced that it would have come out any easier with the Merc. tool. I would have loved to just be challenged by salt water corrosion.

Don't forget, I had tried the exact same se up that you boast about. The very same except I did not use a three jaw puller. I used the axle bearing puller from OEM. Maybe a slight advantage to you with the 3 jaw, but minimal at best. I must have had an excess of 10,000 psi on the tool before it broke. But if you say so, the Merc. tool must be the end all be all.

Thanks to everyones help. I will let you know how everything works out.

Johnny
 

ChrisCraftJohnny

Petty Officer 2nd Class
Joined
Oct 7, 2009
Messages
187
Re: NO MOVE GIMBLE BEARING (pic)

How important is it to seat the gimble bearing so it shows the 1/8" of bearing bore? I know the manual states this.

I have it flush right now. The (JB) or whatever in in my bore is making it impossilble to seat all the way. Will everything still go together? I know the Orings on the drive shaft clear past the gimble bearing when installed. Is this the reason to make sure of the gimble bearing's placement 1/8" counter sunk into the bore?

Please advise.

Johnny
 

Bt Doctur

Supreme Mariner
Joined
Aug 29, 2004
Messages
19,344
Re: NO MOVE GIMBLE BEARING (pic)

If not seated fully the U joints start hitting ,and the input shaft will have some pressure forcing it inward on the case
 

jze1212

Petty Officer 2nd Class
Joined
Feb 11, 2006
Messages
156
Re: NO MOVE GIMBLE BEARING (pic)

I know this post is a little old now, I wonder how you made out with this.. It looks like the original owner used the JB weld to replace some corroded aluminum on the gimbal housing around the bearing, where the drive shaft bellows mount to. I had to do the same thing to my boat, I basically recast the missing aluminum with JB weld. Once it cured, I removed the cast I built and ground it and shaped it to look just like factory. The new bellows installed nicely, there is no pressure on the repair I made, the clamps for the bellows still go over the housing , but there was just a little 'meat' missing. I was very careful not to get any JB weld near the bearing however - See images... If this was the case with yours I'm curious how you made out!
 

Attachments

  • gimball1.jpg
    gimball1.jpg
    83.2 KB · Views: 0
  • gimball2.jpg
    gimball2.jpg
    91.2 KB · Views: 0
  • Gimbal_Housing.jpg
    Gimbal_Housing.jpg
    121.9 KB · Views: 0

ChrisCraftJohnny

Petty Officer 2nd Class
Joined
Oct 7, 2009
Messages
187
Re: NO MOVE GIMBLE BEARING (pic)

I know this post is a little old now, I wonder how you made out with this.. It looks like the original owner used the JB weld to replace some corroded aluminum on the gimbal housing around the bearing, where the drive shaft bellows mount to. I had to do the same thing to my boat, I basically recast the missing aluminum with JB weld. Once it cured, I removed the cast I built and ground it and shaped it to look just like factory. The new bellows installed nicely, there is no pressure on the repair I made, the clamps for the bellows still go over the housing , but there was just a little 'meat' missing. I was very careful not to get any JB weld near the bearing however - See images... If this was the case with yours I'm curious how you made out!

JZE,

Nice job. I just wish both PO's replaced the transom plate on both our boats instead of using J.B. Weld! What makes matters worse on my end, is the fact that the PO had the engine removed for remanufacture! What in the world was he thinkng not replacing the transom plate while the engine was out? I have found used-good condition plates for $100.00! Very penny-wise and pound-foolish!

I was able to get the gimble bearing out. But unlike your situation, I did not have the gimble ring problem. Yes there was some eaten away on the edge. But not enough to prevent the driveshaft bellows from making a 360 DEG. seal.

After all was said and done, I was able to repair the boat. After all the work I performed I boiled it down to this:
The PO must have "spun" the gimble bearing at one point. Thus, destroying the precision fit in the bearing housing of the transom plate. Leving a situation to either replace the transom plate or rigging up some kind of repair. They chose to use J.B. Weld as a "make-up" compound to fill in the gaps left by the original gimble bearing spinning in the bore under load.
So you see, my gimble bearing was "glued" if you will, inside the bore. And let me tell you, that SHI% can hold! After all the mechaical pulling (breakage). After all the slide hammering (no move). It took the combo of a MAP torch for 10 Min. with blasts of cold water via a 2 liter bottle followed quickly with heavy, heavy slide hammering to move it little by little out of the bore. A complete nightmare.

I may get another season out of this repair. But sooner than later I will replace the transom plate along with the 4.3L V6 with a 350! I will purchase a new outdrive that has the proper gear ratio when I do this.

Maybe I will document it all for you boys to see. Ala, Frisco Jarrets.

CCJ
 
Top