Nola Mike's 3.7/470 --> 4.3L swap thread

nola mike

Vice Admiral
Joined
Apr 22, 2009
Messages
5,526
Ok, so working a bit:

1. Actually, the old and new style mount brackets place the mount in the same location, and the squish/solid mounts are the same height. Squish mounts have a longer stud and have a greater adjustment range
2. Drilled out the broken screws on the dizzy. Tried to retap and realized that through bolts are an easier solution. Took the shaft out and knocked some rust off
3. New starter installed
4. Finally got my metric bolts in. Sheesh, special order
5. Should have oil relocation and drain kits tomorrow
6. Ordered new metering rods and jets per Rick Stephen and Volphin recs
7. Cleaned all the gunk off the wiring. Surprisingly satisfying
8. Tired of trying to find the right p/s hose fittings. Ordered one off eBay
​​​​​​​9. Working on fuel pump.. Still some wiring questions, but it looks like I can use the old metal line, so at least there's that.

Issues:
1. Didn't install the dipstick prior to exhaust mani installation. Looks like it needs to come off to get the stick in there. Can anyone confirm?
2. The throttle bracket mounts to the carb studs on the manifold, which are much closer together on the 2bbl v 4bbl. So the bracket won't mount. Need to order part #805359T
 

nola mike

Vice Admiral
Joined
Apr 22, 2009
Messages
5,526
Yet another unexpected issue. Took off the exhaust mani to install the dipstick, but there's something in the new pan keeping it from seating all the way. Looking at the parts diagram, it looks like the new dipstick assembly installs directly into the drain plug? I'm thinking that I can chop the old dipstick end so that it seats. That should let me check the oil level. I already bought a remote drain kit, so that should allow me to drain the oil. Anything I'm missing? Only potential issue that I can think of is that I don't want the dipstick interfering with something important in the pan. Third option of course is just putting the truck assembly back in there.
 

nola mike

Vice Admiral
Joined
Apr 22, 2009
Messages
5,526
Yessir. Forgot the pic BTW.
 

Attachments

  • photo334118.jpg
    photo334118.jpg
    349.3 KB · Views: 1

nola mike

Vice Admiral
Joined
Apr 22, 2009
Messages
5,526
Today's adventures. Been slow going. I keep finding that I need a new part, and then I'm waiting for a week.
1. Cut the dipstick. It doesn't have a tight fit in the bore. I need a bit of sealant or some kind of tape in there I think. I can clamp it so it won't come out, but would prefer it a bit more snug. The dipstick itself is much shorter than the tube, so checking the oil level will be fine.
2. Reinstalled the exhaust manifold. Yay.
3. Installed new starter. Wondered why I was having a hard time torquing bolt. Found crack in starter mounting hole. Uninstalled new starter. Ordered new new starter.
4. Finally got my metric bolts for the flywheel housing. Realized that the flywheel cover is different from the old motor because of the different oil pan. It appears I need part 807456A2. It doesn't look critical, and I have to wait for the damn part again, so I'm fighting the urge to just leave it off. Maybe I'll trim the cover to fit.
5. Throttle bracket and carb spacer supposed to arrive 2 days ago. MIA.

Tomorrow I'm going to wire in the fuel pump I guess. I'd feel better about things if I could install the carb and distributor I think. Guess the good news is that I'm not *too* far away from actually trying to start the damn thing. Which I'm very nervous about.
 

Rick Stephens

Admiral
Joined
Aug 13, 2013
Messages
6,118
Might try wiping a little acid on the dipstick tube and sticking a little solder to it. Then file it to fit.
 

nola mike

Vice Admiral
Joined
Apr 22, 2009
Messages
5,526
Alright, so I spent 24 freaking days waiting on my shift plate, which sapped all of my desire. But got it in, so started back at it.

1.@rick Stephens, like that answer. Unfortunately I can't remove the dipstick now that I have the exhaust manifold back on. Plan b?
2. Got the fuel pump wiring done, and was very pleased with myself that I was able to mount the pump and still use the original hard line
2a. Was displeased that when I mounted the exhaust elbow, the shift plate interferes with said line. I need to bend it a bit more sharply, gotta figure out the best way to do that without kinking the line
3. Drilled out the dizzy cap screws that sheared when I tried to remove. Tried to retap, realized that it was easier to use some screws with nuts to hold it on. Got that all installed.
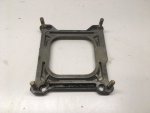
4. Put the new Jets, rods and springs into the carb. Used Rick's suggestions
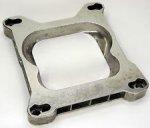
4a. Had some issues with the adapter that I used (bolts were too short and had to grind the heads of the included cap screws). The adapter was an open square-->spread adapter. I saw something saying that Edelbrock doesn't want me using an open adapter, and other info saying I didn't need an adapter at all. I have everything fitting well now... Am I ok or do I need a 4 hole adapter?
5. New starter, wiring, fuse installed
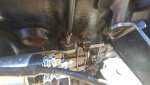
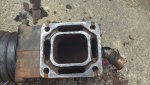
6. Exhaust elbows. I'm not pleased with how they look, but I'm not going to replace them now. I think I need the restrictor gasket, but unclear on when it's needed. I have some pitting in the surface. Not sure on the current state of sealant v no, but I was planning on some permatex on the pitted surface. See pics
7. Remote oil filter and drain installed

All in all, getting close here. I have a few hoses that I'll need to replace, and all of the belts. I'm nervous that this whole thing is going to fail spectacularly when I try to start it.
 

Attachments

  • photo336769.jpg
    photo336769.jpg
    565.8 KB · Views: 0
  • photo336770.jpg
    photo336770.jpg
    515.7 KB · Views: 0

Rick Stephens

Admiral
Joined
Aug 13, 2013
Messages
6,118
Just stick the metalized gasket on and torque it up. Looks great. You can draw file it a bit if you want the surface smooth. Looks good otherwise.

The fuel line position sucks. Where's it sit without the adapter plate?
 

nola mike

Vice Admiral
Joined
Apr 22, 2009
Messages
5,526
That was after filing. Adapter plate doesn't affect it much (what are your thoughts on the adapter?) With the 2bbl the whole line sits fore of the plate. The 4bbl moves it aft and lateral. No way around it. Forgot to mention that the + screw on the coil sheared off. Doesn't seem salvageable. Of course I have 2 spare coils that I can't get to. Also need to swap valve covers, since the oil fill is inaccessible under the shift plate
 

Rick Stephens

Admiral
Joined
Aug 13, 2013
Messages
6,118
Good lord, your list never gets shorter.

I like a square bore the spread bore adapter. But that's cause I figure the magic that makes the airflow clean can only occur if the top of the intake and the carb match up some how. If I was really wanting on answer I'd call Edelbrock.
 

Lou C

Supreme Mariner
Joined
Nov 10, 2002
Messages
13,193
For the fuel line what I saw someone do (this was on an OMC originally equipped with a Q-Jet and converted it to the Edelbrock 4bbl) was put a banjo bolt fitting on the carb and use a Sierra flex fuel line. Looks like that should work on yours, the way it is does not look workable. On the OMC it was kind of the same problem the shift bracket was bolted to the intake and was right next to the carb. On the Quadrajet the fuel line enters in the front so its a non-issue.

PS OMC and Volvo went to the Holley 4160 after Q-Jet production ended in '89-90 and used a similar adaptor to make it work, its a little different than the Mr. Gasket ones you see, not sure if it matters....
 

Attachments

  • photo336803.jpg
    photo336803.jpg
    17.8 KB · Views: 0
  • photo336804.jpg
    photo336804.jpg
    7.4 KB · Views: 0

kenny nunez

Captain
Joined
Jun 20, 2017
Messages
3,352
The “down side” to an open adapter on a dual plane manifold causes a reversion effect which disrupts the air flow. The symptom will be a “flat spot” at various throttle settings. It will feel like a bog or fuel starvation.
 

nola mike

Vice Admiral
Joined
Apr 22, 2009
Messages
5,526
Ok, plan is to weather this storm (lost the roof to my storage shed so far, my keg is low on co2, and no water atm) then back at it. I ordered pipe bending and flaring tools, going to see if I can tweak the line to work.
also forgot to mention my adventure of dropping a carb nut down the intake (retrieved with a magnet on a coat hanger. Surprisingly little drama) and power steering (cable was frozen in the tube. Very difficult to get out, and had to put more pressure on the actuator than I would have liked).
Rick Stephens, the question about the 4 hole adapter came up because I saw a post of yours that had something from Edelbrock specifically recommending against the open adapter. Can't find it now though.
Kenny Nunez, that makes sense about the manifold. I have a single plane manifold. It looks like the airflow should be fine with the open adapter. Thoughts?
It's conceivable that I can try to start this thing within the next few days. Need new belts and a couple of hoses still, should be available locally, but don't know why I'm expecting that to be the case. I don't have an engine stand, and this thing is very tilty. I was going to stack a couple of 4x4 sleepers and lag the side mounts to them. I have all the old wiring intact from the donor, so I'm going to just plug it in and turn the key. And listen to her purr. Or something like that.
 
Top