O'Day Mariner (sailboat) Wet Foam . . .

tpenfield

Moderator
Staff member
Joined
Jul 18, 2011
Messages
18,137
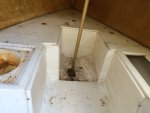
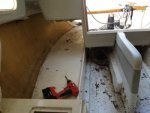
I did some cleaning and checking through everything on my new-to-me O'Day Mariner (Sail #3224) over the past few days. The boat has 'positive flotation' via foam-filled chambers in the bow (v-berth) and the aft-berths.

V-berth area
IMG_6699.jpg

Aft-Berth area (one on each side of the hull . . .
IMG_6701.jpg

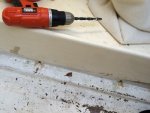
I drilled into a few of these chambers near where they meet the hull to see if the foam was retaining any water. Sure enough, along the aft berths and a small area of the bow, there was water in the foam.


Moisture and a little bit of water from these holes . . .
IMG_6696.jpg

The aft berth fiberglass essentially constitutes the stringers for this boat, and as far as I can tell, there is very little wood in this boat to worry about. . . a bit in the transom and a couple of stiffener strips on the cabin top.


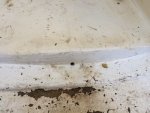
Lots of water from his hole . . . it is a pad area where the porta-pottie goes. The fiberglass in that area has a lot of gelcoat cracking, which would indicate freezing and expansion during the winter.
IMG_6697.jpg

There are a few inspection holes with caps (orange plugs in the photos) and a few are missing, so that may have contributed to the water migration.


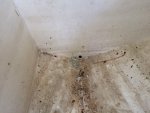
The v-berth area was dry . . . no water from this hole
IMG_6700.jpg

In general, the foam that is visible from the inspection ports, being 40 years old is pretty much dried out and shrunken. So, I am thinking I should re-do the foam in this boat.

"Plan A" - would be to cut open a large enough area in the aft berths and the v-berth, remove the old foam, replace the cut-out areas and then re-load the foam via the 2-part pour-in urethane foam. I may add some areas of foam to give the boat a more positive amount of flotation.

The good news is that I found a 1 gallon gas jug way in the stern trapped under the cockpit seat. . . still some gas in it . . . not sure how old it might be, but it was liquid and not jelled looking :noidea:

Thoughts or advice for "Plan A" ???

Thanks in advance :thumb:
 

Scott Danforth

Grumpy Vintage Moderator still playing with boats
Staff member
Joined
Jul 23, 2011
Messages
50,226
Wet foam is a bummer. Maybe a cup brush on a drill extension to grind up the offensive foam and a shop vac to remove it
 

tpenfield

Moderator
Staff member
Joined
Jul 18, 2011
Messages
18,137
Yes, old foam, wet foam is quite a bummer.

I think that I may have already come up with a "Plan B" . . .

Since the foam filled chambers are made from molded fiberglass, I can probably extract the water from the foam using a reverse process that DryBoat.com uses (they blow hot/dry air into the foam) and then fully seal the chambers by putting epoxy in the 'plug holes' (orange caps in my pics). These chambers would then act like air chambers. Even though the foam may not be providing ample flotation, being seal air chambers, they will provide decent flotation as long as they are dry.

Here are a couple of videos of 'Plan B' with a shop vac . . .


A closer look . . .


In addition to this, I will probably add some flotation foam to the bow and stern just to make sure it has enough to stay afloat in an unplanned event.

This may provide the same results as "Plan A" but with a lot less fuss.
 

hadaveha

Petty Officer 1st Class
Joined
Mar 17, 2009
Messages
389
I hope this works for you but I had a 13ft whaler that was water loged, I tried everything, compressed air, heat, vacume the only thing any of those done was draw the water for a cpl inches from where I was working, once the foam gets saturated it's a bugger to get out. Good luck
 

jigngrub

Fleet Admiral
Joined
Mar 19, 2011
Messages
8,155
Ted, you know better than to try to dry wet foam with white magic... it didn't work on the Magnum and it isn't going to work here either, but you do provide a certain amount of entertainment value for the site whenever you try this kind of stuff.;)

Plan B sounds ok for something to futz around with during the cool/cold months, but I suggest putting plan A into action next summer when the temps are high and you can get good expansion on the 2 part foam.

... or maybe cut and dig the foam out now and then install the new next summer, it'll give you something to keep your hands busy with during the cold and it'll make the job shorter by half or more next summer when it's time for fun in the sun again.
 

ondarvr

Supreme Mariner
Joined
Apr 6, 2005
Messages
11,527
Frequently the water enters the existing chamber in places you can't easily see or find, so even if you could dry it out and seal the holes you made, the water would just get back in the way it did in the first place, resulting in a total waste of time and money.
 

jigngrub

Fleet Admiral
Joined
Mar 19, 2011
Messages
8,155
Ondarvr has a good point. Also, when that foam starts sucking water it never stops... it's like a huge sponge down there that will always absorb any water that gets in it.You have to go with new foam to get your water resistance back.

On the bright side though, if you can remove the foam intact and then slice it into slabs you could start a real nice hydroponic garden!
 

tpenfield

Moderator
Staff member
Joined
Jul 18, 2011
Messages
18,137
Thanks for the input and sanity check guys. I may want to go with 'Plan A' after all. The port side chamber is wet top to bottom, whereas the starboard chamber is dry at the top. I still need to check the bow chamber in greater detail, but I got no water when I drilled into the bottom. At least I won't have to dig out and replace rotten wood :).

I spent the day cleaning out hard-to-reach places under the cockpit and elsewhere. A squirrel had made it home for the winter some time ago. Lots of pine cone remnants.

I may try to get this done before winter sets in. I plan on dedicating the garage to the refurbishment effort during the winter.
 
Last edited:

tpenfield

Moderator
Staff member
Joined
Jul 18, 2011
Messages
18,137
Update:

I have scoped out the foam removal process. Essentially, I will cut openings in the three chambers (bow and 2 aft berths) making them large enough to remove the foam with a variety of tools. Then dry any remaining moisture, seal up the test holes that I drilled, etc. I will then make 'deck plates' out of 1/4" thick HDPE to cover the openings.

I can then re-foam the chambers by pouring into the existing 'plug holes'. . . . I may have to add a hole or two in order to get good distribution of the liquid. Once the foam is expanded/cured, I can then trim any foam emerging from the pour holes and seal those holes with epoxy.

It seems that one of the issues about the boat's original construction is that the plug holes ( 3-4 in each chamber) are not water tight seals so standing water can seep into the foam over time (40 years at this point).

Overall, I plan on doing a restore of this boat, mostly cosmetic, but the foam replacement is more structural/performance/safety related.

I'll start a separate thread for the restoration process itself and related progress updates. :thumb:
 

lbovill

Recruit
Joined
Mar 21, 2016
Messages
1
Update:

I have scoped out the foam removal process. Essentially, I will cut openings in the three chambers (bow and 2 aft berths) making them large enough to remove the foam with a variety of tools. Then dry any remaining moisture, seal up the test holes that I drilled, etc. I will then make 'deck plates' out of 1/4" thick HDPE to cover the openings.

I can then re-foam the chambers by pouring into the existing 'plug holes'. . . . I may have to add a hole or two in order to get good distribution of the liquid. Once the foam is expanded/cured, I can then trim any foam emerging from the pour holes and seal those holes with epoxy.

It seems that one of the issues about the boat's original construction is that the plug holes ( 3-4 in each chamber) are not water tight seals so standing water can seep into the foam over time (40 years at this point).

Overall, I plan on doing a restore of this boat, mostly cosmetic, but the foam replacement is more structural/performance/safety related.

I'll start a separate thread for the restoration process itself and related progress updates. :thumb:

My brother in law and I are looking a similar 1971 O'Day (which incidentally we can pick up for a great price) with water in the port side aft berth, hoping to find out whether or not you made any progress on this project and how it went? Mostly we are wondering if you know how much wood is exposed to the area contained within those floatation areas?
 

tpenfield

Moderator
Staff member
Joined
Jul 18, 2011
Messages
18,137
My brother in law and I are looking a similar 1971 O'Day (which incidentally we can pick up for a great price) with water in the port side aft berth, hoping to find out whether or not you made any progress on this project and how it went? Mostly we are wondering if you know how much wood is exposed to the area contained within those floatation areas?

I have not opened up the foam chambers in the aft berths yet. I did open the v-berth chambers and had about 2" of standing water in the lowest portion right under where the Porta-pot goes. water has been weeping into that area all winter (in my garage). So I am thinking that it may be travelling forward from the aft berths, as the foam in the forward berth area was solid and dry to the touch, as for as I could tell.

Not much wood to speak of in this boat (Mariner), but that is not to say that another O'Day model might have some wood. The only wood that I have found so far is about an 18" square piece under where the porta-pot is located. I am not sure if there in any wood along the aft berth uprights as they essentially form a stringer, but there was none when I drilled into the lower portion of them to check for and drain out the water.

Is the boat the O'Day Mariner, or the newer 19 or maybe even the 20?

Sailboats typically do not have much wood in them, at least the 1970's and beyond. My Catalina 22 did not have much wood, only in the deck and cabin top core.
 
Top