OMC 3.0/Stringer I/O Conversion to Evinrude 225 Outboard project

outdrdave

Seaman Apprentice
Joined
Jul 21, 2011
Messages
43
Re: OMC 3.0/Stringer I/O Conversion to Evinrude 225 Outboard project

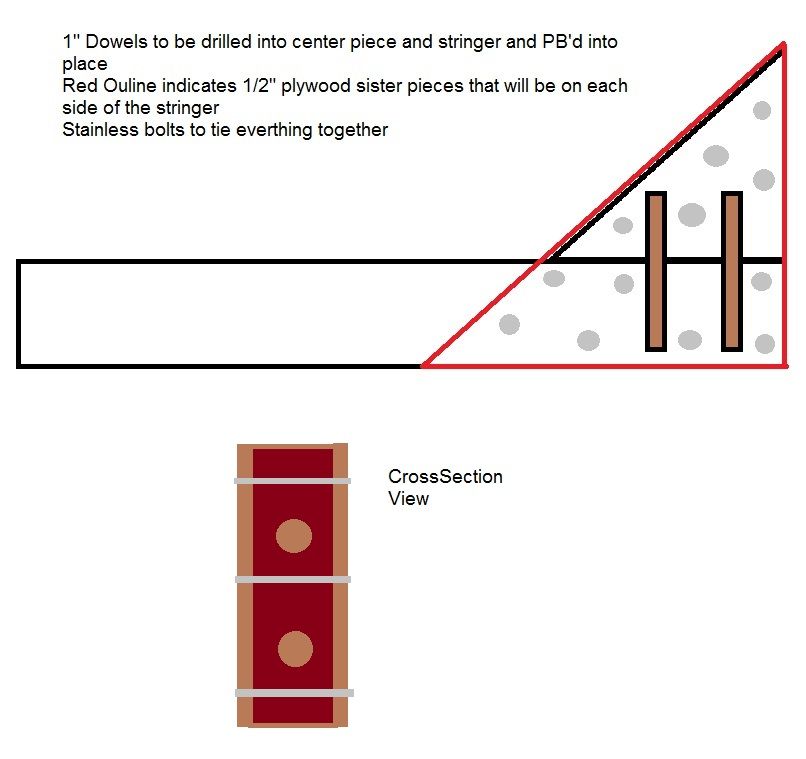
WOG, why would you use the oak dowels vs stainless bolts between the knee and Stringer?
 
Last edited:

Woodonglass

Supreme Mariner
Joined
Dec 29, 2009
Messages
25,929
Re: OMC 3.0/Stringer I/O Conversion to Evinrude 225 Outboard project

I think you're misunderstanding...This drawing should help clear things up....
 
Last edited:

outdrdave

Seaman Apprentice
Joined
Jul 21, 2011
Messages
43
Re: OMC 3.0/Stringer I/O Conversion to Evinrude 225 Outboard project

Thank you WOG. I understood and was thinking about using SS bolts epoxied in where you suggest using dowels until you suggested using 1" oak dowels. Any reason you would use the dowels instead of stainless bolts?

btw.. I picked up a long 1" oak dowel today, it does seem like it would be much easier to work with, Bush.
 
Last edited:

Woodonglass

Supreme Mariner
Joined
Dec 29, 2009
Messages
25,929
Re: OMC 3.0/Stringer I/O Conversion to Evinrude 225 Outboard project

You could use Stainless but...Oak with epoxy would be just as effective and once encapsulated in the epoxy would be there for your grandchildren to enjoy!!!
 

outdrdave

Seaman Apprentice
Joined
Jul 21, 2011
Messages
43
Re: OMC 3.0/Stringer I/O Conversion to Evinrude 225 Outboard project

You could use Stainless but...Oak with epoxy would be just as effective and once encapsulated in the epoxy would be there for your grandchildren to enjoy!!!

thank you :)
 

outdrdave

Seaman Apprentice
Joined
Jul 21, 2011
Messages
43
Got a bunch going on, here is an update.. Stern/transom: - finally finished getting all the new pieces cut out and glued up. Used a router to cut out the core for the new plug to go in from the back of the transom. Also cut the inside core for the new plug as well. These pieces overlap and fit together like a weird puzzle. Used gorilla glue, a make shift press and some screws to pull it all together. Ran some 10" lag bolts up into the stringers for security and it really helped pull the plug tight into the transom. Had to fill some of the voids and cover over the screws, used cat hair fiberglass. Using mat, woven and resin I built the glass back up. When getting closer to orginal transom edge, used Evercoat filler to smooth out the transition before rolling on finial mat and resin. Got top coat on but waiting till done in the bilge to paint the rest. My luck paint would run down the drain hole from the bilge over a nice new finish on the back of the transom.
Screenshot_2014-05-26-21-30-59_1_zpsfamsnqos.jpg
Screenshot_2014-05-26-21-30-22_1_zpspoewvvfb.jpg
Inside transome, bilge area: - Used PL to glue the new knees in along with stainless screws. It cured up rock solid. Next I PB'd all joints/edges with cat hair, tabbed in all joints and rolled on a thin layer of mat. In between the knees on the transom, in the inside corners where the knees meet the transom and the inside of the knees from the hull to the top of knees.. I used woven roven for added strength. Decided to do a second layer of roven in between the knees on the transom (where bolts will be for bracket) before a second layer of Matt over everything. - sanded and painted first coat using rustoleum and enamel hardner.
Screenshot_2014-05-26-21-29-58_1_zpswverl0wo.jpg
Bracket: - Used paint striper, Sanders and abrasive disks to get all old paint off bracket. Washed with 50/50 vinegar/water, etched, primed and painted with rustoleum and enamel hardner. Came out really nice.
Screenshot_2014-05-26-21-30-08_1_zpsfkbzaglo.jpg
Next: coat bilge area with 2 more coats rustoleum/hardner, re-drill transom drain, paint lower back of transom, install brass transom drain plug/insert, drill bracket holes and mount bracket, figure out new floor hatch and panel where dog house used to be. Hope everyone had a great weekend and good Memorial Day, remember today wasn't National bbq day.. Thank you to all our service men and women, past and present. Dave
 
Last edited:

outdrdave

Seaman Apprentice
Joined
Jul 21, 2011
Messages
43
Paint on the Transom
IMAG0960_zpsphvtutpj.jpg
Really like the way it came out!
IMAG0961_1_zps1iico3vc.jpg
Bilge and new supports coming together
IMAG0959_zpsogvtawvc.jpg
better picture of how the bracket came out
IMAG0942_zpsguahhwou.jpg
 

outdrdave

Seaman Apprentice
Joined
Jul 21, 2011
Messages
43
Thank you WOG.

Used a template and drilled the 10 holes for the bracket. My teeth grinded as we drilled through that beautiful transom but the holes drilled cleanly and all matched up to the bracket.
IMAG0968_zpscb81vncj.jpg


Used 5200 to seal it up, bracket layed perfectly against the transom
IMAG0975_zpsbxy4zkpl.jpg


Motor hung.. still need to refinish that ugly outboard hat/cowl
IMAG0983_zpsvawh3htk.jpg


IMAG0986_zps9ywjj25l.jpg


Got the rigging in, still have to run the oil/fuel hoses
IMAG0990_zpsdyypsiz2.jpg
 
Last edited:

outdrdave

Seaman Apprentice
Joined
Jul 21, 2011
Messages
43
Redid the gauge panel and have it set up the way we want although the finish will have to be touched back up..

IMAG0964_zpsjiy3abrl.jpg


IMAG0969_zpsebne6czd.jpg


IMAG0972_zpshcilrpcj.jpg


still need to wire all the switches..
 

outdrdave

Seaman Apprentice
Joined
Jul 21, 2011
Messages
43
things we've gotten done from this past weekend and a few evenings this week..

- Got the wiring all run - ordered, received and installed new TeleFlex cables for shift/throttle.. I just didn't like how tight the old ones were. Cost $50.00, think it was money well spent.
- batteries mounted
- oil tank installed
- bilge pumps installed, wired and plumbed
- transducer installed and wired
- temp fuel cell in the bilge where engine used to be, want to know we run the boat on a good mixture at first and want to tune the boat with known good gas
- hung old curtains that came with the canopy, but they wont work. $1500 - 2500 for new curtains but might make my own for less than $250.00, doesn't look like a complicated process.
- fuel deck cover had 'popped' over the weekend. the bond had broken between the internal ply core and fiberglass (it was old and rotted). Took the time to clean up the fiberglass skin really good, lay new fiberglass inside the skin and laminated in a new piece of Arauco plywood as a core and then sealed it with more glass/resin (used 1250 ml of resin). It came out great and is super solid.. really happy about the way it came out (still needs to be painted, but the deck of the boat needs to be painted at same time, not this summer). Conner likes because he's aloud back in the boat with me when I'm working on it (he really likes to play in the boat with me).
- Steering installed
- Wired all the switches and fixed a few lights, cleaned up all wiring with zip ties and cut wires to look better

things to do..
- double check a few things with the wiring, label switches
- change lower gear oil in the outboard
- fill transducer with RV antifreeze
- fix/install latches on cabin door
- adjust the WOT timing and set idle
- start thinking about making curtains for canopy..

Dave
 

outdrdave

Seaman Apprentice
Joined
Jul 21, 2011
Messages
43
Well.. buttoned up a bunch of loose ends and was able to splash her this evening. Going to try a few different props gain some rpm, also going to double check the linkage to make sure we're getting WOT. ]
IMAG1018_zpsg51plr5s.jpg
IMAG1015_zpsse3hxmh6.jpg
IMAG1020_zpsdw50o4rp.jpg
IMAG1023_zpsvpibl0yx.jpg
No 'porpoising', didnt have to 'fight' to get it on plane, turned great, responded great, held the water like a champ.. very, very pleased!! Note: Last updated for a little while until custom hatches where the dog house is. Might start a new thread for that with a reference link to this conversion thread. I ordered materials for making our own enclosure and depending on how it goes, I'll start a new thread for that also. Thanks for following along and good luck on the water this summer. Dave
 

Marc Peternell

Petty Officer 3rd Class
Joined
Dec 21, 2013
Messages
97
Great job! I really enjoyed reading your thread. I really appreciate the pride and workmanship that you've put into this. I'd like to hear a little more about the performance differences..
 

outdrdave

Seaman Apprentice
Joined
Jul 21, 2011
Messages
43
Thank you, will update when we dial in WOT rpm. Here's what we experienced: 3.0 w/Stringer 400 14.5x17 prop - 17-19 knots tops - slug out of the hole - could not trim for better ride while trying to get on plane - lacked power in heavy current or inlet - 3.0 ran great and opperated in its rpm range Evinrude 225 on setback bracket, 4 inches higher than keel w/14.5x17 prop: - 28 knots at 4800 rpm (WOT supposed to be 5800-6200 and we'll figure that out) - No effort to get out of the hole and up on plane - was able to trim and use trim tabs for a comfortable ride - seemed to have plenty of power - need to dial in WOT (going to double check cable adjustments, double check timing advance and experiment with props.
 

outdrdave

Seaman Apprentice
Joined
Jul 21, 2011
Messages
43
We've had the boat out a half dozen times so far and it runs great. Did run into a problem over Fathers day weekend where the magnets de-laminated from the flywheel but that was easily resolved and couldn't be happy with things! Might be heading out 15-20 miles this weekend, weather permitting.

Need to sand, clean and glass the new bilge covers/deck at some point. Might use the ones that are there for the rest of year and then use them as a template for a winter project.
 

REdington

Petty Officer 3rd Class
Joined
Apr 22, 2014
Messages
97
Hi Dave
Thats a job well done. Looks like that little guy is really enjoying the ride and ready to get some fish.
 

undone

Petty Officer 2nd Class
Joined
Jul 26, 2014
Messages
147
Great job, looks like a much better fishing platform now. I love these conversions
 

outdrdave

Seaman Apprentice
Joined
Jul 21, 2011
Messages
43
Still using the old mock up doors for the deck over the bilge and access to transom but she's still running strong. Looking forward to a great season on the water, good luck everyone.
 
Top