Ouachita Spirit 16' Tri Hull

Status
Not open for further replies.

JeffsAV

Seaman
Joined
Dec 6, 2008
Messages
59
I recently purchased a 1977 Ouachita Spirit 16' tri hull. I have had a dickens of a time finding anyone else who owns/owned one. I understand they went out of business in the 80's. I would like to hear from some of you who have one, and post pics please! I am in love with mine, and have spent some time rebuiling it to meet my standards. Let me know if you have one too!
 

Bob_VT

Moderator & Unofficial iBoats Historian
Staff member
Joined
May 19, 2001
Messages
26,065
Re: Ouachita Spirit 16' Tri Hull

Welcome to iboats! We really are picture junkies so if you would like to put a few in we would enjoy seeing them.

Many boat companies come and go so, I am not surprised about Ouachita either.
 

JeffsAV

Seaman
Joined
Dec 6, 2008
Messages
59
Re: Ouachita Spirit 16' Tri Hull

Here are a few pics from the day I got my baby in my garage. I will post more pics as I progress into making the changes I need to the boat.
Show me your old bass boat pictures! I am dying to see other tubs like these in the wild!
 

Attachments

  • 101_4946.jpg
    101_4946.jpg
    26.3 KB · Views: 3
  • 101_5268.jpg
    101_5268.jpg
    29.8 KB · Views: 4
  • 101_4948.jpg
    101_4948.jpg
    27.7 KB · Views: 3
  • 101_4952.jpg
    101_4952.jpg
    31.1 KB · Views: 2
  • 101_4951.jpg
    101_4951.jpg
    24.2 KB · Views: 2

JeffsAV

Seaman
Joined
Dec 6, 2008
Messages
59
Re: Ouachita Spirit 16' Tri Hull

When I first got the boat, it had issues, just like most older affordable boats do. The front casting deck had a chair mount that was collapsed partially. I have cut out the portion of the deck that had rotted plywood underneath. I discovered that the floor under that had been moist for years, most likely. The floor was plywood under a loose fiberglass mat that was basically useless. I cut out the bad section, and replaced it with a layer of automotive subwoofer box carpet soaked in fiberglass resin. I then put a plywood layer on top of that, coated it with resin, and then put the final top layer of carpet and soaked it in resin as well. I am aware that I added some heft to the front, but I don't mind...I figure I will perhaps get up on plane faster with more weight up front anyway. I am certain that it is now extremely solid in that area now. I still need to make a hatch lid to cover the hole I made, and I want to put the seat mount on the lid as well. That should be fun, since I have to engineer something strong enough to take the leverage forces applied by the weight of someone actually sitting there. Your suggestions on how to do this are welcome. I also found that the rear cargo area had the same problem on at least one side. I cut the floor out and discovered more rotted plywood and a cavity with only one-third of it filled with foam, the rest was filled with black water....yuck. I dug it all out, cleaned up the mess, and let it dry out for a week. I put new foam into the cavity(completely filling the cavity this time), and reinforced the cavity with a layer of fabric and resin. I cut out a new piece of plywood, coated it in resin, and then applied a top layer of (don't laugh)spandex and resin. The final product came out quite well. I realize that my use of materials is unusual, but I am not trying to do a vintage restoration, just trying to fix it so it will be better than it was when I got it. I have also rewired the boat, since it was a nest of random wires run to the batteries(2) which were in the storage area in trays that were screwed down(kind of) to the floor. I moved the batteries to the area under where the rear chair mount is. I put a rubber floor mat from my old work van under the batteries to keep them in place, cushion them, and provide airflow under them. As I write this, I am becoming aware of how many things I have done that are not text-book, but I have limited resources to work with, so I make no apologies for going with what works. I ran new wire to the transom for the bilge and live well pumps. They had wires strung across the floor to the nearest battery as well. I wanted the compartment to be free of clutter so I could actually put thing in there without the fear of unplugging something on accident. I put a terminal strip above the pump well so I could easily swap out the pumps when needed. I sealed the connections, and screw holes with liquid electrical tape...very handy stuff indeed. I extended the outboard starter wires with 8 ga. wire to re-route them so they go around the edge of the compartment. I also ran 8 ga. wire to the steering console area and put power-distribution blocks there to branch out of. I have more to do, but I have certainly got the bug for working on my boat. Here are some more pics of some work I have done thus far.

101_5273.jpg

101_5275.jpg

101_5287.jpg

101_5288.jpg

101_5293.jpg
 

rtpassini

Chief Petty Officer
Joined
Nov 27, 2008
Messages
508
Re: Ouachita Spirit 16' Tri Hull

i cant find much info on my boat either. i know they went out of business (amf/crestliner) back in the day also. but would like to know its history.

good luck on your searching!
 

tashasdaddy

Honorary Moderator Emeritus
Joined
Nov 11, 2005
Messages
51,019
Re: Ouachita Spirit 16' Tri Hull

i remember them, and that was one of their favorite colors.
 

74SkeeterHawk

Seaman
Joined
Oct 11, 2008
Messages
73
Re: Ouachita Spirit 16' Tri Hull

Hey I have a 74 skeeter with a similar setup to yours except I dont have the rear casting deck. Im in the middle of a full restore and Ive been playing hel trying to find some detailed designs for my layout. I looked at your pics and I like the way things are setup. I was wandering you could get some more detailed pictures of the framing and inturnal structure of your rear casting deck. I'd like to copy it as much as I can to make my boat a little more functional. Thanks!;)
 

JeffsAV

Seaman
Joined
Dec 6, 2008
Messages
59
Re: Ouachita Spirit 16' Tri Hull

The internal strucure is basically just the inside of the outer shell. There isn't much bracing or pillars of support under the skin. The only support other than the shell itself is the vertical plywood piece that the anchor light and dual battery charger are mounted to. It screws to the floor with 90 degree angle aluminum, and also to the underside of the deck. the whole back area under the deck is WIDE open. I like that, and I spent time moving the batteries and wiring to maximize that. You can't have too much storage on a boat, in my humble opinion. Here are some more pics to further illustrate:
 

Attachments

  • 101_4952.jpg
    101_4952.jpg
    31.1 KB · Views: 2
  • 101_5291.jpg
    101_5291.jpg
    29.1 KB · Views: 2
  • 101_5292.jpg
    101_5292.jpg
    24 KB · Views: 2
  • 101_5295.jpg
    101_5295.jpg
    22.8 KB · Views: 2
  • 101_5300.jpg
    101_5300.jpg
    25.2 KB · Views: 3

jcsercsa

Captain
Joined
May 21, 2007
Messages
3,401
Re: Ouachita Spirit 16' Tri Hull

Dont feel bad , I got a 68 crownline and i cant find any info on it !!
 

tmcalavy

Rear Admiral
Joined
Aug 29, 2001
Messages
4,005
Re: Ouachita Spirit 16' Tri Hull

Can you outline how you fixed the soft spots in the deck, front and rear? Good work, and creative use of materials. I'm always looking to expand my knowledge base on that kind of stuff. How did you support the wood pieces you used to fix the soft spots?
 

JeffsAV

Seaman
Joined
Dec 6, 2008
Messages
59
Re: Ouachita Spirit 16' Tri Hull

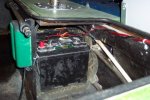
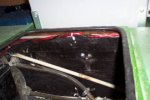
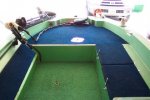
The front area was very simple. I cut a piece of automotive carpet to the shape of the cutout I had made in the floor under the casting deck. I fit it in, and soaked it with resin. I put the plywood piece right on top of the bottom carpet layer while the resin was still wet, so that it would soak the bottom of the plywood. I then put the final top layer of carpet on top of that while the resin was still wet, and soaked it as well with resin. Warning; using automotive carpet with fiberglass resin = a LOT of resin. As for the back end of the boat, I cut out the soft spot, dug out the rotted material, and filled the cavity with foam up to the level of the bottom of the plywood. I cut the plywood to fit the cutout I had made, brushed resin to the underside, and screwed it down to the fiberglass structure(after closely examining the depth of the hull so I did not go through the hull) with drywall screws. I then poured more resin into the edges that had space between the plywood I cut out and the original boat structure. Once I had the gaps filled with enough resin to level it off, I put the Spandex fabric on top, overlapping the cutout, and brushed resin all the way around. I let it dry for a day or so, and then sprayed some surface grip texture to the floor so that things would not slide around on the new repaired area.
 

tmcalavy

Rear Admiral
Joined
Aug 29, 2001
Messages
4,005
Re: Ouachita Spirit 16' Tri Hull

Thanks for the explanation...must be dense today, I understand most of what you wrote except for installing the first piece of carpet in the cutout you made in the floor under the casting deck. Did you have access from below to cover the hole with the carpet? Or does the carpet go over the top of the hole, with the plywood piece pushed down into place on top of the carpet. The rest of it I get...just not visualizing well today.
 

JeffsAV

Seaman
Joined
Dec 6, 2008
Messages
59
Re: Ouachita Spirit 16' Tri Hull

The carpet simply set from the top into the cutout. I cut it to fit the shape of the void in the bottom of the inside of the hull. I then set the plywood on top of that first layer of resin soaked carpet.
 

tmcalavy

Rear Admiral
Joined
Aug 29, 2001
Messages
4,005
Re: Ouachita Spirit 16' Tri Hull

That's what I was kinda visualizing...thanks for clarifying.
 

JeffsAV

Seaman
Joined
Dec 6, 2008
Messages
59
Re: Ouachita Spirit 16' Tri Hull

Here are some updated pics of my progress. I am rebuilding the front deck to have a lid that allows storage space under the deck. The original casting seat mount was in rotted wood, which I cut out. I am going to put a mount into the new deck hatch lid.

The original deck the day I got the boat. Note the seat mount. The mount was bolted to the deck and the plywood under the deck from the factory was glassed in very roughly, and did not seal the plywood, causing moisture to be let in, and rotting the board out. The mount was collapsing, and it was not safe to put a seat pole into the mount and sit on a seat.
ry%3D400


The cutout I made hastily...
ry%3D400


Removing the rubber backing and adhesive....not fun...
ry%3D400


Frame to attach under the glass deck, resin all around
ry%3D400

ry%3D400


I used automotive carpet to act as a gasket between the new frame and the existing deck. It helped get more contact for the resin, and also filled the gaps created by the irregular underside of the glass deck to the wood frame.
ry%3D400
 

JeffsAV

Seaman
Joined
Dec 6, 2008
Messages
59
Re: Ouachita Spirit 16' Tri Hull

I then added a layer of fleece soaked in resin to the coutout to flush the frame to the top of the glass deck.
ry%3D400

ry%3D400


Once that was done, I made a pattern out of denim, and cut out a new 3/8 plywood cover to go on top of the glass deck.
ry%3D400


I fit the plywood to the deck, and routered out the opening.
ry%3D400


I put resin on all sides.
ry%3D400


I pre-drilled screws all over the deck to use a clamps for adhering the deck to the plywood. I then bondo filled the screw heads, sanded, and put resin over the whole assembly. It is strong and watertight now, I hope.
ry%3D400
 

JeffsAV

Seaman
Joined
Dec 6, 2008
Messages
59
Re: Ouachita Spirit 16' Tri Hull

I still need to build the hatch lid, with the new seat mount in the lid itself. I have not seen this done before, have you guys? I will post pics as I go through that process. I have also put a stereo in the boat, and I will be posting pics about that as well.
 

ksubigbuck

Petty Officer 2nd Class
Joined
Aug 18, 2006
Messages
180
Re: Ouachita Spirit 16' Tri Hull

I have a 1978 Ouachita Spirit, but it is a 17'. It is however very similar to yours, but needs a bit more work. Looks like you have done a nice job!
 

dwyork@hotmail.com

Petty Officer 2nd Class
Joined
Jan 14, 2009
Messages
178
Re: Ouachita Spirit 16' Tri Hull

Looks like your project is coming along quite well...I am anxious to follow your progress. Keep us posted and good luck.
 
Status
Not open for further replies.
Top