Overheating AQ125a leaking cooling sustem

JAL51974

Chief Petty Officer
Joined
Apr 26, 2005
Messages
608
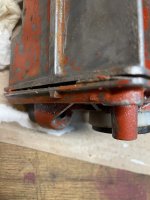
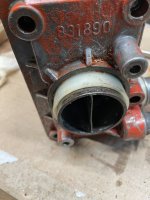
End of last season I got into a shallow muddy situation and sucked up river mud. I knew it was trouble immediately. As soon as we got into open water and got above 2000 rpm on plane the temps jumped up but came back down to normal when I idled. We idled back to the dock. But I had antifreeze out of the closed water tank and raw water out of several gaskets on the heat exchanger tank, specifically where the strainer housing mates with the tank and the square plate that is the top of the tank.

I checked all the lines for water into and out of the raw water system to clear blockages, changed the impeller and gasket, drained and replaced the antifreeze and radiator cap, checked the water neck fitting on the outdrive. That fitting was replaced in 2006 by me.

On the muffs in the yard engine stays steady about 180 degrees. But I’m still getting leaks around the base of the raw water strainer housing and the top plate of the heat Exchanger/ reservoir plus leaks at the top plate and sides of heat exchanger reservoir.

Is there any way to fix these leaks without dismantling the whole raw water side of the cooling system? If I need to take it apart who still sells all the gaskets and spacers I need? I had it apart years ago and it is a pain to rebuild as I recall. Thanks
Joe
 

kenny nunez

Captain
Joined
Jun 20, 2017
Messages
3,326
Sierra Marine # 18-0590. Cooling pipe gasket set.
This is what you need
Are you sure that the exhaust manifold is not partially blocked up with mud? Does your engine have an oil cooler, if so you will need to check it also. Clean the heat exchanger while you are replacing the pipe seals.
 
Last edited:

Donald0039

Chief Petty Officer
Joined
Jun 11, 2022
Messages
418
If this a half or full closed cooling system? I think you need to remove the heat exchanger and have it flushed. And the exhaust riser needs to be flushed also.

I don't understand why you would have multiple leaks out of gasketed joints after sucking up mud.
 

JAL51974

Chief Petty Officer
Joined
Apr 26, 2005
Messages
608
I saw that cooling pipe gasket set thx. But the leak is from the base of the plastic strainer housing not the cooling pipe. The other one is from the metal top plate of the raw water reservoir. I don’t know how to post pics and circle the spots of the leaks.
 

JAL51974

Chief Petty Officer
Joined
Apr 26, 2005
Messages
608
If this a half or full closed cooling system? I think you need to remove the heat exchanger and have it flushed. And the exhaust riser needs to be flushed also.

I don't understand why you would have multiple leaks out of gasketed joints after sucking up mud.
The system overheated very briefly from the silt sucked into the raw water system. In this system the antifreeze circulates through the engine block in a closed setup. That antifreeze solution is cooled by raw water pumped in from the lake and by means of a heat exchanger it acts like a car radiator that’s cooled by the air flow. Those gaskets are probably brittle from 1986. The overheating caused them to fail. My theory anyway. No overheating or leaking prior to the incident in the shallow water silt.
 

Donald0039

Chief Petty Officer
Joined
Jun 11, 2022
Messages
418
The system overheated very briefly from the silt sucked into the raw water system. In this system the antifreeze circulates through the engine block in a closed setup. That antifreeze solution is cooled by raw water pumped in from the lake and by means of a heat exchanger it acts like a car radiator that’s cooled by the air flow. Those gaskets are probably brittle from 1986. The overheating caused them to fail. My theory anyway. No overheating or leaking prior to the incident in the shallow water silt.
So a half closed cooling system is where only the block is cooled by coolant circulated between the engine block and heat exchanger. A full closed cooling adds the exhaust manifolds to the closed cooling loop. The exhaust elbow or riser is always raw water cooled.
 

JAL51974

Chief Petty Officer
Joined
Apr 26, 2005
Messages
608
I ordered the required gasket and piping kits to do the work on the heat exchanger. A good water flow out of the outdrive now on the muffs. Steady temps at 180-190 too. Once I get the leaks fixed I will test it at the lake and let you know. Thanks
 

JAL51974

Chief Petty Officer
Joined
Apr 26, 2005
Messages
608
In order to service the raw water side of the cooling system do I need to drain the antifreeze too? I’m planning to disassemble the raw water tank, raw water strainer housing from the closed side of the cooling system in order to service the filter in the raw water tank. The left side is raw water in this photo. IMG_0586.jpeg
 

kenny nunez

Captain
Joined
Jun 20, 2017
Messages
3,326
You need to drain the antifreeze. That way you will be able to clean the raw water side of the exchanger. Sometimes there is a lot of trash stuck in the outside of it.
 

JAL51974

Chief Petty Officer
Joined
Apr 26, 2005
Messages
608
Ok will do. It’s what I was thinking too. Now I just have to find the time this week to get it done.

That white gasket on the cover to the raw water pump- is there any trick to keeping it in place before you tighten down the four fasteners? I get it set then it moves on me no matter what I do.
 

JAL51974

Chief Petty Officer
Joined
Apr 26, 2005
Messages
608
Thx. Any tips on getting the top plate off the heat exchanger so I can get at the wafer type of strainer inside? Right now I’m soaking the top plate joints in PB BLASTER to loosen it from the body of the H/E. The entire H/E is on the workbench. I’m talking about the metal top plate the plastic H/E strainer housing sits on.
 

kenny nunez

Captain
Joined
Jun 20, 2017
Messages
3,326
If the bolts are causing the problem you might need some heat around the head of the bolts. As far as the cover it will take some gentle persuasion with some thin wide screwdrivers.
 

JAL51974

Chief Petty Officer
Joined
Apr 26, 2005
Messages
608
Those bolts were easy to get the whole unit off the boat and the bolts holding the top plate to the unit weren’t bad either. Not sure how much persuasion should be used to get the cover off.
 

JAL51974

Chief Petty Officer
Joined
Apr 26, 2005
Messages
608
I’ve tried screwdrivers, putty knife, even a pry bar for taking moldings off. These pictures show how much that cover moves then nothing. I wonder if the white bushing is holding it up? I don’t want to mangle that though.
 

Attachments

  • IMG_0638.jpeg
    IMG_0638.jpeg
    1.7 MB · Views: 3
  • IMG_0637.jpeg
    IMG_0637.jpeg
    1.8 MB · Views: 3

kenny nunez

Captain
Joined
Jun 20, 2017
Messages
3,326
Try to slide the white plastic sleeve off. With a block of wood on the table tap the bottom of the extended stainless down which should drive the cooler up and out.
 

JAL51974

Chief Petty Officer
Joined
Apr 26, 2005
Messages
608
I think that will work. I’ll let the penetrating oil soak overnight on it.
 

Donald0039

Chief Petty Officer
Joined
Jun 11, 2022
Messages
418
Obviously you will need to order new rubber gaskets.

I would stick in a putty knife and use a hammer to push the putty knife down and around the gasket surface area.

It looks cast so too much force could snap a piece of.
 

JAL51974

Chief Petty Officer
Joined
Apr 26, 2005
Messages
608
I had the putty knife in the crevice all around but it’s not moving and yes I’m afraid to snap a piece of it. It’s over 40 yrs old!

I’m gonna try to see if the top will rotate around the white plastic and metal pipe.
 

JAL51974

Chief Petty Officer
Joined
Apr 26, 2005
Messages
608
I got the white plastic bushing off but that top part is still not coming off. It seems like the top cover part is attached to the insert and all of it should come out in one movement? This is crazy.
 
Top