PlayDoh’s 16 SS resto underway

Watermann

Starmada Splash of the Year 2014
Joined
Jan 12, 2013
Messages
13,822
I have the adjustable helm pedestals and a slide to adjust distance on mine at the helm. 15" is a bit way too high for most anyone once you add the seat. Mine are set at 13" from deck to bottom of the seat.
 

PlayD0h

Petty Officer 1st Class
Joined
Apr 23, 2009
Messages
326
I have the adjustable helm pedestals and a slide to adjust distance on mine at the helm. 15" is a bit way too high for most anyone once you add the seat. Mine are set at 13" from deck to bottom of the seat.

Man, your awesome! Thank you so very much for all your help. I think I’ll go with the plastic as well. I cant see a reason not to and I won’t need to flare them as a bonus. And I don’t feel like paying $25 shipping for $20 in parts.
I mistakenly drilled the knee brace to transom metal holes to 1/4, so I’m either going to have to drill the transom 3/16 holes to 1/4 and use bolts, or weld the holes and redrill 3/16, or get 1/4 solid rivets if they exist.
The bolts I have for my under hull knee brace plate have hex heads, which I’d like to replace with a dome head. And use the same for the transom-knee. I’m going to try a local bolt specialty shop, or keep searching the web.
Thanks again WM, I might have to name my boat after you at this rate :cool:
 

Watermann

Starmada Splash of the Year 2014
Joined
Jan 12, 2013
Messages
13,822
Yeah The SS H20 :lol:

Make sure the plastic drain tubes say fit 1" diameter hole, the inner tube is 3/4' but they have a collar on the ends that fit tight into the 1" hole. Of course you have to trim them down some to fit for length and use 5200 to seal/secure the tubes. I put a bolt through mine with some big washers and a nut tightened down made a good clamp holding them tight until the 5200 set.
 

PlayD0h

Petty Officer 1st Class
Joined
Apr 23, 2009
Messages
326
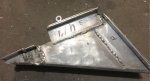
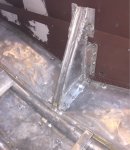
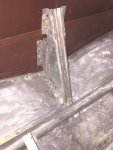
So I’m pretty sure I’m done with the knee brace. I can’t find anything else to weld, lol. The welds look big and nasty but that’s only because they are :lol:

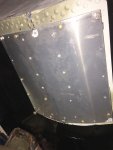
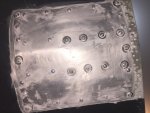
the one pic is the hull bottom plate. 6 1/4” bolts on the perimeter, 8 1/4” bolts to knee brace, 16 perimeter rivets and 4 that are for the rib. Going to slather 5200 on the plate and fasteners, then gluvit the top/inside once 5200 cures.

I think the brace qualifies for total overkill, but that’s my style.
I put the Marine Tex on the first day when it was 20°c / 70 something °F and it took 2 days to be tack free. The second time I put it on, on the other side of the transom and hull spot it was near that temp but it’s dropped since. The stuff is still a bit tacky to the touch.

Anyways once I bolt up the brace I should have the rest of the foam cut. I’m thinking of using a can of spray foam to glue the pieces together and fix them in place. The main reason I used the hot wire cutter is so I would have a sealed cut edge, and avoid it crumbling and clogging the rib drain channels. I don’t mean gobs of spray foam, or using it to fill voids. Just keep the foam from rattling and breaking apart.
The wood is done and ready to rivet and I’m going to grab the vinyl decking from HD next week. Might get seats the same day, or at least some mounts/pedestals. I might have to toss the old seats in for a month cause I’m burning money it seems like. Just paid $100 for drain tubes 2 splash well 1 plug drain, 2 new stern eyes and a front navigation light on a pole. My trolling motor blocked the original.
I considered running conduit under the deck, but don’t like the idea. I’m skipping the ski locker also. It let in lots of pine needles and sand, and I don’t trust sealing the locker in the long term. Meaning eventually it will not seal and in comes the crap.
I want everything below deck to be 100% sealed off and good until my great grandkid gets curious as to what’s under there, lol.

I wonder if caulking the edges of the deck wood, is an idea? For the day the edge of the vinyls gets ripped at the edge. The vinyl is going to cover the deck and up the sides all in one piece, but I know the stuff can get torn, and corners especially.

Oh oh and I have to not forget to do a water test. For some reason it skips my mind when I’m planning ahead. I’ve personally inspected, cleaned and sealed every single rivet so it seems like a redundant step, but I know better than to skip it.

Experience comes from bad decisions. Bad decisions come from a lack of experience.
 

Attachments

  • photo312663.jpg
    photo312663.jpg
    208.7 KB · Views: 3
  • photo312664.jpg
    photo312664.jpg
    189.1 KB · Views: 3
  • photo312665.jpg
    photo312665.jpg
    194.7 KB · Views: 3
  • photo312666.jpg
    photo312666.jpg
    281.7 KB · Views: 3
  • photo312667.jpg
    photo312667.jpg
    257.7 KB · Views: 3

PlayD0h

Petty Officer 1st Class
Joined
Apr 23, 2009
Messages
326
So I'm about to put the rivets and bolts in the knee brace plate, and I got some charts to make sure I'm using the right length of solid. for 3/16 the 'clinch allowance' is .187",
The 'Working hole diameter' is .191"
Drill size 11
Now I've read you want the rivet a little loose in the hole, as you want the rivet to expand and fill the hole, yet were talking 40 thousandths here. I'd imagine a lil wobble of the drill would do at least that much, yet thats not ideal obviously.
I'm going to see if a "size 11" bit can be had locally I guess. Would I be anal at thinking I should have one? have millions of rivets been installed in a 3/16' hand drilled hole? I'd think keeping the bit in the hole a few extra seconds, straight as hand eye can get, would get you the .187 to .191.
 

classiccat

"Captain" + Starmada Splash Of The Year 2020
Joined
Dec 20, 2010
Messages
3,412
Right or wrong, I’ve used 3/16” and 5/32” bits for solids. :lol:
 

PlayD0h

Petty Officer 1st Class
Joined
Apr 23, 2009
Messages
326
I took the micrometer to the holes I had drilled. A third were .190 a couple a bit more. I read an aerospace detail actually stating that .188 min to .204 was the acceptable range.
I took the 3/16 bit and just ‘ringed’ it in the hole at 90° and it would barely add a ten thousandth. A quick angled reem would usually add 2 to 4 ten thousandths. I know this isn’t an AirBus but I like to learn. At .191 a 3/16 bit will barely wiggle / rattle in the hole when moved perpendicular.
To be clear, these holes are ones I drilled through the hull and my plate. Not existing holes.

I also learned my 82’ - 83’ SS has ‘Modified brazier’ rivets. The softer rivets I first bought from Aircraft Spruce are modified brazier despite them not mentioning that. The harder 2117 rivets are Brazier, which have the dimple. There is quite a difference in head width between the 2.

Heres a source of rivet data
https://www.hansonrivet.com/rivets/solid-rivets/aerospace-solid-rivets/

i had the hull bottom primed under the knee brace plate since the plate idea came after. I hummed and hawed at whether 5200 was better to use on bare aluminum, and decided it was. If my primer was compromised than the 5200 bond would also. I’m sure 5200 bonds well on paint or primer, but didn’t actually look for the details, if they exist officially from 3M.

So plate goes on today!
 

PlayD0h

Petty Officer 1st Class
Joined
Apr 23, 2009
Messages
326
Plate and brace installed, and stringers all riveted.

Next is the transom wood. Put in place, holes drilled using my 3/4” aluminum plate as a drill guide. Wood removed, holes drilled larger and filled with epoxy. Then placed back and re-drilled proper size.
My drain tubes and stern eyes won’t get shipped till mid next week, so I won’t be able to finish it off. I’ll probably start prepping the hull sides for paint, and doing a leak test in the meantime.
 

Attachments

  • photo312792.jpg
    photo312792.jpg
    231.6 KB · Views: 3
  • photo312793.jpg
    photo312793.jpg
    220.9 KB · Views: 2
  • photo312794.jpg
    photo312794.jpg
    337.4 KB · Views: 1
  • photo312795.jpg
    photo312795.jpg
    241.1 KB · Views: 2
  • photo312796.jpg
    photo312796.jpg
    251.5 KB · Views: 3

PlayD0h

Petty Officer 1st Class
Joined
Apr 23, 2009
Messages
326
i had the hull bottom primed under the knee brace plate since the plate idea came after. I hummed and hawed at whether 5200 was better to use on bare aluminum, and decided it was. If my primer was compromised than the 5200 bond would also. I’m sure 5200 bonds well on paint or primer, but didn’t actually look for the details, if they exist officially from 3M.

guess I could have looked at the 3M directions, Do’h.

“When using 3MTM Marine Adhesive/Sealant 5200 with metals, it may be necessary to prime the surface to achieve adequate adhesion and durability of the bond. Scotch-WeldTM Structural Adhesive Primer EC- 1945 B/A may be used for priming of most metals.
 

Watermann

Starmada Splash of the Year 2014
Joined
Jan 12, 2013
Messages
13,822
guess I could have looked at the 3M directions, Do’h.

“When using 3MTM Marine Adhesive/Sealant 5200 with metals, it may be necessary to prime the surface to achieve adequate adhesion and durability of the bond. Scotch-WeldTM Structural Adhesive Primer EC- 1945 B/A may be used for priming of most metals.


5200 adheres great to clean bare AL. I once tested it on 2 flat pieces , took a hammer and chisel to get them apart.
 

PlayD0h

Petty Officer 1st Class
Joined
Apr 23, 2009
Messages
326
Overlap Shear Strength
One inch (2.54 cm) overlap specimens (0.093 inch (0.2362 cm thickness). Samples cured at 70°F (21°C), 50% Relative Humidity.
Substrate. psi. kg/cm2
Wood(s):
Teak. 502. 35.3
Pine. 680. 47.8
Oak. 549. 38.6
Maple. 656. 46.1
Fir. 700. 49.2
Mahogany. 564. 39.7

Metal(s):
Steel. 538. 37.8
Stainless Steel. 352. 24.7
Aluminum. 393. 27.6
Brass. 474. 33.3
Bronze. 252. 17.7
Copper. 198. 13.9
Lead. 107. 7.5
Zinc (Galvanized). 484. 34.0

Plastics/Polymers:
Fiberglass. 362. 25.5
Gelcoat. 519. 36.5
Polycarbonate. 381. 26.8
Acrylic. 217. 15.3
Nylon. 175. 12.3
ABS. 231. 16.2
Polypropylene. 55. 3.9
Polyethylene. 48. 3.4

Note: Because actual use conditions can vary for each application, each user must determine the suitability of 3M Marine Adhesive/Sealant 5200 for the intended use.
 

PlayD0h

Petty Officer 1st Class
Joined
Apr 23, 2009
Messages
326
I just put a space heater by a Marine Tex patch, cause I don’t think it cures at all unless it’s warm enough. It’s 60° F now, probably 50’s at night (in the garage) and it’s still quite tacky.
I have some short strand fiberglass body filler I got from a body shop supplier. It’s waterproof and has Kevlar and seems like it should do the job on a couple patches at or above the water line. And it cures quick vs Marine Tex or General epoxy.
I started on the trailer with a wire cup / grinder powered, and I’m not going to spend 2 days doing that and going through a half dozen wire cups. There’s a place in Calgary that has outdoor DIY sandblasting. Shouldn’t take me more than an hour and I think it’s like $75 an hour. I spent a small fortune on chemical paint strippers for the boat, since everything has to be low VOC and such. Not the Mar Hyde or days gone by that’s for sure.
And blasting will strip paint and sand smooth in one shot. I’m sure I have a couple things I could bring along that are blast worthy. They provide you with the positive pressure suit and such, so it’s not some guy who will let you use his blaster and fill your lungs with silica, lol.
 

Watermann

Starmada Splash of the Year 2014
Joined
Jan 12, 2013
Messages
13,822
Hey on that Marine Tex, that stuff goes off quick and will actually smoke unless you get the mix ratio wrong.. which yours truly has done. I'm afraid you'll have to scrape it off as it will never get set up and be strong without the proper mix ratio.
 

PlayD0h

Petty Officer 1st Class
Joined
Apr 23, 2009
Messages
326
Hey on that Marine Tex, that stuff goes off quick and will actually smoke unless you get the mix ratio wrong.. which yours truly has done. I'm afraid you'll have to scrape it off as it will never get set up and be strong without the proper mix ratio.

While I won’t say it’s impossible I got the ratios / mix wrong, I spent an hour triple checking everything. It hardened solid pretty much overnight. The tacky isn’t the type where you can see fingerprints, and you can’t dent it, but it’s sticky a bit.

After a few hours at 80°-90° it’s not sticky at all, and the only way to remove it would be to sand it. I think it’s cured, yet from what I’ve read it’s temperature during cure effects it’s strength. The first night it was mid 60’s at the lowest and low-mid 70’s for the first few hours. I’ll test it out once it’s all sanded down and ready for a skim coat.

I was in an awful mood last night and decided before bed I could drill out the holes in the hull sides and get them ready for rivets. I didn’t realize I had the 1/4” bit in the drill and drilled 3 holes to 1/4”. They should all be above the waterline, as it was the top 3 rivets that hold the end cap of the long side storage shelf.

Now I don’t know what to do, yet I think some 1/4 solids might be the best choice. Ordering 100 rivets when I need 3 is going to suck. Especially at $30-$50 shipping.

Its that or fill the holes with epoxy and drill again. Probably wouldn’t hurt anything to do that as there not structurally important and a 3/16 head is .450-.490 and a 1/4 is .250.

Anyone have 3 spare 1/4” solids they could mail me on my dime? I once got some alignment cam bolts for my truck from a guy in California. He put them in a flat rate box, yet it must have weighed 10 pounds. It cost $10, yet US companies and me get robbed on shipping across the boarder for some reason. It’s almost funny how a company will ship items for free from places in the states that are ten times farther than I am from them. Yet the range of shipping fees is absurdly inconsistent. 35 million potential Canadian customers yet most companies don’t even bother knowing their shipping rates drive us all away to their competitor who took the time to set up reasonable shipping.

Even here, Iboats store has an option to select country in shipping address but only has the states as an option. And last time I did look into shipping it was way too high. I bought $60 in boat motor parts from the states once and they shipped it UPS. UPS shoes up and tells me I owe $45 in brokerage fees, on top of the $35 I already paid for shipping. Guess who never uses UPS now? Don’t think I’m alone either.

Ok, off topic rant complete. lol
 

PlayD0h

Petty Officer 1st Class
Joined
Apr 23, 2009
Messages
326
Anyone have any suggestions on adding guides and trailer mods? There were some short bar roller guides on the rear sides, but they were useless.
I’m thinking of taking the bogey wheels off and adding a keel roller in it’s place. I’m thinking of side 2x4 guides and a pair of tall bar / pole guides at the very rear.
I once missed the keel roller by a few inches and got a decent scratch from the bracket that holds the roller. I’d like to avoid the possibility of that, and make retrieving a lot easier.
I would steer the boat till it got to the rear roller, then jump out onto the trailer at the bow, and guide it by hand the rest of the way till the next roller. The one roller is a self-centering roller that I added and it helped a lot. I could stay dry doing all that, but it was sketchy and not a lot of fun.
I’m sure there’s loads of info on here but I barely have time to do anything lately. A tip on who and what to search for would be very helpful. The trailer tilts but I admit I’ve never used the tilt on 2 boat /trailers I’ve had, nor even seen someone else using one. Plenty of 4 stroke guys who just putt their boats up, no problem at all, lol
 

Attachments

  • photo313055.jpg
    photo313055.jpg
    359 KB · Views: 1
  • photo313056.jpg
    photo313056.jpg
    385.8 KB · Views: 1
  • photo313057.jpg
    photo313057.jpg
    415.2 KB · Views: 8

Watermann

Starmada Splash of the Year 2014
Joined
Jan 12, 2013
Messages
13,822
Rollers for the stern where the most support is needed, I would consider putting bunks there, sure would make it easier to load and give way more support.

fetch
 

DLNorth

Chief Petty Officer
Joined
May 26, 2016
Messages
432
Rob, you are not from MN. :)
With that said, I don't like those roller supports, not enough "depth", makes it too easy to contact them with the boat.
Most trailers here these days have the frame "vee'd" to both lower the boat and give clearance to the boat.

I'd get a different trailer if it was me.

Dan

Rollers for the stern where the most support is needed, I would consider putting bunks there, sure would make it easier to load and give way more support.
 

PlayD0h

Petty Officer 1st Class
Joined
Apr 23, 2009
Messages
326
Rollers for the stern where the most support is needed, I would consider putting bunks there, sure would make it easier to load and give way more support.

Thanks, I think I’ll go that route and live with it for a season if not longer. I wouldn’t say it’s difficult to load, but you have to know what your doing.
I don’t like the idea of not having rollers and relying only on bunks. Yet I get the idea of having nothing but bunks to hit.
I’d build a trailer, or completely redesign this one before I’d buy one. I have more time than money. And I’ve built a few deck trailers. I guess the best way is to got look at some trailers and see what I can make happen.
Out of curiosity, what’s with MN regarding boat trailers? We have some nasty ones here in Alberta. 2 feet of ice do a number of them. Not always a bad thing though as it keeps some lakes quiet and the big ski boats and there D-bag owners away, lol.
 

DLNorth

Chief Petty Officer
Joined
May 26, 2016
Messages
432
What's the question?

We have a lot of boats and boaters, and most/many go from home to lake each use, meaning lots of launches.
Everybody want's easy launching and often the boat needs to be cranked up, tough to do that with bunks.
We do have bunks here but it "seems" they are on high powered speed boats and bass boats.
I "think"? most of the fishing/aluminum are on rollers.

Dan
ps: there are about 850k reg boats and 1.6 million fishing licences in MN, makes for a lot of boats on the roads and lakes

Out of curiosity, what’s with MN regarding boat trailers?
 
Top