Popular Mechanics 1962 PM38 Build [SPLASHED 2017]

pekstrom

Chief Petty Officer
Joined
Dec 31, 2015
Messages
490
No Title

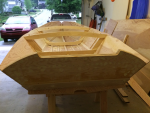
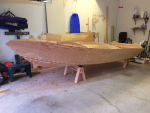
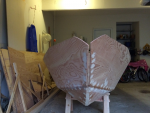
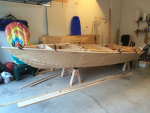
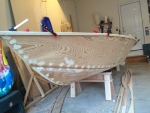
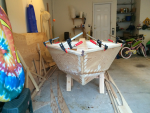
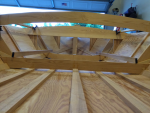
Finally got her turned over tonight. It took 4 of us to get it accomplished. I put together the two saw horses after I realized I didn't have anything to support her at a height that would allow me to work on the inside and the decking. They are about 18 inches tall and puts her at a good height for me. She looks so different now. :) 
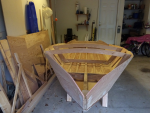
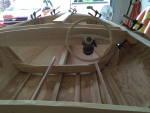
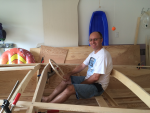
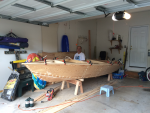
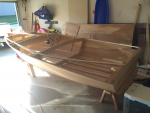
On to the sheer rails so I can trim off the excess plywood, and then frame #1 and the dashboard, etc, etc.
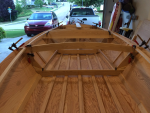
 

Attachments

  • photo245512.png
    photo245512.png
    1.4 MB · Views: 2
  • photo245513.png
    photo245513.png
    1.3 MB · Views: 2
  • photo245514.png
    photo245514.png
    1.5 MB · Views: 2
  • photo245515.png
    photo245515.png
    1.4 MB · Views: 1
  • photo245517.png
    photo245517.png
    1.7 MB · Views: 2

Ned L

Commander
Joined
Sep 17, 2008
Messages
2,268
Congratulations! You should feel quite a sense of accomplishment, and rightfully so. Nice job!
 

pekstrom

Chief Petty Officer
Joined
Dec 31, 2015
Messages
490
Thank you for the encouraging words. They are much appreciated. I have been waiting for this moment for quite a while and seeing her like this makes me think I may actually pull this off. :)
 

pekstrom

Chief Petty Officer
Joined
Dec 31, 2015
Messages
490
No Title

This weekend was pretty productive. Got the side plywood trimmed down along the sheer rail so now the true lines of the boat shows. Also got the inner deck supports steamed and bent in place. Got frame #1 installed and got the dashboard temporarily in place. I need to work some more on the fit of the side supports before I can attach it permanently. The plans call for cutting out the bottom arch of the dash. But I have seem others comment that there's very little room for gauges etc. if you do, so I opted to keep it. Looks like I'll have plenty of room for the gauges I eventually want.
 

Attachments

  • photo246036.png
    photo246036.png
    1.6 MB · Views: 2
  • photo246037.png
    photo246037.png
    1.6 MB · Views: 2
  • photo246038.png
    photo246038.png
    1.6 MB · Views: 2
  • photo246039.png
    photo246039.png
    1.3 MB · Views: 2
  • photo246040.png
    photo246040.png
    1.5 MB · Views: 2

pckeen

Commander
Joined
Jun 20, 2012
Messages
2,067
Good idea - if you decided you wanted to cut it out, it can always be done later. Looking great - what's the next task?
 

pekstrom

Chief Petty Officer
Joined
Dec 31, 2015
Messages
490
Yes pckeen it is always easier to remove than to add back :) And in looking at it, I kinda like how it looks so unless it becomes a problem with legroom I'll probably leave it like this. We will see. Next up is to work on getting the proper fit between the side supports for the dash and the sides of the hull. Then to glue and screw it in place. After that I'll work on the inside deck supports to get those permanently in place as well. Once that's done I'll probably work on the bench. There are a couple of risers and a 'bench' for it to rest on. I'll leave the actual seat out though until I have epoxied and painted the innards so I can get to everywhere. :)
 

pekstrom

Chief Petty Officer
Joined
Dec 31, 2015
Messages
490
No Title

Btw, had to revert to an old school method for my steam bending process. Turns out my little camping stove decided to quite working, so I decided to use the charcoal method. :) Worked like a charm though.
 

Attachments

  • photo246085.jpg
    photo246085.jpg
    84.4 KB · Views: 0
  • photo246086.jpg
    photo246086.jpg
    81.2 KB · Views: 0

pekstrom

Chief Petty Officer
Joined
Dec 31, 2015
Messages
490
No Title

So I just couldn't wait, I had to step in the boat and sit in the driver's seat for a moment. The seat isn't done yet so I just rigged a temporary seat. I also used a clamp to temporarily hold the steering wheel in place to try it out. Not too bad! And the one of the full boat shows a bit of its size too. :)
 

Attachments

  • photo246337.png
    photo246337.png
    1.2 MB · Views: 1
  • photo246338.png
    photo246338.png
    1.2 MB · Views: 1
  • photo246339.png
    photo246339.png
    1.4 MB · Views: 1

ssdale

Starmada Splash of the Year 2016
Joined
Nov 4, 2011
Messages
285
You've got a nice set up in the making with that 25 hp. Will be as zippy as it looks! Press on!
 

pekstrom

Chief Petty Officer
Joined
Dec 31, 2015
Messages
490
No Title

Thank you for all the kind words! This is how she's sitting right now. I finished the foredeck center support and the side deck supports yesterday. Also attached the sheer rails with screws so I could remove all the clamps. They aren't glued yet though. Basically I just have the seat left and some spackling/sanding, and then epoxy and pain for the inside. :)
 

Attachments

  • photo246394.png
    photo246394.png
    1.3 MB · Views: 0

TruckDrivingFool

Lieutenant Commander
Joined
Jul 30, 2007
Messages
1,818
I didn't realize it until that last pic you posted that last pic but look at all that space back there, you got any plans for filling it?
 

pekstrom

Chief Petty Officer
Joined
Dec 31, 2015
Messages
490
Yeah, it does have quite a bit of space back there. There are 4 of us in the family so my plan is to replicate the forward facing bench as a rear facing bench just behind the frame. That will give me a couple of more seats back there. And of course the gas tank and battery will also take up some space but closer to the transom. Over time I may come up with some other items too but for now that's the immediate plan.
 
Top