Questions about replacing prop shaft seals

MercGuy

Petty Officer 2nd Class
Joined
Jul 20, 2006
Messages
195
Hi all,

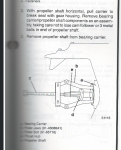
I plan to replace the propshaft seals on my 1998 Merc 115.

Per the attached photo I plan to use a 2 jaw puller to remove the bearing carrier.

However, I'm bothered about the sentence "take care not to lose the cam follower or 3 metal balls in the end of the propeller shaft"

My plan is to break the bearing carrier loose and then slide it off the prop shaft while holding the prop shaft firmly in the lower unit, replace the seals and then reassemble.

Is that practical ? Can anyone offer advice before I tear into this project ?

Thanks

fetch
 

Attachments

  • photo237033.PNG
    photo237033.PNG
    316.9 KB · Views: 0

wrench 3

Commander
Joined
Aug 12, 2012
Messages
2,108
You can take it apart like that but you will still have to remove the prop shaft in order to reassemble it. If you flip ahead a few pages in the manual, you will find the assembly instructions. You need to hold the shaft into the bearing carrier as you install them in order to keep the reverse gear thrust bearing in place. And believe them. The shoulder that keeps the bearing in place is very shallow.
The balls etc. are nothing to worry about. They just slide into the front end of the shaft. Reinstall them with a bit of grease before installing the shaft. They're just worried that you'll drop them on the floor and loose them. Take precautions to stop them from rolling away and you should be fine.
 

MercGuy

Petty Officer 2nd Class
Joined
Jul 20, 2006
Messages
195
Thanks for that info.

In your experience do I need to worry about grooves in the prop shaft from seal wear ? Should I order some speedy sleeves in advance ?

Also, I have found seal kits from Sierra and GLM, are either of those good to use or should I source official Mercury parts ?

Thanks again,

-Steve
 

wrench 3

Commander
Joined
Aug 12, 2012
Messages
2,108
It's hard to give an opinion on the grooves without seeing them. But shallow smooth wear is fairly normal and should seal OK. I'm not sure how you would install a speedy sleeve that far down a shaft, but I guess if there's a will there's a way.
I use mainly Sierra kits and have had really good luck with them. Also most of their seal kits come with line cutter seals to help prevent fishing line from wrecking the seal.
 

MercGuy

Petty Officer 2nd Class
Joined
Jul 20, 2006
Messages
195
I thought I would follow up on this.

This job turned out to be a real headache, due to an error on my part.


Here is the bearing carrier and prop shaft pulled from the lower unit. Everything looked excellent. After 17 years and 1,100 hours of run time I could not see any significant wear, or anything that indicated that there isn't many,many years of serviceable life left in the lower unit.

0


When I pulled the prop shaft out of the bearing carrier there was some wear on the shaft from the oil seals, but it wasn't really that bad. I decided to go ahead and install some speedy sleeves to repair the seal wear - bad decision on my part.

You can see here where I pressed on a speedy sleeve indicated by the red arrows. There are 2 oil seals on the prop shaft, the blue arrow shows the wear mark from the second oil seal. I decided not to install a speedy sleeve for that seal because it is so close to the needle bearings. You can see the polished surface just to the right of the blue arrow where the shaft rides on the needle bearings.

0


Well, I was in for a big surprise when I tried to put the shaft back into the bearing carrier. Of course the speedy sleeve would not fit through the needle bearings !!! Very stupid on my part !!!!

So, I had no choice to to remove the speedy sleeve which was pressed on and loctited in place. I had to use a chisel to remove the speedy sleeve, and in the process of getting the speedy sleeve off I boogered up the shaft such that there was no possible way that an oil seal would ever work.

Shoot !!! So now what was I to do ???

What I ended up doing was pressing the first oil seal in the bearing carrier and installing the prop shaft into the bearing carrier.

Then, I very carefully installed a speedy sleeve to the shaft after it was installed past the needle bearings. It was quite difficult to press the speedy sleeve on the assembly, I had to use a length of pipe over the prop shaft to accomplish this


0


After the speedy sleeve was pressed on the prop shaft I then used the length of pipe to install the second oil seal as shown:

0


Whew, it worked !!!

I think the final job is as right as rain. However the prop shaft can no longer be removed from the bearing carrier because the speedy sleeve won't pass through the bearings !!!

I don't think that will ever be my problem seeing as how the first set of seals lasted 17 years, but someday someone else might end up scratching their head trying to figure out why they can't get the prop shaft out of the bearing carrier !!!
 
Top