Rebuild/repurpose 1986 Alumacraft 1610 Supreme

ezmobee

Supreme Mariner
Joined
Mar 26, 2007
Messages
23,767
Re: and the transom, too

Re: and the transom, too

Rotted all the way through about a foot wide, but the port 3/4s is solid.

Geez, what a lot of wasted effort. You could have just shifted your motor over some :p:D
 

Lewis

Petty Officer 2nd Class
Joined
Jun 17, 2002
Messages
164
Re: and the transom, too

Re: and the transom, too

Here's the epoxy mixing station -- an offcut piece of plywood on top of a trash can. Still, it's the most organized and neat that I'm likely to be for the next couple of weekends. I've read here that Auruco really soaks up epoxy, so I layed out all three pieces of the new transom wood and coated each mating face with unthinned epoxy. While the thin layer on the boards was still liquid, the leftover epoxy went way exothermal on me! After the epoxy on the boards had just gelled, I put them together with some more epoxy thickened slightly with microfibers. Oh, yeah, and a couple of clamps. They say you can't have too many clamps, but they've never met an addict like me.
More tomorrow....
Lewis
 

Attachments

  • 087.jpg
    087.jpg
    134.4 KB · Views: 1
  • 086 (980x735).jpg
    086 (980x735).jpg
    79.6 KB · Views: 1
  • bb 001.jpg
    bb 001.jpg
    146.8 KB · Views: 1
  • bb 002.jpg
    bb 002.jpg
    144.5 KB · Views: 1

Lewis

Petty Officer 2nd Class
Joined
Jun 17, 2002
Messages
164
Re: and the transom, too

Re: and the transom, too

Here are a couple of my ostensible helpers. One's pretty good if the wolves are after the sheep, and one's pretty good if you want a cute pair of shoes. But the two of them together have a tough time figuring out which is the business end of a wrench.
 

Attachments

  • 069 (980x735).jpg
    069 (980x735).jpg
    52.1 KB · Views: 1

Lewis

Petty Officer 2nd Class
Joined
Jun 17, 2002
Messages
164
Re: and the transom, too

Re: and the transom, too

Clamps are off, test fit passed, and all of the holes have been drilled oversize and filled with epoxy thickened with microfibers and chopped strand. In many applications, this is a really ugly mixture -- it doesn't fair well, it doesn't sand well, and it sure doesn't finish well. But it's strong as nails and will work well here.

It might also work well for plugging unused through-hull holes; I've got a thread going about that: http://forums.iboats.com/showthread.php?t=473822. But that's something I need to think about a bit.

I pried part of the center of one of the holes out when I was partway through with the hole saw. I was pleased to see it tore at the wood, not the joint.

My brother in law stopped by yesterday to return a belt sander he'd borrowed, and happened to mention using a heat gun to get off the decals. I gave it a try while the epoxy was setting. Works like a charm! Still a pain, because there are so many on this boat that have to come off, but way easier than I expected.
 

Attachments

  • 005.jpg
    005.jpg
    144.1 KB · Views: 1
  • 001.jpg
    001.jpg
    143 KB · Views: 1
  • 004.jpg
    004.jpg
    135.5 KB · Views: 1
  • 002.jpg
    002.jpg
    143.3 KB · Views: 1

bassmanhb

Petty Officer 2nd Class
Joined
Sep 4, 2010
Messages
147
Re: got rivets?

Re: got rivets?

lewis,

im about to order some rivets for my boat and was wondering how yours worked out ? im looking at these.....

http://www.rivetsonline.com/closed-end-blind-rivet-pr84asph.html

alittle bigger than what you are using. what size rivets are in your boat now 3/16 th ? and are you worried about the holes being out of round or mishaped ? for the new rivets being the same size. thanks


bass
 

Lewis

Petty Officer 2nd Class
Joined
Jun 17, 2002
Messages
164
Re: got rivets?

Re: got rivets?

Bass,
The wide flange rivets are for fastening down the floor. The floor I'm replacing is not the original, and so I don't really know how the original floor was attached. I'm going to be drilling all new holes in the floor and through the ribs and bulkheads below. Maybe I'll hit an old hole in a stringer or bulkhead, but certainly not many. Since all the holes will be new, I'm not worried.

For the other ones, the closed end ones, the existing holes are 3/16", the same as I'm going putting in. I'll probably need a few aluminum 3/16" backer washers for a handful of holes that I need to wallow out or drill a little oversize, but again not many.
Lewis
P.S. Just made it to page 2!
P.P.S. Just so you know, I haven't actually put in a single one of these 300 rivets, so take this for what it's worth!
 

bassmanhb

Petty Officer 2nd Class
Joined
Sep 4, 2010
Messages
147
Re: got rivets?

Re: got rivets?

lewis,

thanks for the quick reply.... mine will all be in the hull to replace 11 that i have that are leakers :( so im going to drill them out to 1/4 and use those i posted the link for.... along with some 3m 5200 then i will use gluvit inside the hull around the rivets and seams, i hope it works ;)


bass
 

KellyC

Senior Chief Petty Officer
Joined
Aug 24, 2010
Messages
733
Re: got rivets?

Re: got rivets?

Hey bass, I was reading your thread and see that you are ordering aluminum rivets with steel mandrels. I have been of the understanding that you want to use all aluminum rivets, this includes the mandrel as part of it stays in the rivets and will eventually corrode. Just going by what I have read though and it is not a for sure thing.

Kelly
 

Lewis

Petty Officer 2nd Class
Joined
Jun 17, 2002
Messages
164
Re: got rivets?

Re: got rivets?

Kelly,
Good catch! I didn't look at Bass' order that closely. You are absolutely right; you should not use rivets with a steel mandrel in a marine environment. Rivetsonline has them with aluminum mandrels, Bass, so double check to make sure you're getting the right ones.
Lewis
 

Lewis

Petty Officer 2nd Class
Joined
Jun 17, 2002
Messages
164
back at it

back at it

Work stuff, house stuff and family stuff have kept me from getting as much done as I would have liked, but I have made some progress. All the deck pieces (1/2" Arauco ply) are cut and the spots where the seat pedestal bases will be are reinforced with a layer of 3/4" Arauco, all epoxied together and the bottom side coated with two coats of epoxy. I use the "basic no blush" epoxy from http://www.epoxyproducts.com/. I've used it for quite a few projects over the years and always with good results.

I've made the most progress on the splashwell. The first photo shows it just after I cut it (circular saw with a plywood blade), with the two pieces lined up. This thing is huge! Then fast-forwarding through a a lot of work that I didn't photgraph, the transom wood is reinstalled and the cut-down splashwell, too.
 

Attachments

  • 005.jpg
    005.jpg
    144.3 KB · Views: 2
  • 009.jpg
    009.jpg
    142.7 KB · Views: 2

Lewis

Petty Officer 2nd Class
Joined
Jun 17, 2002
Messages
164
Re: back at it

Re: back at it

I need to get the motor mounted soon, even though that will put me outside because the boat won't fit in the garage with the motor on. I may rent an engine hoist for a couple of days so I can temporarily mount the motor. I need to be able to see where it hits when it's tilted all the way because I think I'll need to cut down the forward end of the splashwell. You can see from the pics that it's pretty tall. You can also see that I need to strip a lot of old silicone and repaint the outside of the transom! And paint the trailer, too.

I used Aluthane (from progressive epoxy) on the transom - wood and aluminum both. I don't have any connection with progressive epoxy other than being a satisfied customer, but I think Aluthane is a miracle product. This stuff adheres to anything and is hard as nails when dry. It makes plywood look like aluminum and it makes aluminum with old paint look bright and new.
 

Attachments

  • 011.jpg
    011.jpg
    139.9 KB · Views: 1
  • 010.jpg
    010.jpg
    135.6 KB · Views: 1

Lewis

Petty Officer 2nd Class
Joined
Jun 17, 2002
Messages
164
Re: back at it

Re: back at it

I also need to get the motor mounted with the tiller on to be able to tell where the driver's seat goes. I put in an 18" reinforcing piece for the driver's pedestal base, so I've got a pretty good fore and aft range. The first pic shows the layout marks to get the reinforcing piece in the right spot, then a view of the bottom of the starboard side aft deck. The last one shows a cut edge of the Arauco. I have cut up a lot of this stuff over the last week or two, and I have yet to find any significant voids. I'm very impressed with this stuff. I've rounded over all the cut edges of all the pieces with a router, and it machines very well. Only time will tell if it lasts, but it works great and takes finish well.
 

Attachments

  • 012.jpg
    012.jpg
    138.8 KB · Views: 1
  • 013.jpg
    013.jpg
    139.9 KB · Views: 1
  • 014.jpg
    014.jpg
    132.9 KB · Views: 1

Lewis

Petty Officer 2nd Class
Joined
Jun 17, 2002
Messages
164
Re: back at it

Re: back at it

Thanks, EZ.
Well, last night I did the first truly dumb thing (that I know of!) in this project -- unless you count not walking away when I saw how much rot there was. I am putting the motor on today so I scraped off all the old silicone and other gunk from the section of the transom that the motor will cover, and then wire-wheeled it. The wire wheel took off the gunk, but also some of the paint, so I wanted to get a coat of Aluthane on that area before I bolt the motor on. It was dark and I was tired, and I completely forgot to wipe down the transom before I painted. Didn't even brush it off, much less clean it with any kind of solvent. Surprisingly, it looks pretty good! I was planning to scape and repaint this morning, but I can hardly even scrape it off. Not the smoothest finish ever, but it won't really show. Guess I dodged a bullet this time.
 

Lewis

Petty Officer 2nd Class
Joined
Jun 17, 2002
Messages
164
Converting 1994 Mercury 60HP to tiller

Converting 1994 Mercury 60HP to tiller

Hi,
I'm looking for some help on setting up 1994 60HP Mercury motor for a tiller. I have never done this before, and I'd hoped it would be an easy bolt-on job, but not so far! The pics attached show the front of the motor I'm trying to attach a tiller to. I understand (I think) how the shifter, throttle, wiring etc. all connect, but I'm not sure how the tiller mechanically connects to the motor. Here's a link to the tiller I bought: http://cgi.ebay.com/ebaymotors/ws/e...0519421153&viewitem=&sspagename=STRK:MEWNX:IT
Obviously it doesn't fit, but is that because it's the wrong tiller, or because there's another piece (that I'm missing) that goes between the motor and the tiller? The motor serial number is 0G024262 if that helps.
I'm also posting on the motor forum: http://forums.iboats.com/showthread.php?t=476124&p=3220809#post3220809
Thanks,
 

Lewis

Petty Officer 2nd Class
Joined
Jun 17, 2002
Messages
164
Re: Converting 1994 Mercury 60HP to tiller

Re: Converting 1994 Mercury 60HP to tiller

Not many pics tonight, but quite a bit of progress. The motor is on, the tiller is attached (altho I still need to adjust the throttle and hook up the wiring). I spent quite a while this afternoon in the boat with a desk chair on the deck boards lying loose. I'd roll back and forth trying to figure out the optimal placement for the pilot seat. Neighbors thought I was crazy; I'm not sure they're wrong. The tiller on this 60 is much longer than on any motor I've ever had. The side-to-side sweep is about 6 feet; I'm 5' 10" and I don't have a 6 foot wingspan, so there's no place to put the seat that I can push the tiller from stop to stop. I marked about 8 spots that I thought would be OK to put the pedestal base, and then ultimately drilled and cut at the first one! That spot *I think* will allow me to sit and hold the tiller comfortably for long runs between holes and still let me cover most of the side-to-side range. I think it will also allow me to stand just behind the pilot seat and run the boat standing up and leaning on the back of the pilot seat.

So I went ahead and drilled and cut out the holes for three pedestal bases, and coated the top sides of all the deck pieces and bow platform pieces with a heavy coat of epoxy. Tomorrow night I'll rivet down the floor and lay down the Super Convoy (http://www.kelleytech.com/olympic/olympic-techbulletin-view.asp?ID=27). I used this stuff on my Searay project a few years ago, and I really like it. I think its original purpose was as a non-slip coating for diving boards and pool decks, so it should stand up to quite a few years of UV rays. It's definitely non-skid, but not too much bite. I've had to spend some time under the dash on the Searay, and I can squirm around on my back without a shirt and not draw blood.

One of the most interesting aspects of this project is the compromises between time and quality. I got the boat on April 13; I plan to splash on May 13. That's exactly one month to tear out the consoles, windshield, etc., replace the floor and transom, rig out a new outboard and trolling motor (and maybe a kicker), put in new seating, get titles and licenses, and load it up with beer and fishing tackle. If I had a lick of sense, I'd never have started! Most of the concessions I've made for time are really just cosmetic: I've kept a lot of the 25 year old carpet, and I'm not repainting the hull. I've got plans for storage and electronics that won't get done for the first trip, but the structure's there to get that stuff done time permitting this summer.

I've got a few photos of the action over the last couple of days, but who needs to see another pic of deck boards on sawhorses? I'll cull thru and try to do a photo recap tomorrow.
Lewis
 

ezmobee

Supreme Mariner
Joined
Mar 26, 2007
Messages
23,767
Re: Converting 1994 Mercury 60HP to tiller

Re: Converting 1994 Mercury 60HP to tiller

Sounds good Lewis. I'll be interested to see your set up.
 

Lewis

Petty Officer 2nd Class
Joined
Jun 17, 2002
Messages
164
more progress, more pics

more progress, more pics

I'm waiting for the epoxy floor coating (Super Convoy) to induce, so I thought I'd throw up a few quick pics. The motor installation went off without a hitch, although I had to lower the motor onto an impromptu motor stand quickly attached to the pallet so that I could take up some more chain on the hoist. And even though it looks close, I managed to get the motor on the boat without bashing into the garage.
Then there's a pic of the first floor piece installed, and finally the whole deck. That's it for the pics for tonight. Time to go lay some goopy epoxy paint!
 

Attachments

  • iphone 133.jpg
    iphone 133.jpg
    147.6 KB · Views: 5
  • iphone 131 (732x980).jpg
    iphone 131 (732x980).jpg
    139.6 KB · Views: 4
  • iphone 134 (732x980).jpg
    iphone 134 (732x980).jpg
    97.7 KB · Views: 5

Lewis

Petty Officer 2nd Class
Joined
Jun 17, 2002
Messages
164
more questions

more questions

I'm getting closer to being able to splash and even fish a little this weekend, but some of the finer details still need to be worked out. On of those is exactly how the splashwell will be finished. I can cobble something together that will keep the water out, but not at all sure it will be ideal.
The pics show a current model Alumacraft 1650 tiller -- something close to the design I'm working towards. It is hard to tell from the pics, and I've never seen one of these in person, so I'm hoping someone here can help me out. I'm hoping someone here owns this boat or at least has checked one out at a boat show. It looks like the splashwell is really small and the forward end of the splashwell is a narrow platform with a seat pedestal base or maybe even two. Is that correct?
Thanks,
Lewis
 

Attachments

  • Classic-165-Tiller-2.jpg
    Classic-165-Tiller-2.jpg
    28.6 KB · Views: 4
  • Classic-165-Tiller-3.jpg
    Classic-165-Tiller-3.jpg
    34.5 KB · Views: 4

Lewis

Petty Officer 2nd Class
Joined
Jun 17, 2002
Messages
164
quick update

quick update

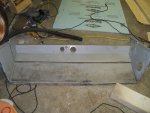
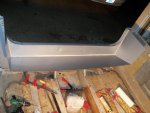
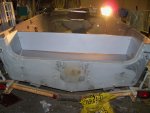
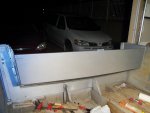
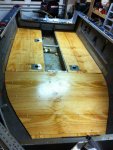
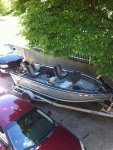
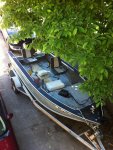
Work almost kept me from making my launch date, but I compensated by not sleeping! Still a lot of work to be done, but the pictures show the boat back home after its inaugural trip -- splashed it 31 days after purchase. The boat had zero issues. Seating and general layout seemed pretty good. Had some issues with getting the motor set up properly with the tiller, but it ran like a champ.
First day out, I had the shift lever adjusted way too short, so that it only started in forward gear, wouldn't go in reverse at all, and would only go in neutral if I held the shift lever. The trolling motor blew out the microswitch and didn't work after the first few minutes, and I forgot to load a paddle or oar. So I spent the afternoon fishing with two friends, and we had to be careful not to get into any situation that we couldn't get out of by motoring forward! For the second day, I had the shift lever adjusted much better so that all 3 gears worked, and I picked up a stout stick to push off of things. Caught a bunch of fish and generally enjoyed the new boat and just being out on the water.
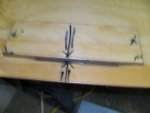
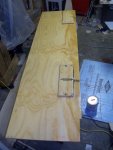
I'm going to redo the bow platform to allow better access to the storage space beneath and keep the storage space drier, add side storage, electronics, rig the lights, etc. But at this point, all of that seems more like tweaks than major rebuilding. I'm planning a 4-day trip in mid-June, so that should serve to keep me motivated! I'll post some pics of some of the detail work, and plan to move into the "finished projects" section by June 16.
Lewis
 

Attachments

  • 002 (956x1280).jpg
    002 (956x1280).jpg
    148.6 KB · Views: 7
  • 001 (956x1280).jpg
    001 (956x1280).jpg
    151 KB · Views: 6
Top