Rebuilding Mercruiser 165 - GM 250 I6

Status
Not open for further replies.

Fishermark

Vice Admiral
Joined
Oct 19, 2003
Messages
5,617
Here's the modification when finished. (You can tighten up the hoses a little bit to make it a little cleaner!)

DSCF5700.jpg
 

ethan169

Petty Officer 2nd Class
Joined
Oct 21, 2012
Messages
137
Man I cant believe the amateur mistake I made. You guys guessed it timing was off. Specifically 180? out. I turned that engine over by hand for about 20 min until I convinced myself I was actually on the compression stroke. Once I had the #1 on at TDC on the compression stroke I rewired the cap and the wires magically routed in a much cleaner fashion. I turned the motor over a few times to build some oil pressure again with the coil disconnected. Once I had 30+psi I attached the coil and it basically fired right off. It didnt really run but I dont know if the idle settings are right. It was only me in the garage tonight so the throttle basically stayed closed. Tomorrow I'm going to have a helper work the key and I can mess with the throttle and timing while they are cranking.

Since the engine harness from the boat is so long I just wheeled the engine on the stand up behind the boat and plugged the harness in. So I'm starting the engine from the help. The only difference is there is no throttle control.

Fishermark where did you end up sourcing your manifold from? Did you ever look into repairing any cracking? The crack I have seems so small. I really dont want to spend another $500 on this engine if I dont have to.. I will I have to though since I've basically passed the point of no return.

Thanks for the help guys!
 

ethan169

Petty Officer 2nd Class
Joined
Oct 21, 2012
Messages
137
Fishermark - thanks for the information on rerouting the water flow through the manifold. I will certainly look into it!

I rigged up a piece of string to the throttle and was able to get the motor actually started today. I had everything running for about 15 minutes at 2000 rpm with a handful of varying revs in there. It seems to run well on the stand. It doesn't really idle though. I had to replace both idle mixture screws and I'm not sure where to really start with them. Same with idle adjustment. It seems at slight part throttle it stumbles a little but is very snappy when the throttle is jabbed. As I mentioned before the mixture screws are slightly different then the ones I took out. I can't seem to find a good starting point for idle. Maybe the throttle is just closed too much to start with? Could I have messed something else up on the rebuild or the carb?

My boat help doesn't have an actual oil pressure gauge or a water temperature gauge. Just the warning lights. Right now I have a mechanical oil pressure gauge plumbed in and the oil pressure switch is not installed. I wanted to be sure the pressure readings were accurate. I get about 50-60psi between 1-3k rpm. Seems ok to me. For the water temperature I have the sensor that was from the donor motor which i believe was a 1968. Who knows how old the sender actually is though. When its connected to the boat harness it throws the temp warning light on quite early. I connected a known good electronic gauge from my other boat to it and it looks like it sits between 130? and 150?F I have a few blank gauges at the helm and plan to add oil pressure and water temp however I would like the warning lights to work properly. Anybody know when they are supposed to turn on? Is there a specific water temp sender I should be using?

Something else to note I do have a very small amount of blowby coming out of the valve cover vent. Nothing crazy but there is some haze. I assume this is normal since the rings really heaven't seated yet?
 

Alumarine

Captain
Joined
Feb 22, 2005
Messages
3,738
I have a Sierra Audible Warning Kit and their sensors are set for 6 lbs for oil pressure and 200 degrees for temp.
 

ethan169

Petty Officer 2nd Class
Joined
Oct 21, 2012
Messages
137
Thanks for the specs on your setup Marc.

I cant get the idle right for some reason. I have tried with both screws basically almost all the way in and it kind of stumbles and doesn't want to stay running without a little bit of throttle. tried with them a few turns out and basically got the same result. I've raised the idle a little with the adjustment screw so it would somewhat stay running by itself and I could fiddle with the mixture screw but nothing seems to really making a difference.

Maybe this is related but I dont really know what to time this engine to. The sticker on the valve cover says 6 degrees before TDC. I try that and it wants to start to stall. It seems to run better around the 12 degree mark or more. The highest mark I have on my timing cover is the 12 mark. My timing light is ancient so I suppose if that sort of thing goes bad it could be going bad. What did you guys with the 250's time your motors too?

How about adjusting the idle? Any Ideas?
 

ihc1470

Seaman
Joined
Jun 21, 2015
Messages
65
Several things that it could be. You mentioned earlier a weak spark. Did you get that corrected? Is it points or electronic ignition? If points what do you have them set at and how did you check that sitting feeler gauge or dwell meter? And what is your setting? As far as testing a coil with an ohm meter basically I look for a reading of around 1.2 to 1.5 ohms on the primary and 7.5 to 10 k on the secondary side. I question the average ohm meter to read spot on under 1 ohm. The best and most accurate way is a coil tester if you can find someone who still has one. Most coils that are supposedly weak when I have tested them are actually just fine. I have a Snap On coil tester. 6 degrees should be just right on timing. If you think you have a fuel issue a trick you can try is to give it another source of fuel. What I use is propane. If you have a plumbers torch crack the valve open, with your engine running run the unlit torch along the manifold joint and where the carb bolts to the manifold and also into the carb. If you pick up speed you have found a leak. If on the other hand you don't pick up speed and when you feed a little into the carb it slows down or loads up more your running to rich. A little depends on how open you have the propane valve. Just crack it as you can get way to much fuel if you open it wide open. Propane is pretty safe to use this way. One last question; why did you have to replace the idle mixture screws? As far as initial sitting I would set them 2 turns out from lightly seated and go from there.
 

Alumarine

Captain
Joined
Feb 22, 2005
Messages
3,738
Here's some generic 165 settings.
Idle is 650-700 in gear in the water
Points .022" dwell 28-34
Timing 8 BTDC
Initial carb settings 1-1/4 turns out, after gently seating them
Firing order 1-5-3-6-2-4

Maybe you have a vacuum leak?
You could spray some carb cleaner around the carb/manifold and see if it affects the idle.
 
Last edited:

ethan169

Petty Officer 2nd Class
Joined
Oct 21, 2012
Messages
137
Thanks for the replys Marc and ihc.


Ihc - to answer some of your questions

- Yes I think the origional coil is ok. It measured at 1.2-1.3 ohm on the primary and a little over 10k on the secondary. I used a fairly good Fluke DMM (I forgot the model number) and subtracted the lead resistance for the primary measurement. The engine seems to run the same with the known good MSD blaster coil from my other motor and the original mercruiser one that it came with.

- I has points ignition with new points, condensor, plug wires, plugs, cap, rotor. I set the points gap with precision feeler gauges to whatever the manual I have said. I will have to look at it tonight when I get home to confirm the gap. I have a dwell meter but haven't used it yet. I can check the dwell its just hard when the engine wont really idle.

- I have a plumbers torch and can give this a try as a last resort. I dont think I have any leaks as I replaced every gasket and made sure connections were tight.

- as for replacing the mixture screws, one of them was fine but the other one was corroded a little bit below the taper. I ordered two of them since they were cheap. I tried the original screws and the new ones with the same result.

I'll take a look tonight and report back.

Thanks again.
 

alldodge

Moderator
Staff member
Joined
Mar 8, 2009
Messages
42,561
Hope this isn't your problem but it is sounding to me that the timing chain/gears are not correct.
 

ihc1470

Seaman
Joined
Jun 21, 2015
Messages
65
Hope this isn't your problem but it is sounding to me that the timing chain/gears are not correct.

I some what get that same feeling too. Easiest way at this point to check that is pull the valve cover and bring the engine through TDC. Watch the valve train on the cylinder 1 or 6 that is on the exhaust stroke the exhaust valve should have just close as you hit TDC. As you go past the intake will start to open. This normally happens very close to TDC unless you have a wild cam grind. If your finding things don't match up like that then I would suspect maybe cam timing is off a tooth or so. Lets us know what you find.

You can check dwell at cranking speed. It usually will be pretty close to what it will be running. Small dwell numbers= wide points and large dwell number= small points gaps.
 

ethan169

Petty Officer 2nd Class
Joined
Oct 21, 2012
Messages
137
Well I should say that that cam had what looked to be a new timing gear on it. If I recall on the crank and the cam timing gear there was a dimple on each gear that was marked with a sharpie or something like that. I have to go back and look at my manual but I believe I followed my manual on installing the cam and setting the timing between the two.

I will try to try ihc1470's checkout procedure as soon as I can. My oil primary on my boiler went out and even though its warm enough to survive without heat I didn't have any hot water. So tonight that was my project. I'll report back with what I find.

If it were off a tooth (I hope I was more careful then that) It wouldn't be so bad to fix right? I mean the motor is on a stand. The biggest issue would be making sure the timing cover were to seal correctly upon re installation. Or am I missing something? Is it possible that the gear was installed on the cam wrong? Its keyed isn't it?

I should be able to check the dwell at the same time and let you know.

Thank you!
 

ethan169

Petty Officer 2nd Class
Joined
Oct 21, 2012
Messages
137
No Title

I took a look at my manual again and this is what it says.

"Removal/Installation
1. Crank the engine over until the No. 1 piston is
at the top of its compression stroke. The timing
mark on the pulley/damper will align with the
TDC mark on the timing gear cover and the
distributor rotor will point to the No. 1 spark plug
terminal in the distributor cap. Remove the
distributor. See Chapter Thirteen.
2. Remove the rocker arm cover as described in
this chapter.
3. Remove the timing gear cover as described in
this chapter.
4. Remove the fuel pump. See Chapter Eleven.
5. Remove the rocker arm assemblies as described
in this chapter.
6. Remove the pushrod covers (Figure 20) and
discard the gaskets.
7. Remove the valve lifters and place in a rack or
other container in the order removed so they may
be reinstalled in their original locations. Figure 21
shows lifter location, with one lifter removed.
8. Rotate the camshaft to align the timing gear
marks (Figure 22).
9. Working through the access holes in the
camshaft gear, remove the 2 camshaft thrust plate
screws. See Figure 23.
10. Carefully withdraw the camshaft from the
front of the engine to avoid damage to the bearings.
11. Installation is the reverse of removal. Coat the
camshaft lobes with Lubriplate or equivalent and
the journals with heavy engine oil before
reinstalling in the block. Check gear run-out and
backlash as described in this chapter."


As far as I recall I basically followed this procedure. I put cylinder #1 at TDC. At that point the head was not on so I just put #1 cylinder all the way up. I then slid the cam in and matched the timing marks on the gear. Not much else to it right? If they were off by even just one tooth the mark wouldn't line up right?

The picture below is from my manual and I put a red arrow going to where the timing marks were when I installed the cam.

I also looked up the dwell spec I used. It says 0.016-0.019". I Think I set it to 0.017"
 

Attachments

  • photo240642.PNG
    photo240642.PNG
    28.9 KB · Views: 0
  • photo240643.PNG
    photo240643.PNG
    81.2 KB · Views: 0
Last edited:

ihc1470

Seaman
Joined
Jun 21, 2015
Messages
65
Yes the cam and crank gears are both keyed so that should not be an issue getting them wrong. And your correct if your off a tooth the marks should not align. You should have had one gear with the mark on a tooth and the other the mark would have been in a valley. Recheck your point chart the .016-.019 is the setting with your feeler gauge. The dwell is checked with a meter and is the 31-34 degree setting. Not a real issue there if you set your points carefully the dwell should be pretty close.
 

ethan169

Petty Officer 2nd Class
Joined
Oct 21, 2012
Messages
137
Update:

I finally got a chance to try ihc1470 recomended procedure for checking cam timing. I pulled the valve cover and all of the spark plugs so I can see into each cylinder. I rotated the engine by hand basically one tooth at a time from the flywheel. I watched the #1 and #6 cylinder reach the bottom of its stroke and start to come back up. On the way up I saw that the exhaust valve on #6 was starting to open. I checked #1 and the exhaust valve remained closed. So #6 is on its exhaust stroke right? I keep turning it over until the #6 starts to near TDC and I see the exhaust valve pushrod for #6 start to loosen up right before full TDC. It probably started to be loose a few rings widths south of TDC. Once I rolled through TDC the intake valve on #6 started to open. I say open but really I was looking to see if the rocker was still loose or if the pushrod was loose. One at TDC the #6 pushrod started to have pressure on it.

Just to double check my self I kept going to check this on #1 as well. As I was turning the crank and watching #1 going up in the cylinder on its exhaust stroke (the exhaust valve was open during this) The valve seemed to be fully closed to the point where I could rock the rocker side to side just slightly and twist the pushrod at the same point that #6 did. I took picture of the timing mark on the front damper/pulley to show how far off it was from the 0 TDC mark.


At this point you can barely see the piston travel north anymore. Its pretty damn near TDC but I dont have much to compare it to since I haven't spent this much time ever staring through a sparkplug hole of any engine.


Does this look correct to you guys? I feel like im too careful with all of this to really get the cam timing off. If I saw that those marks didn't line up I would have said something and asked questions. Its still possible that I screwed it up and didn't notice though. It just doesn't sound like something I would let go.

I'm going to try checking the dwell while cranking the engine over with the starter and not starting it now. I'll report back with what I get for reading.
 

alldodge

Moderator
Staff member
Joined
Mar 8, 2009
Messages
42,561
Guess I'm old school but how I would check timing is; rotate crank until timing mark reaches TDC and number one intake valve has closed prior. Back off rocker studs for both intake and exhaust valve 1 turn, there should be play on both push rods. If there is no play in both timing is off
 

ethan169

Petty Officer 2nd Class
Joined
Oct 21, 2012
Messages
137
AllDodge thanks for the alternate method. I was going to check your way as well after I checked the dwell. However I think we found the issue!

I checked the dwell while just turning the engine over with no plugs installed and it was right at 20 or 21?. The spec on the valve cover and in the manual is 28-34?. I popped the distributor cap and checked the gap and it was right about 0.016" which is within spec. The manual says .016-.019" and the valve cover says .015-.021". Either way I adjusted the gap closer to .019" and rechecked the dwell at cranking speeds. It was right at 29-30?. I decided to put everything back together and give it a whirl. I flooded the engine at first since I was messing with the throttle so much but once it cleared some fuel out it started and idled by itself!

Now i didnt get to spend too much time on it after it was running since I was running late for some dinner plans but it was a hell of a lot better. I set the timing and then tried messing with the idle mixture screws again. I didnt get much response out of them but the engine was still pretty cold and the choke was still on.

The plan now is to hopefully get some time at the beginning of the week and get i up to temp and set the timing again then try to set the idle speed and idle mixture screws.

Thanks for all the help! I'll keep everyone posted with any progress.
 

ethan169

Petty Officer 2nd Class
Joined
Oct 21, 2012
Messages
137
Update:
Its been a very busy summer and I've been trying to get as much boating in as I can with my other boat before the summer was over. The last 2 months however I have been able to devote some time to the Glastron.

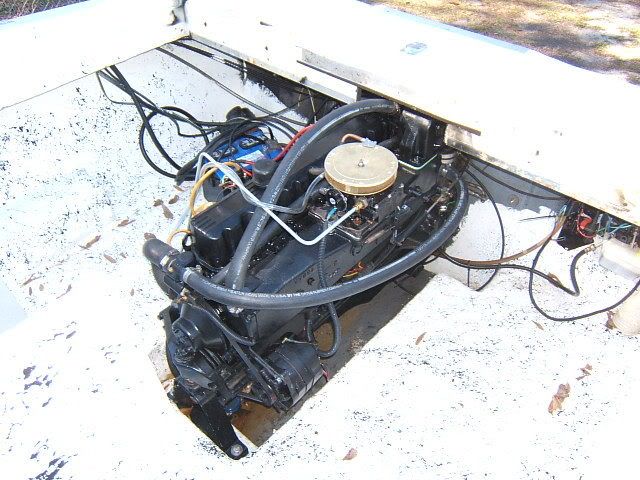
I got the motor up to temp a few times and set the timing and everything seemed good while running on the stand. I finally got a chance to drop the motor in the boat which wasnt too bad. It took me a few hours but I didnt have an extra hand in doing so and I went very slow. For anyone thinking of doing an engine pull or installation this was my method of performing this work with a standard engine house. I basically lowerd the trailer as close the ground as I could. Removed both wheel and left just enough room under the axle to fit a low profile floor jack. Then I raised the tongue up as high as I could. With my hoist in its almost maximum raised position I was able to clear the stern of the boat. I did have a load leveler that helped by tilting the engine in my favor to clear the tansom.

So the engine was installed, aligned with the alignment tool. Took some messing around but eventually got it nice and straight. I installed the drive and was good to go! I had to do some other things with the boat too but I'll keep this thread just about building the merc 165.

Fast forward to this past weekend - I did a float test to see if the bellows that I replaced would hold. The boat say in the water for about 30 min while still hooked to the trailer just in case. Not water seeping through anywhere. Great! I also ran the motor for a few min but there was water leaking from exhaust elbow to transom pipe coupler. I had forgot to tighten all 4 clamps apparently. I shut it down and pulled the boat out of the water since the ramp started to get busy. I had went to a ramp that I thought no one used since it was on a very shallow part of the river but there were probably 5 or 6 boats out there.

The next day my girlfriend and I took the boat to a small local lake for a sea trial. It was a pretty busy day there since it was labor day weekend but everything went fairly well. The glastron didn?t come with a temp gauge, only a temp light and the original temp switch sender was destroyed when I took it out. I had put in a proper sender in its place however I don't have a temp gauge on the panel yet. I do have a new set of full gauges coming in a few days. For my sea trial I went and purchased a mechanical gauge that comes with a capillary tube and some fittings. I installed this in the hole right next to the temp sender on the thermostat housing so it would read the same temp.

If I recall I put a 140? t stat in there. I kept an eye on the gauge and it never went above 160 ish. We trolled mostly and I did a few almost wide open cruises for maybe about 1-2 minutes each. The engine really seems to like it at 1/2 throttle on up. This could be due to my prop too since I just threw on what I had. If you get after it a little it hops up on plane almost immediately and holds 40-42mph quite easily. That was with 2 people, 15 gallons of fuel and a few tool boxes full of tools.

After the few runs I checked again at the temp and it seemed like it was good. Around the 165-170? mark. I put my hands on the riser and intake/exhaust manifold to see how hot they were and they were hot. I didn?t get burned but they were too hot for me to comfortably keep my hand there for an extended period of time. On my Merc 260 the risers stay warm but basically cool enough to keep my hand there. I don?t usually check the exhaust manifolds on that during operating temp so I can?t compare those. After I saw that they were a little hot we basically shut it down for a few min and then decided to head back to the ramp. It was getting dark anyway and my bow light is so old and dilapidated that its blue and clear instead of red and green.
I think I?m going to invest in an IR thermometer/gun and wait until my electronic temp gauge comes in. But going by the gauges everything looks ok, if you touch the riser I feel like its too hot. Any ideas of what to check? I have installed a new impeller with pump housing and base, new water tube between bell housing and gimbal housing. I had the pipe on the inside of the boat that attaches to the transom assembly off and the shutters are both there with no blockages. I don?t have a new engine water pump but I inspected it and it seemed ok. There isnt much to it so I figured if it wasn?t deformed and didn?t leak then it was good.

Maybe I?m just being paranoid?

Here are a few pics of her in the water. It was darker and my phone is crap with pictures but you get the idea.


alldodge

Moderator
Staff member
Joined
Mar 8, 2009
Messages
42,561
Looks good, and don't think you have an issue with the exhaust temp, just nature of the beast and how water flows. Checking with temp gun isn't a bad idea, but you didn't get burned so your probably fine
 

josh42177

Cadet
Joined
May 1, 2018
Messages
12
All of those are viable options. The easiest would be to find another 250 straight six and drop it in after rebuilding or evaluating it. One thing to look for - not all the 250 blocks have provisions for the front mount. It can be "fixed" to work by fabbing up a mount... but if you can find a block with the extra two holes for the front mount it will be easier. Here's a couple of pics of what I ended up doing with an engine without the mount area. It worked fine.

DSCF7044.jpg


DSCF7046.jpg

Hey Fishermark! I know this is an old old post, but I'm swapping a merc 165hp Inline 6 with a non marine chevy 250 and I'm missing the left side 2 hole mount. Those photobucket pics are no longer available. Any chance you still have them so I can take a look? Is it possible maybe to explain how you fabbed them up? I'm guessing I can have someone weld a plate on there and drill two holes where they need to be, but I'd love to see how someone did it before I wing it myself! Any help is greatly appreciated!
 
Last edited:
Status
Not open for further replies.
Top