reinstalling bell housing after bellow replacement

natemoore

Master Chief Petty Officer
Joined
Jun 13, 2009
Messages
844
My problem is not getting the drive bellows to slip onto the gimbal housing or the bell housing. I was able to do dry runs both by starting with the drive bellows on the gimbal housing and pushing onto the bell housing, and starting with the bellows on the bell housing and pushing onto the gimbal housing (this is a Mallory kit). I could easily do this without the special tool by working from the inside of the bellows.

What frustrates me is how the heck do you even get to the hose clamps? I made a 15" long 5/16" nut driver thinking this would do the trick, but I don't see how you can get to the clamps.

I'm perfectly willing to drill cheater holes in the bell housing if it make access easier. Maybe if Mercruiser had a mechanic help design this setup, those holes would already be there.

Where to drill?
 

ErieRon

Chief Petty Officer
Joined
May 5, 2009
Messages
463
Re: reinstalling bell housing after bellow replacement

Wow...you're tearing it up down there. Making me feel guilty for laying around watching football all day.

I wish I could help on this one, but I've never done it. I do know that Don S. and the other Gurus always recommend OEM bellows...:rolleyes: I think I've read where the clamps are really just a precaution should the glue not hold.

I will be doing it in the next month or so since I spun my coupler late spring. I have a 470 too in a 1984 Imperial VC230. Whole engine has to come out...obviously, so I'll be doing all of the PM while it's out.

Remember all the tricks so I can ask you.
 

drkaras

Cadet
Joined
Aug 13, 2009
Messages
17
Re: reinstalling bell housing after bellow replacement

I was able to do it with a socket universal joint.
 

Bondo

Moderator
Staff member
Joined
Apr 17, 2002
Messages
71,187
Re: reinstalling bell housing after bellow replacement

Ayuh,... Do you have them clocked,+ pointed the Right way,..??
 

natemoore

Master Chief Petty Officer
Joined
Jun 13, 2009
Messages
844
Re: reinstalling bell housing after bellow replacement

Wow...you're tearing it up down there. Making me feel guilty for laying around watching football all day.

I wish I could help on this one, but I've never done it. I do know that Don S. and the other Gurus always recommend OEM bellows...:rolleyes: I think I've read where the clamps are really just a precaution should the glue not hold.

I will be doing it in the next month or so since I spun my coupler late spring. I have a 470 too in a 1984 Imperial VC230. Whole engine has to come out...obviously, so I'll be doing all of the PM while it's out.

Remember all the tricks so I can ask you.

I'll be posting a spreadsheet listing all my parts suppliers, part numbers, costs, etc, for my complete rebuild. I haven't had the stomach to tally it all up yet. Popped another $100 yesterday torquing down the side cover (cover for the lifters). Fifteen foot-pounds on the inner two bolts crushed the cover in that area. Wonder if a good aluminum welder could TIG the cracks.
 

natemoore

Master Chief Petty Officer
Joined
Jun 13, 2009
Messages
844
Re: reinstalling bell housing after bellow replacement

Ayuh,... Do you have them clocked,+ pointed the Right way,..??

I read the manual on the procedure, but still don't see how to get the nut driver up in there. Do you have to tilt the bell housing up or down, left or right? On one side the shift cable seems to block the way to the drive bellows clamp; on the other side the fresh water inlet blocks.:mad::confused::mad:

No sweat doing the clamps on the gimbal housing side. A tiny ratchet and socket took care of those.

Thank god tomorrow is Monday. I can go to work and do some tediously intricate double-layered cherry crown molding on an expensive set of cabinets while I let my brain and body relax. Thermos of fresh ground black coffee, a Lortab for the bad hip, a nice 80 degree low humidity day, little bit of talk radio...will be just great!
 

fishrdan

Admiral
Joined
Jan 25, 2008
Messages
6,989
Re: reinstalling bell housing after bellow replacement

As Bondo said, if the bellows are clocked correctly, you can get to the clamp screws easily. I used an extra long (15"?) standard screwdriver and was able to tighten them down without problems. I wasn't able to use a socket and Ujoint, didn't have the clearance, maybe I was a bit off on the clamp clocking?

I made a home-grown exhaust bellows tool from a pair of 8" long carrige bolts, few nuts, piece of 1/2" PEX (hard plastic plumbing pipe) few rubber bands and a long thin phillips screwdriver. The $3 tool works like the $40 tool, just not as easily and comfortably. BUT,,, it got the job done in a few minutes and I wasn't filling the garage with foul words doing the exhaust bellows. Think I'll post up a thread on the home/grown EX bellow tool.

Oh yeah, I had to tilt the bell housing and gimble ring around to get good clearance while working on the bellows. Laying on a creeper made it easy to see what was going on and tighten the clamps down.
 

ziggy

Admiral
Joined
Jun 30, 2004
Messages
7,473
Re: reinstalling bell housing after bellow replacement

I read the manual on the procedure, but still don't see how to get the nut driver up in there. Do you have to tilt the bell housing up or down, left or right? On one side the shift cable seems to block the way to the drive bellows clamp; on the other side the fresh water inlet blocks.:mad::confused::mad:

No sweat doing the clamps on the gimbal housing side.
in looking at s/m #6 it looks like the install is the same as for my 1 drive. drive shaft bellows. both clamps pointing down on the starboard side. ya install the drive shaft bellows on the bellhousing side first. on the bench if i remember right. then ya can get to the clamp. then do the gimble housing side on the boat..
 

natemoore

Master Chief Petty Officer
Joined
Jun 13, 2009
Messages
844
Re: reinstalling bell housing after bellow replacement

in looking at s/m #6 it looks like the install is the same as for my 1 drive. drive shaft bellows. both clamps pointing down on the starboard side. ya install the drive shaft bellows on the bellhousing side first. on the bench if i remember right. then ya can get to the clamp. then do the gimble housing side on the boat..

The manual says to look for the "AFT-TOP" mark in the bellows. Mine has no markings (Mallory kit). Here are three pictures. Can you help me orient it? One of the convolutions is flattened on one end, and the rib on the inside mating surface is closer to the edge on one end than the other.

Thanks.
 

Attachments

  • tn_DSC03467.JPG
    tn_DSC03467.JPG
    43.5 KB · Views: 0
  • tn_DSC03466.JPG
    tn_DSC03466.JPG
    41.5 KB · Views: 0
  • tn_DSC03465.JPG
    tn_DSC03465.JPG
    36.2 KB · Views: 0

ziggy

Admiral
Joined
Jun 30, 2004
Messages
7,473
Re: reinstalling bell housing after bellow replacement

i assume yer alpha1 will be the same as my 1 drive...
i have the flat spots in the bellows located port and starboard, that end attached to the gimble housing..

i used oem bellows and it was marked so i assume i did it right..

seemed logical. the water hose and the shift cable run right by the flat spots in the bellows..
 

natemoore

Master Chief Petty Officer
Joined
Jun 13, 2009
Messages
844
Re: reinstalling bell housing after bellow replacement

i assume yer alpha1 will be the same as my 1 drive...
i have the flat spots in the bellows located port and starboard, that end attached to the gimble housing..

i used oem bellows and it was marked so i assume i did it right..

seemed logical. the water hose and the shift cable run right by the flat spots in the bellows..

I figured the flat spots were for clearance. Thanks for the help.
 

natemoore

Master Chief Petty Officer
Joined
Jun 13, 2009
Messages
844
Re: reinstalling bell housing after bellow replacement

Simply for posterity and to help future forum members, I'm going to give a synopsis of what I did to replace the bellows and reinstall the bell housing.

I installed the exhaust bellows to the gimbal housing first using bellows adhesive. I've found actually three different drying times depending on where you look. Manual says 10 minutes and 20 to 30 minutes, but the adhesive box instructions say wet or aggressively tacky.

Whatever. By the time you get your crap in one sock, it will be partially dried. I had no problem getting to the clamp with a 1/4" drive socket and ratchet.

Next I installed the shift cable bellows to the gimbal housing. Same procedure as above. Very easy to access the clamp.

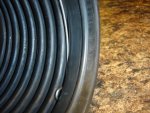
I then installed the u-joint bellows onto the bell housing. With the clamp at the three or four o'clock position when viewed from behind, facing down, I could easily access the clamp tightening nut.

I shoved the shift cable through the shift cable bellows. It helps to lube the cable because damned that was a tight fit. I can't remember how to route the shift cable to the right side of the engine, so I guess I'll start a new thread on that.

The water hose went on next. With the clamp at 3 o'clock (viewed from the rear) and pointing down, access to the tightening nut is easy. I lay on my back beneath the housing to do that one.

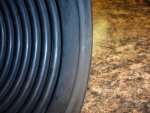
Here's where I had my first misfortune. I put bellows adhesive on the u-joint bellows and on the gimbal housing, waited a few minutes for it to get tacky, then slid the bellows onto the gimbal housing. It went on so easily. I felt the little thump as the raised lip on the inside of the bellows fell into the corresponding groove on the outside of the gimbal housing flange. Ahh, that wasn't so bad.

But then I noticed the water hose was crimped. Seems it was too long. Crap! So I pulled it apart, cut a half-inch off the hose, then tried to reassemble. After 30 minutes of struggling, I finally got the u-joint bellows pressed onto the gimbal housing. Crap again! Hose was still crimped. So I disassembled, cut off another half-inch, then tried to reassemble.

By this time, quit a lot of adhesive had built up since I had reapplied more adhesive to reactivate it each time. I swear, I struggled for a good hour trying to get that bellows reinstalled. Don't mean to whine, but my arthritic hands were really screaming by the time I got it back on.

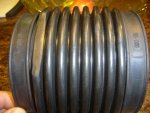
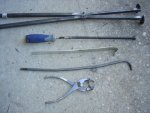
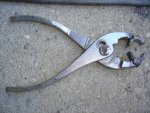
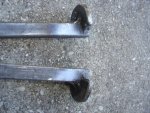
Next step was to pull the exhaust bellows onto the bell housing. Didn't do this until today. Had to make a bellows expander tool, put improvise a couple other helper tools before I got it installed to my satisfaction. That only took all day.

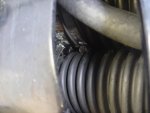
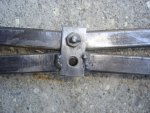
I've included some pictures of the process. One shows how to get to the exhaust bellows clamp nut on the bell housing side from below. Another shows to get to the u-joint bellows clamp nut on the gimbal housing side by "putting the boat in a right turn". This one required a 1/4" universal joint, 5/16" socket, and a ratchet.
 

Attachments

  • tn_DSC03471.JPG
    tn_DSC03471.JPG
    36.2 KB · Views: 1
  • tn_DSC03474.JPG
    tn_DSC03474.JPG
    24.5 KB · Views: 1

natemoore

Master Chief Petty Officer
Joined
Jun 13, 2009
Messages
844
Re: reinstalling bell housing after bellow replacement

Here are the tools I made today to get the exhaust bellows installed on the bell housing.

I printed out a picture of a commercially produced exhaust bellows tool to get the angle. I used 1/2" square tube purchased at Lowes for the body of the tool. The business end of the tool is three halves of 1/2" fender washers welded to the square tube on each side. The fender washers measured 2" in diameter, and sandwiched together measured almost 1/4" thick. After welding everything together, I ground down the washers until I could insert them fully into the exhaust port. Hint: make a template of the inside of the exhaust port while you've got the thing apart. Would make the grind down of the fender washers go quicker. The brass bushing wasn't an issue, but obviously you'll have to remove the shift shaft.

The first helper tool was made out of a piece of 3/4" wide, 1/8" thick aluminum flat bar. I used this to break the bond between the bell housing and the bellows when tweaking the positioning. It also was a handy little puller when used from the inside.

The second was the steel rod. I used it on the very first insertion to get the bellow's lip around the bell housing flange, but you could just go straight to the aluminum flat bar tool and skip this one.

The crimping tool is just a 1/2" nut welded to the pliers, then drilled out with a 1/2" drill bit. I think this is from the SELOC manual. Not my idea.

Extended nut driver. Anyone can make one of these.

Hope this helps someone.
 

Attachments

  • tn_DSC03481.JPG
    tn_DSC03481.JPG
    42.4 KB · Views: 0
  • tn_DSC03482.JPG
    tn_DSC03482.JPG
    48.8 KB · Views: 1
  • tn_DSC03483.JPG
    tn_DSC03483.JPG
    50.7 KB · Views: 0
  • tn_DSC03484.JPG
    tn_DSC03484.JPG
    46.4 KB · Views: 0
  • tn_DSC03485.JPG
    tn_DSC03485.JPG
    24.1 KB · Views: 0

ziggy

Admiral
Joined
Jun 30, 2004
Messages
7,473
Re: reinstalling bell housing after bellow replacement

But then I noticed the water hose was crimped. Seems it was too long. Crap! So I pulled it apart, cut a half-inch off the hose, then tried to reassemble. After 30 minutes of struggling, I finally got the u-joint bellows pressed onto the gimbal housing. Crap again! Hose was still crimped. So I disassembled, cut off another half-inch, then tried to reassemble.
i've had the crimped hose blues too. even got pics to prove it..:(
so. what length did you cut the water hose to first time. i went with 13 7/8 maybe 13 3/4". also did you install the hose on the bellhousing 1st? that's the way i did mine the first time. 2nd time, grr, i installed that darn hose on the gimble housing side 1st. that worked much better. i felt it wasn't the length of the hose so much as when it was pre attached to the bellhousing, while routing it. it'd get the kink when finally attached to the gimble housing. + the hose gets short by the time ya get it to the gimble housing waterpipe nipple. gimble housing 1st, route it, then into the bellhousing and is a straight shot, so the hose i felt had a chance to get into whatever position it wanted prior to connecting the two ends...
that hose is painful, no doubt about it.. the hardest part of the whole job imho...
for shift cable routing. it's in the book. when i did mine, i chased it with a string when i pulled the old one out. then just pulled the string back when i reinstalled. that seemed to work pretty good.....
 

cr2k

Captain
Joined
Mar 19, 2009
Messages
3,730
Re: reinstalling bell housing after bellow replacement

I like the crimping tool. But I just use a zip tye on the small end of the cable boot. Never had a problem and WAY easier to do.

You can get the zip tyes that have a little rounded end for small diameter hoses like gas lines, etc.

Once you put the adhesive on you can spray it with windex or spit on your fingers and wet it to allow the bellows to slip on without sticking until you clamp it down.

When you do 3 or 4 a week you learn some tricks.

Not only does the water hose have to be exact length you need to lay it in so the natural curve of it follows the needed path to the bell housing, this helps a lot toward no kinks.

And to whom ever said the clamps were to back up the adhesive...The adhesive is to hold the bellows on while clamping and ensure a water tight seal, the clamp is to keep the bellows in place and from not pulling off when the drive is raised.
The clamps are absolutely necessary.
 

natemoore

Master Chief Petty Officer
Joined
Jun 13, 2009
Messages
844
Re: reinstalling bell housing after bellow replacement

for shift cable routing. it's in the book. when i did mine, i chased it with a string when i pulled the old one out. then just pulled the string back when i reinstalled. that seemed to work pretty good.....

That is super genius material. Of course, I pulled my engine completely, so it wouldn't have helped me even if I thought of that. I took copious amounts of pictures to help me reassemble. Used a lot of masking tape and labels for wires, etc. Just overlooked that little detail.

Sing this with me! You know the tune!

The water hose connected to the...gimbal housing.
The exhaust bellows connected to the...gimbal housing.
The cable bellows connected to the gimbal housing.
Oh hear me curse the world.

The u-joint bellows connected to the...bell housing.
The shift cable shoved through the...cable bellows.
The water hose connected to the...bell housing.
Oh hear me curse the world.

The u-joint bellows connected to the...gimbal housing.
The exhaust bellows connected to the...bell housing.
The bell housing connected to the...gimbal ring.
Oh hear me curse the world.

Thank you! I'll be here all week!


I neglected to compare the new water hose to the old one, assuming that it would be the correct length. I did cut about 1" off in order to get a gentle curve in the hose when assembled.
 

natemoore

Master Chief Petty Officer
Joined
Jun 13, 2009
Messages
844
Re: reinstalling bell housing after bellow replacement

I like the crimping tool. But I just use a zip tye on the small end of the cable boot. Never had a problem and WAY easier to do.

You can get the zip tyes that have a little rounded end for small diameter hoses like gas lines, etc.

Once you put the adhesive on you can spray it with windex or spit on your fingers and wet it to allow the bellows to slip on without sticking until you clamp it down.

When you do 3 or 4 a week you learn some tricks.

Not only does the water hose have to be exact length you need to lay it in so the natural curve of it follows the needed path to the bell housing, this helps a lot toward no kinks.

And to whom ever said the clamps were to back up the adhesive...The adhesive is to hold the bellows on while clamping and ensure a water tight seal, the clamp is to keep the bellows in place and from not pulling off when the drive is raised.
The clamps are absolutely necessary.

I'm not even sure a clamp or zip tie is needed. I could not pull the cable through the bellows unless I lubed it.

Fifteen years in the kitchen remodeling business before I learned about how to apply silicon to a granite backsplash seam without mucking it up and making a mess (and having to do alot of cleanup with mineral spirits): apply a bead of silicon, spray with windex, squeegee with your finger. What a great trick. Windex keeps the silicon from sticking. But I digress.....

I agree with you about the clamps. I think the adhesive is just insurance against leaks.
 
Top