Repairing stringer

nemo2011

Petty Officer 2nd Class
Joined
Feb 15, 2011
Messages
157
Hello all!
This is my first post here so if I don't do things quite right please bear with me!
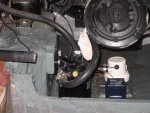
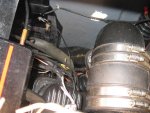
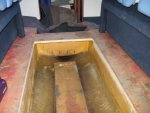
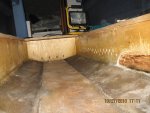
My boat is a 1989 Campion deep V cuddy cabin fiberglass boat 19.5 ft in length.

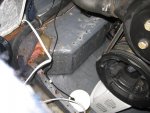
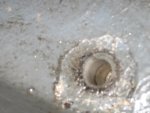
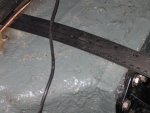
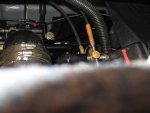
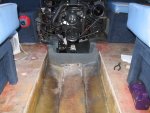
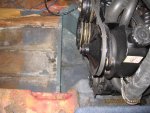
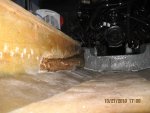
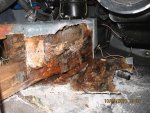
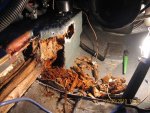
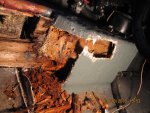
My starboard side stringer from the transom to 1/2 way too the bow was completly shot including the motor mount.
The stringer bottom had a 1/4" space between it and the hull.
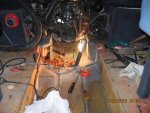
My plan is to splice in a new stringer following the original design.
I guess my main question for now is attaching the stringer to the hull!
How many layer of fiberglass are required ,and in what configuration(laps etc)
I have read through a lot of the posted threads but cannot find any with specific instructions as the the the process.
any help would be appreciated.
 

mcgyver

Petty Officer 2nd Class
Joined
Oct 3, 2009
Messages
123
Re: Repairing stringer

Nemo, I'm going through a very simular rebuild as you...although my starboard stringer was rotten to the bow. Mine is a O/B model 21.5'. I also had a 1/4"+ gap the whole stringer which probably lead to the water being able to migrate forward so fast. I'm bedding my new stringer in PL premium and then tabbing with 1.5 oz mat and then 2 layers of 1708 biax extending 4" out on the hull. Should be 100x stronger than the chopped mat spray that was on there and only extended 6" up the stringer...... Check out oop's thread and Jeff Bison's thread..learn't just about everything from those guys...fantastically helpful guys. Everything you need to know is contained within this forum...just takes some time to sift it all out. Good luck
Doug
 

mcgyver

Petty Officer 2nd Class
Joined
Oct 3, 2009
Messages
123
Re: Repairing stringer

BTW....did you pop the cap to chase the rot when you say it is 1/2 way up the stringer? How did you access? Do you have a pic? it will help everyone on here give you advise. Are you positive that the transom is fine? I thought mine was but alas..I was wrong again! Check my link.
Doug
 

nemo2011

Petty Officer 2nd Class
Joined
Feb 15, 2011
Messages
157
Re: Repairing stringer

I did not pop the cap but pulled the seal strip and there was no evidence where water would have come in . I strongly suspect that where the water came in was through the improperly sealed foam holes!
There was a small amount of wettness under a small area of foam.
As far as the transom goes I used a ice pick and everything was solid and will probably out last me!!
I'll post some pictures and that will give you a better idea what I have done so far! any suggestions on the best way to post pictures? The info is probably here somewhere but being basiclly lazyn this might be better :)
 

rickryder

Commander
Joined
Jun 24, 2010
Messages
2,722
Re: Repairing stringer

Welcome to iboats nemo

I would check your transom by drilling a few 3/8" holes in a few spots on the transom. Only go about 3/4 through DON"T drill through your outter shell. Look at the wood chips that come out....if they are bright,dry and clean your good ... fill the holes with 3M 5200

If the chips are real dark,damp or like sawdust you'll have to replace it.

When you splice your stringer are you planning to use butt blocks? Sistering a splice piece across the break in the stringers?

I mostly agree with mcgyver on the bedding and fiberglass layup 1.5 oz csm tabs and 2 layers of 1708 biax but extend your first layer 6" and the second 4'' so the load is spread better from the stringer to the hull.

Also when you bed your stringer filet the PL so there is a cove from the stringer to the hull. It will help the glass to lay better to the hull and avoid air bubbles and gaps where the stringer meets the hull.

Feel free to check out my thread on my rebuild also.
 

nemo2011

Petty Officer 2nd Class
Joined
Feb 15, 2011
Messages
157
Re: Repairing stringer

(When you splice your stringer are you planning to use butt blocks? Sistering a splice piece across the break in the stringers?)

I have cut my existing stringer at approx 60 deg angle and I was going to epoxy the two pieces together as well as reinforce the splice with a couple of layers of 1.5 oz csm on either side. Do you think this will sufice?
I will drill a few test holes in the transom and report back my findings here I am presently trying to post some pictures but want to do it right so pictures aren't too large.
 

rickryder

Commander
Joined
Jun 24, 2010
Messages
2,722
Re: Repairing stringer

I have cut my existing stringer at approx 60 deg angle

Ahhh a scarf joint.... I would CSM the joint and biax the stringer. I know there are some threads on splices and scarfs if you do a search. You might find some tips on it :)
 

Woodonglass

Supreme Mariner
Joined
Dec 29, 2009
Messages
25,929
Re: Repairing stringer

Don't worry bout sizin yer pics the forum takes care of that for you. Just post em.
 

jonesg

Admiral
Joined
Feb 22, 2008
Messages
7,198
Re: Repairing stringer

Don't worry bout sizin yer pics the forum takes care of that for you. Just post em.


You sure about that?
It used to be we put pics in photobucket first to resize.

On the OP, its a gut job, you just haven't discovered it yet.
 

Woodonglass

Supreme Mariner
Joined
Dec 29, 2009
Messages
25,929
Re: Repairing stringer

Yep, since they installed this NEW Forum format picture size is NO longer an issue!
 

nemo2011

Petty Officer 2nd Class
Joined
Feb 15, 2011
Messages
157
Re: Repairing stringer

I tried posting some pictures but the only way it seemed to allow me to post was to start a new thread.
I did try and post on my original thread but had no success I tried to follow the instructions here http://forums.iboats.com/showthread.php?t=410147
but that did not seem to coincide with the page I was on???
I don't think this is rocket science just will have to do a little more reading! :-(
or does anyone have any clearcut instructions on how to post pictures to a thread already started?
 

nemo2011

Petty Officer 2nd Class
Joined
Feb 15, 2011
Messages
157
Re: Repairing stringer

test run on posting pict's
first attempt at spongy motor mount repair using""GIT-ROT""
(waste of time)
 

Attachments

  • IMG_3378.jpg
    IMG_3378.jpg
    144.9 KB · Views: 0

nemo2011

Petty Officer 2nd Class
Joined
Feb 15, 2011
Messages
157
Re: Repairing stringer

some pictures before motor removal!
 

Attachments

  • IMG_3398.jpg
    IMG_3398.jpg
    149.1 KB · Views: 0
  • IMG_3395.jpg
    IMG_3395.jpg
    145.8 KB · Views: 0
  • IMG_3404.jpg
    IMG_3404.jpg
    139.9 KB · Views: 0
  • IMG_3388.jpg
    IMG_3388.jpg
    146.6 KB · Views: 0
  • IMG_3403.jpg
    IMG_3403.jpg
    146.7 KB · Views: 0

nemo2011

Petty Officer 2nd Class
Joined
Feb 15, 2011
Messages
157
Re: Repairing stringer

Gas tank(which had a leak) removed
 

Attachments

  • IMG_3388.jpg
    IMG_3388.jpg
    146.6 KB · Views: 0
  • IMG_3389.jpg
    IMG_3389.jpg
    147.1 KB · Views: 0
  • IMG_3391.jpg
    IMG_3391.jpg
    146.3 KB · Views: 0
  • IMG_3392.jpg
    IMG_3392.jpg
    142 KB · Views: 0
  • IMG_3390.jpg
    IMG_3390.jpg
    147.1 KB · Views: 0

nemo2011

Petty Officer 2nd Class
Joined
Feb 15, 2011
Messages
157
Re: Repairing stringer

starting to find the bad stuff!!!
 

Attachments

  • IMG_3413.jpg
    IMG_3413.jpg
    148 KB · Views: 0
  • IMG_3411.jpg
    IMG_3411.jpg
    142.1 KB · Views: 0
  • IMG_3414.jpg
    IMG_3414.jpg
    146.6 KB · Views: 0
  • IMG_3412.jpg
    IMG_3412.jpg
    145.4 KB · Views: 0

Woodonglass

Supreme Mariner
Joined
Dec 29, 2009
Messages
25,929
Re: Repairing stringer

Yeah, but the GOOD NEWS is I have seen a LOT worse. Keep going and keep the pics comin. When you planning on pulling the motor?
 

rickryder

Commander
Joined
Jun 24, 2010
Messages
2,722
Re: Repairing stringer

Not looking too bad....I had worse in my boat! Keep posting and we will help you along.
 

nemo2011

Petty Officer 2nd Class
Joined
Feb 15, 2011
Messages
157
Re: Repairing stringer

Really getting ugly here now.
It's surprising wahat a little fiberglass will hide :)
 

Attachments

  • IMG_3418.jpg
    IMG_3418.jpg
    151.6 KB · Views: 0
  • IMG_3415.jpg
    IMG_3415.jpg
    151.9 KB · Views: 0
  • IMG_3416.jpg
    IMG_3416.jpg
    151.3 KB · Views: 0
  • IMG_3417.jpg
    IMG_3417.jpg
    147.7 KB · Views: 0
  • IMG_3410.jpg
    IMG_3410.jpg
    148.2 KB · Views: 0
Top