Repairing Transom Keyhole Cracks

woodman7975

Seaman Apprentice
Joined
Aug 12, 2008
Messages
46
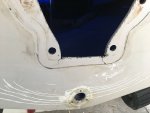
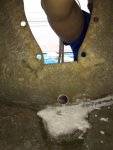
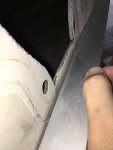
I have attached some pictures of the transom keyhole on my Sea Ray I am repairing. These cracks are the ones that lead me to find that I needed to replace the transom and ultimately everything else. I have just finished sanding the hull and transom and am gettin everything ready to set the transom.
My question is about the cracks. I had planned on routing them out a little bigger on the inside and then filling them with peanut butter when I install the transom. Then routing them out a little larger on the outside and filling them with gel coat, same with the stress cracks around the drain. Is this the right plan of attack?
Also, when I put a straight edge against the area there is a gap slightly larger than 1/8”. I plan on setting the transom with 2x4s clamped with threaded rod. Will this pull the area flat? Any suggestions on getting this area flat? I do not want to run into flatness issues when I put the engine and out drive back on.
I would also love to hear any pointers on getting this area as flat as possible. Thanks.
 

Attachments

  • 83B0C2BD-EEA4-4892-9673-0B42EF6A0FDD.jpeg
    83B0C2BD-EEA4-4892-9673-0B42EF6A0FDD.jpeg
    1.9 MB · Views: 1
  • F7D0BB61-13FB-4991-975C-477811761891.jpeg
    F7D0BB61-13FB-4991-975C-477811761891.jpeg
    1.8 MB · Views: 1

woodman7975

Seaman Apprentice
Joined
Aug 12, 2008
Messages
46
It wouldn’t let me attach the last picture on the previous post.
 

Attachments

  • 5C8F1345-E854-4C52-B9B5-1A046346A680.jpeg
    5C8F1345-E854-4C52-B9B5-1A046346A680.jpeg
    1.7 MB · Views: 0

AShipShow

Lieutenant Commander
Joined
Jul 8, 2016
Messages
1,803
Personally, I think the crack need addressed with more than PB. I would go ahead and set the new transom in place with PB and clamp it sufficiently. Then after your done, see what you're dealing with for transom flatness. I believe the MERC spec is 1/16" across keyhole (assuming your talking mercruiser).
Then, to fix the cracks, I would grind down from the outside at least a few inches outward from the affected area, and fill with 2 layers of 1708, the 2nd layer at least an inch bigger around than the first, then 2 layers of CSM also increasing in size to help feather out the repair. Then fair/sand/gelcoat/polish.

As far as the flatness goes... The way you're measuring it is not exactly what MERC cares about. It only needs to be flat within the area of the gimbal housing/transom plate. Its basically to ensure the gasket has no problem sealing around the gimbal housing.
 

Scott Danforth

Grumpy Vintage Moderator still playing with boats
Staff member
Joined
Jul 23, 2011
Messages
50,282
Since you are replacing your transom, here is what I would do

grind on the inside so you can do a layer of CSM, then two layers of 1708 (assuming your going poly)

then grind flat, then replace transom wood

on the outside, grind down, do a layer of CSM, two layers of 1708, then grind flat, fair as needed, and re-gelcoat the transom
 

woodman7975

Seaman Apprentice
Joined
Aug 12, 2008
Messages
46
Thanks for the advice. I was hoping that I was done with grinding, but if that is what it takes to do it right. I only have 1708 and no CSM. Would it hurt anything to just do 3 layers of 1708, since it has the CSM on the back already?
 

Redtruck12

Petty Officer 1st Class
Joined
Jan 25, 2018
Messages
344
No it will not hurt to only apply 1708, but may be a little more work to get it smooth
if yo are applying csm I would lay it as your last layer
 

froggy1150

Master Chief Petty Officer
Joined
Nov 3, 2017
Messages
861
Think of csm mat as a "primer". When you look as the surface of what you are putting the glass on and also the texture of the woven glass you have voids. The csm is short random glass strands that "poke" into those voids to fill with glass so you don't get resin rich pockets. Resin without glass is weak and will crack and fail. So your layers should go mat,fabric,mat,fabric and then one layer of mat to help smooth. You can also add a top layer of finishing cloth if you need a real smooth finish. But you really should have mat first. This applies for poly. Epoxy is not that critical
 

Scott Danforth

Grumpy Vintage Moderator still playing with boats
Staff member
Joined
Jul 23, 2011
Messages
50,282
Thanks for the advice. I was hoping that I was done with grinding, but if that is what it takes to do it right. I only have 1708 and no CSM. Would it hurt anything to just do 3 layers of 1708, since it has the CSM on the back already?

if you own a fiberglass boat.....you are never done grinding.

no, you can use 3 layers of 1708 down. just put the CSM layer first

you will need to grind the top layer smooth anyway.
 

woodman7975

Seaman Apprentice
Joined
Aug 12, 2008
Messages
46
Thanks again for all the advice. I got the interior patches done and the transom in. I will be working on the outside once it warms up a little.
In the picture that I posted earlier you can see the difference in color between the patches made around the drain hole and the actual color of the boat. I went to Sea Ray and got them to tell me the color of my gelcoat (Artic White) and ordered the kit from Spectrum, but as you can see the color is nowhere near a match. They also had boats with an Oyster color in that year range, but that seems way to beige. I am guessing that the color has just faded through the years, but it seems like an awful lot.
Any pointers on matching the color? I already have neutral gel coat to do the interior once I get there.
 

Redtruck12

Petty Officer 1st Class
Joined
Jan 25, 2018
Messages
344
If it’s gelcoat it’s likely oxidation and staining.
its tough stuff, sanding will remove the discolouration but will likely lead to you wanting to do the entire boat 😳
you will probably want to sand the area surrounding your repair area before applying the new gel coat.
 
Top