Replacing Impeller/water pump - a couple questions.

rkhanso

Seaman
Joined
Apr 1, 2004
Messages
51
I have a 1991 (or is it 1992?) Johnson 90HP outboard - model J90TLAIE. I had the engine rebuilt about 10 years ago and haven't replaced the impeller since that time. We don't use the boat much anymore. I'd guess it has less than 200 hours on it since it was rebuilt 10 years ago. Maybe less than 100.

The last time we were out, the alarm came on steady. I let it sit for a while and started it up with no further trouble on the way back to the boat landing. Since it's been so long, I thought I'd be wise to put in a water pump kit.

I watched some videos online how to get the shift shaft disconnected, and they were all different from my motor (they said to take a bolt out holding it together - mine doesn't have a bolt). I had to remove a pin and push the shift rod assembly, where the cable mounts to it to the port side and then the lower unit released very easily. I hope I can put it back together properly and easily.

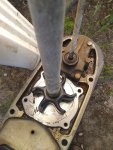
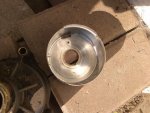
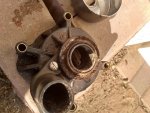
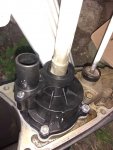
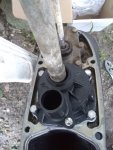
I took some pictures and think the pump, housing and plate look like they're in good shape, which makes me wonder if I have a different problem that caused the over-temp. Though, I was going through some heavy weeds slowly for a while about 10 min before the alarm sounded (but did lift the motor to make sure there were no weeds wrapped around the prop or covering the water intake).

Should I inspect any other areas before putting in the water pump kit and putting it back together? I'm not sure what or how to check for obstructions, etc.
 

Attachments

  • photo298833.jpg
    photo298833.jpg
    250.8 KB · Views: 0
  • photo298834.jpg
    photo298834.jpg
    233.4 KB · Views: 0
  • photo298835.jpg
    photo298835.jpg
    238.1 KB · Views: 0
  • photo298836.jpg
    photo298836.jpg
    205.4 KB · Views: 0

jakedaawg

Rear Admiral
Joined
Jun 26, 2012
Messages
4,275
Maybe back flush in the t-stat housing and out the water tube before reassembling. Other than that, check tstat and poppets.
 

jakedaawg

Rear Admiral
Joined
Jun 26, 2012
Messages
4,275
Hard To tell in pic but looks like your are missing the rubber grommet in the "water out" hole
 

rkhanso

Seaman
Joined
Apr 1, 2004
Messages
51
Maybe back flush in the t-stat housing and out the water tube before reassembling. Other than that, check tstat and poppets.
Thanks.
Though - I have no clue what poppets are so I'll Google that and see if I can figure out what you mean.
I'll take a look and see if I can find the thermostat housing and how to back-flush that also.


Hard To tell in pic but looks like your are missing the rubber grommet in the "water out" hole
I'm not sure about that, but if it's in the Sierra water pump kit I bought from Amazon, then I'll be able to make sure it's put together with all the parts.

I'm trying to round up some adhesive and gasket sealer alternatives since I don't have the "official" types mentioned.

I do see that people have used other various types (Permatex #3, weatherstrip rubber adhesive, etc). I suspect that the rubber adhesive is used to keep the housing o-ring seal in place and not pop off when installing - and that the o-ring itself really does the actual sealing, not the adhesive.
What I have on-hand is
a generic Rubber Cement
Permatex Red RTV Gasket Maker
Permatex Water Pump & Thermostat Housing RTV Silicone Gasket Maker
Permatex Super Weatherstrip Adhesive
 
Last edited:

jakedaawg

Rear Admiral
Joined
Jun 26, 2012
Messages
4,275
Simple weatherstrip adhesive is fine and cheaper than so called marine products. Use that for the o ring.

permatex aviation form a gasket is a good all purpose schmoo. Use on the bottom gasket between lower and plate. Other gaskets are dry.

I put a drip of green or blue lock tight on the very end thread of every bolt and a little permatex just under the head of every bolt. This helps with corrosion. Especially in brackish or salty water. I just make it a habit on all.

a little glycerin, available at any pharmacy is a great lubricant for the impellar.

any grease is better than nothing for splines and the end of the water tube so it slides into housing easy.

others will argue maybe but I have done hundreds this same way....
 

F_R

Supreme Mariner
Joined
Jul 7, 2006
Messages
28,226
Good that you are going to replace that impeller. It is about to shear off the vane tips.
 

rkhanso

Seaman
Joined
Apr 1, 2004
Messages
51
Thanks for that info jakedaawg.

On my lower unit, that large cover with rubber seals on top/bottom, that looks like exhaust goes through since it's so black - mine is loose and easily pops/lifts off. Should this be "glued" in place? Or does it just sit there and pressure holds it in place?
 

racerone

Supreme Mariner
Joined
Dec 28, 2013
Messages
38,454
Replace the seals on the horse shoe.-------New seals will keep it in place.
 

rkhanso

Seaman
Joined
Apr 1, 2004
Messages
51
I got some of it back together. Have to quit because it's getting dark and mosquitoes are getting bad.

Is that top o-ring/washer/seal thing supposed to fit tight against the driveshaft? The old one didn't, so I guess this may be OK?
 

Attachments

  • photo298847.jpg
    photo298847.jpg
    174.9 KB · Views: 0
  • photo298848.jpg
    photo298848.jpg
    160.9 KB · Views: 0

rkhanso

Seaman
Joined
Apr 1, 2004
Messages
51
Replace the seals on the horse shoe.-------New seals will keep it in place.

I've been looking for a part number for those seals. Searching for horse shoe and lower unit diagrams online and haven't found anything.
 

cfauvel

Chief Petty Officer
Joined
Aug 16, 2005
Messages
645
I got some of it back together. Have to quit because it's getting dark and mosquitoes are getting bad.

Is that top o-ring/washer/seal thing supposed to fit tight against the driveshaft? The old one didn't, so I guess this may be OK?

there is an oring between the plastic housing and the inner stainless steel cup....is the oring you are referring to THAT oring?

there is another oring that fits at the top, right below the splines of the drive shaft. You'll know if you application needs one as there will be a recess to accept the or ring

Update: Oh I see what you are referring to, it seals against something in the mid section, not around the drive shaft per se.
 

rkhanso

Seaman
Joined
Apr 1, 2004
Messages
51
I'm just getting back to putting this together now. Have been struggling the last 1/2 hour to get the lower unit back up and installed. It seems to be getting close, maybe 1/4" or so away from being fully seated together.

I removed the lower unit with the shift shaft with it in neutral, after pulling the pin and pressing the linkage shaft in hard to get it to release. I'm suspecting I have to do the same when putting it back together? Do I need to press that shaft that the linkage connects to, and the pin that was removed back in hard to get the shift shaft to go up into place?

I do know that it's still in neutral at the steering control area as well as the lower unit (when I turn the driveshaft, the propeller doesn't turn.

I'm not sure it's hanging up on the shift shaft or not though. It seems like it's in the middle somewhere - maybe where that exhaust housing sits between the lower and upper parts. I'm just not sure.

Is there a trick to putting this back together?
 

cfauvel

Chief Petty Officer
Joined
Aug 16, 2005
Messages
645
the trick is have two people, I do this job very seldom because I have no kids that can help....and I know it will be a PIA

I usually put the LU in gear so that I can turn the prop shaft to line up the splines at the top.

The next thing, this is usually my freaking problem, is place a vice-grip on the shift shaft, after it is partially into the midsection, so that I can turn the shaft slightly to slip into the groove of the block that holds the end of the shift shaft's end.

putting the vice-grip there also helps to hold the LU so that you can double check the water tube is in its place.

Remove the prop to lower the weight.
 

rkhanso

Seaman
Joined
Apr 1, 2004
Messages
51
the trick is have two people, I do this job very seldom because I have no kids that can help....and I know it will be a PIA

I usually put the LU in gear so that I can turn the prop shaft to line up the splines at the top.

The next thing, this is usually my freaking problem, is place a vice-grip on the shift shaft, after it is partially into the midsection, so that I can turn the shaft slightly to slip into the groove of the block that holds the end of the shift shaft's end.

putting the vice-grip there also helps to hold the LU so that you can double check the water tube is in its place.

Remove the prop to lower the weight.

Where are you putting the vice grip? At the bottom, just above the lower unit and that rubber seal put onto the shift shaft? Or up at the top somewhere? I'm not quite picturing this in my mind.
 

rkhanso

Seaman
Joined
Apr 1, 2004
Messages
51
I don't think the shift shaft is the problem.
It looks like that exhaust housing/passage with rubber seal on each side is the culprit - not letting the lower unit come up high enough to fully seat. I wonder if I bought the correct seals for that thing.

Is the correct way to install that exhaust passage to simply put the rubber seals on each side, butted up to the ridge and then it just sits in the opening? It doesn't appear there's enough room to actually get that top seal up in enough to pop around on the top unit - even though there is a curve on the outside of that seal - that almost looks like it could if there was enough room.

Suggestions?
 
Last edited:

racerone

Supreme Mariner
Joined
Dec 28, 2013
Messages
38,454
They have used that exhaust adaptor " horseshoe " for many years like 20 or more .-------Never a problem for me.
 

rkhanso

Seaman
Joined
Apr 1, 2004
Messages
51
So, it just sits loose in place and the lower unit should just be easily pushed flush with the upper part with no struggles?
And, if it rocks back and forth from the center area, is there anything else that can cause that? It's not rocking from closer to the edge - such as the driveshaft or shift shaft area. More in the middle.

I took the exhaust thing out completely and then the lower unit can sit flush with the upper.

Is something wrong with the seals I bought or the way this is put together?

IMG_20180908_171405574.jpgIMG_20180908_171421093.jpgIMG_20180908_171417175.jpgIMG_20180908_171356719.jpg
 
Last edited:
Joined
Jul 31, 2013
Messages
29
I just did my Evinrude 90hp last month and it went in pretty easy. Make sure you don't have any grease on the top of the shaft where the splines are. If there is grease on the very end it creates a back pressure on the shaft trying to push it out.
I hope this is OK if not you can delete... This video is a pretty good one for the water pump on the Johnson / Evinrude engines. (it's 2 parts) https://youtu.be/dUCAWVtYed0
 

rkhanso

Seaman
Joined
Apr 1, 2004
Messages
51
There is no grease on the top of the driveshaft. The videos don't show putting the lower unit in, nor how to manage that exhaust passage when putting everything back together.

With the exhaust passage NOT in, the lower unit fits up flush and tight. With the exhaust passage in, it doesn't. That confirms that's where it's getting hung up. Now I just have to figure out why.

Did I buy the wrong rubber seals for the ends of the exhaust passage? I didn't remove them and try to check the gap without the seals on the passage (I glued them on with rubber cement). I suppose that might have to be the next test.
 
Top