Replacing The Floor On My 14 foot Starcraft

1988Starcraft

Seaman
Joined
Nov 30, 2011
Messages
72
I have a 1988 Starcraft open fisherman with a side console and the floor is getting soft. It also lost a rivet on the hull below the waterline last season so that needs to be addressed too. The seats, live well, and storage containers are all riveted to the hull. The floor is attached to the seats with crews but I don't know what else (if anything) holds the flooring in place. My question is do I need to remove all the interior fixtures by grinding or drilling out the rivets or can the floor be taken out without that effort. Also, any suggestions for the best type of fastener to use to replace the factory rivet in the hull that's gone. Would lining the bare hull with some kind of sealant before I put it all together be a good idea to help keep the remaining hull rivets tight? If so, what material is best for that? Lots of questions, hopefully good answers. Thanks.
 

pxlxr

Cadet
Joined
Mar 25, 2010
Messages
25
Re: Replacing The Floor On My 14 foot Starcraft

Since nobody has chimed in, yet, and since I asked these questions earlier myself:
Yes, everything must go to get the floor out
Yes, you must drill out the rivets
As for replacing the rivet, unless I'm mistaken, the floor isn't riveted to the actual hull on any SC's, so you are safe, there
Yes on lining the inside of the hull- clean the crap out of it while the floor is out and use Gluvit. You only need to worry about riveted areas unless something is obviously funky with the aluminum elsewhere

Good Luck
 

jasoutside

Supreme Mariner
Joined
Dec 20, 2009
Messages
13,269
Re: Replacing The Floor On My 14 foot Starcraft

Pxlxr has some good info there.

Have ya got some photos? Photos are always a big help for the guys giving ya advice.

Welcome to iboats!
 

bananaboater

Ensign
Joined
Jul 27, 2009
Messages
932
Re: Replacing The Floor On My 14 foot Starcraft

Yeah, photos are very helpful. Rivets are easily replaced. The ones in the hull might need a second set of hands to set. I was surprised at your description of the deck being screwed into the seats. Cannot envision that. Lots of suggestions will come your way eventually.
 

jigngrub

Fleet Admiral
Joined
Mar 19, 2011
Messages
8,155
Re: Replacing The Floor On My 14 foot Starcraft

This is a good and easy way to replace hull rivets:

http://www.youtube.com/watch?v=L0MA1-5NXjs&feature=related

Anything that is sitting on the decking (console, seats, etc.) must be removed to be able to remove the decking.

Self tapping stainless steel screws are an acceptable method of fastening new decking to your boats structure, blind rivets are also acceptable.

Have you given any thought to what you're going to put on your new decking... carpet, vinyl, paint...?
 

1988Starcraft

Seaman
Joined
Nov 30, 2011
Messages
72
Re: Replacing The Floor On My 14 foot Starcraft

Thanks for the quick responses. No pictures yet because I haven't started the work and the boat "looks" fine. It's a winter project and I want to have it well thought out before I make any mistakes. I'll start submitting pictures once I start taking things apart. As far as the rivets go, where can I get the OEM rivets? I have no experience putting them in. What special tools are needed? Are pop rivets OK if they're sealed on the inside? What method should I use to remove the original rivets: center punch the outside and drill them out from the outside in, grind off the inside piece and drive them out from the inside of the boat, or some other way I haven't thought of yet? I don't want to make the holes any bigger by drilling. I've read elsewhere that stainless bolts can be used to replace the rivets that hold in the seats, etc. above the waterline. Is that a good idea? Sounds easier than hammering in rivets. Can they be used below the waterline on a limited basis. Right now only one rivet is missing below the waterline.

As far as the screws joining the seats and storage areas to the floor go, there is a flange on those seats and storage areas that is just like the flange that the rivets to the hull go through. There are screws that go through the flange and into the floor. Most of them have come out because the wood is soft (reason for replacing the floor). Getting them out and replacing them is easy.

I'ms sure I'll have more questions once I get into this project so thanks in advance for the help.
 

1988Starcraft

Seaman
Joined
Nov 30, 2011
Messages
72
Re: Replacing The Floor On My 14 foot Starcraft

I missed your response when I replied a minute ago. The existing floor is covered by a vinyl non skid material. I don't think it's glued to the wood floor so I'd hoped to salvage it and just put it back on the new wood. It's in good shape. I built a casting platform for the bow years ago and painted it with marine paint with a non-skid additive in it and it's worn very well so I had planned on using that if I couldn't salvage what's there now. That video makes it look easy. Any suggestions where I can get those solid end rivets? Thanks.
 

jigngrub

Fleet Admiral
Joined
Mar 19, 2011
Messages
8,155
Re: Replacing The Floor On My 14 foot Starcraft

You can get any kind of rivet you want here:

http://www.rivetsonline.com/rivets-en.html

Did you watch the video I posted? The rivet(s) in the vid are closed end blind rivets, they're water and vapor proof, and used in the aircraft and boating industries. You can use an ordinary pop rivet tool to set these up to 3/16" diameter, for 1/4" diameter you need the heavy duty setting tool like in the video. Open end blind (pop) rivets aren't acceptable for through hull applications.

For rivet removal, grinding off the backs (inside the hull) and driving the stud out with a center punch is the best method for solid rivets. Drilling out blind rivets is the easiest.

Stainless steels bolts to replace rivets is amateurish IMO and they'll leak sooner than a rivet will. They make the job look like you didn't really quite know what you were doing.
 

1988Starcraft

Seaman
Joined
Nov 30, 2011
Messages
72
Re: Replacing The Floor On My 14 foot Starcraft

Thanks jigngrub. I did watch the video and he made it look easy enough now that I know where to get the rivets. The rivets in my boat are 3/16 solid rivets I think based on what the good ones look like and the hole from the one that came out. If it's as easy as it looks, I might not use the bolts. Rivets are probably cheaper too. You've been so helpful so far, what tool do you recommend I get for grinding off the backs of the rivets? 1988Starcraft.
 

jigngrub

Fleet Admiral
Joined
Mar 19, 2011
Messages
8,155
Re: Replacing The Floor On My 14 foot Starcraft

You shouldn't need to remove any through hull rivets to replace your decking, but then again... we're talking about a Starcraft, so you may.
For the few, if any that you need to remove I'd say a grinding disc attachment for a drill should do the trick.

It would help if you'd go ahead and post some pics of your boat, and especially of the areas that have the rivets that need to be removed.
 

1988Starcraft

Seaman
Joined
Nov 30, 2011
Messages
72
Re: Replacing The Floor On My 14 foot Starcraft

Several of you helpful people suggested I take some pictures, so I did. I'm new to this so feel free to make suggestions for other things I should take pictures of.
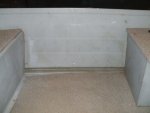
The first picture shows the starboard midsection of the inside of the boat. Left is forward in this picture. You can see the back of the front bench seat and the front side of a storage area that's attached to the front of the console.
View attachment 123884

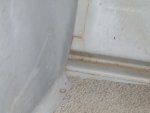
The next picture is a sloce-up of the connection of the front seat to the hull and floor. You should be able to see the backs of the rivets that hold the seat to the hull and a few of the screws that attach the base of the seat to the floor (which is common to all the seats, storage areas and the live well). All the rivets that hold these interior pieces to the hull are above the waterline.

View attachment 123885

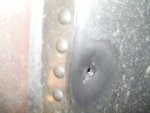
The last picture is of the hole where the rivet came out below the waterline. It is on the starboard aft corner of the hull. I cleaned it up with a wire brush so it showed up better in the picture. That is the only rivet that's missing or loose that I know of based on a close visual inspection of all the below waterline rivets.

View attachment 123886

I hope this gives you a good impression of what I'm working on. Thanks for the continuing suggestions. I'm already way smarter than I was when I started.

1988Starcraft
 

jigngrub

Fleet Admiral
Joined
Mar 19, 2011
Messages
8,155
Re: Replacing The Floor On My 14 foot Starcraft

I think you need to resize your pics to be able to post them here, or join Photobucket and host them there.
 

1988Starcraft

Seaman
Joined
Nov 30, 2011
Messages
72
Re: Replacing The Floor On My 14 foot Starcraft

Sorry about the problem with the pictures. I'm not sure what went wrong. I used the "Image" button in the reply box and it indicated that JPG files were OK. I've asked the administrator for help. The attachments opened fine before I posted the reply. How do people include pictures right in the text? I'll keep working on getting pictures into my posts.
 

GT1000000

Rear Admiral
Joined
Jul 13, 2011
Messages
4,916
Re: Replacing The Floor On My 14 foot Starcraft

Howdy 1988Starcraft,

Check out the sticky at the top of the forum titled, "How To's and Other Great Information", #12, Photo Posting Instructions...OR

Use the "Go Advanced" feature.


Best Regards,
GT1M
 

ezmobee

Supreme Mariner
Joined
Mar 26, 2007
Messages
23,767
Re: Replacing The Floor On My 14 foot Starcraft

Yep. Just click Go Advanced when posting pics. There's a glitch with the forum software which kills them if you try to upload in a regular post or reply.
 

1988Starcraft

Seaman
Joined
Nov 30, 2011
Messages
72
Re: Replacing The Floor On My 14 foot Starcraft

I'm trying again to post pictures. Thanks for the suggestions. They seem to be going into the post this time.

This first picture is looking outboard to starboard at the attachments of the front bench seat and the storage area just forward of the side console. This is basically how all the interior features are attached.

DSCF0417.jpg

This next picture is a close-up of the attachment of the bottom corner of the bench seat to the hull and to the floor boards. Here you'll hopefully see that there's rivets through the hull(above the waterline) and screws into the floor.

DSCF0418.jpg

This last picture is of the hole where the rivet came out of the hull below the waterline. It's on the aft starboard corner taken from a funny angle because I'm lying on my back looking up and inboard. I've wire brushed it to make it stand out better. This is the only one that's missing but it's hard to tell if others are loose or not.

DSCF0419.jpg
More suggestions about the best way to post pictures will be gladly taken. Hope this helps.
 

Attachments

  • New Pheasant 2.jpg
    New Pheasant 2.jpg
    144.3 KB · Views: 2

GT1000000

Rear Admiral
Joined
Jul 13, 2011
Messages
4,916
Re: Replacing The Floor On My 14 foot Starcraft

Pics are working perfectly now...
 

jasoutside

Supreme Mariner
Joined
Dec 20, 2009
Messages
13,269
Re: Replacing The Floor On My 14 foot Starcraft

Ah! Now we can see your challenge!

I suppose you have several options but really, the only one that makes sense to me would be to remove all the seating to get that deck out.

To do that, as suggested up there ^^^^, grind down the rivets from the inside. You should be able to punch em out from there. Take the seats out, then the deck.

Then, clean everything out, Gluvit, flotation (noodles or pink/blue foam), build and seal the deck (epoxy), vinyl if ya like (I'd use new stuff), install the seats back in (stainless screws w/ 5200 and rivets).

You'll have that rig good as new!:)
 

1988Starcraft

Seaman
Joined
Nov 30, 2011
Messages
72
Re: Replacing The Floor On My 14 foot Starcraft

That's basically my current overall plan. I have to find a good grinding tool that will let me get at all those rivets. Most are pretty wide open but there are a few tucked in tight spots. Showing my ignorance once again but what's "5200"? Another question that's come to mind is how do you determine the correct grip range for the rivets? Is the grip range I see in manufacturer's tables supposed to equal the metal thickness that I'm putting the rivet through or do you have to figure out that dimension plus something extra to form the gripping part of the rivet? Is there a rule of thumb to use to determine the right rivet lengths?
 

jasoutside

Supreme Mariner
Joined
Dec 20, 2009
Messages
13,269
Re: Replacing The Floor On My 14 foot Starcraft

Here ya go...
http://www.jamestowndistributors.co...3&familyName=3M+5200+Fast+Cure+Marine+Sealant

It's used for whenever you are poking holes in stuff (wood, thru hulls) and you want to seal it up.

I really prefer the 10 oz. cartridge "Regular Cure" that goes in my calk gun but that's just me. Most of the guys around here like the 3 oz. "Fast Cure".

Also just a heads up, many fellas will use 4200 or 3200 instead of the 5200 as they want the fastener to be less "permanent". All depends on the application ya know.

On your rivets, if you can get yourself 1/4" (give or take a little) beyond the material you'll be all set. You'll want a little less and more precise with riveting those seats into the hull so it looks good.

Have fun!
 
Top