Replacing The Floor On My 14 foot Starcraft

jigngrub

Fleet Admiral
Joined
Mar 19, 2011
Messages
8,155
Re: Replacing The Floor On My 14 foot Starcraft

A Dremmel tool is good for getting into tight spots for grinding.

5200 is a marine sealant made by 3M and used by many here for below the waterline sealing.

The grip range of the rivet is the thickness of both pieces of metal that you plan to rivet together. You should be fine with the 1/8-1/4" (.125-.250) grip range.
 

1988Starcraft

Seaman
Joined
Nov 30, 2011
Messages
72
Re: Replacing The Floor On My 14 foot Starcraft

Thanks. This forum is great. I though about a Dremel tool but didn't know if it would be heavy duty enough to grind off all those rivets and not take forever. Would a power tool like an angle grinder be OK to take care of the more exposed rivets then use a Dremel for the few that might be more out of the way? I know I'd have to be real careful with the grinder but as you can see from the pictures, the seat flange is always between the rivet and the hull so it provides a little safety against inadvertent hull grinding.

Thanks for the grip range information. I've always wondered about that and usually wind up with rivets that stick out way too far for fear that they wouldn't be long enough. The hull where the rivet is missing is two layers thick but the total thickness looks to be just slightly less than 1/4". I think the hull above the waterline is only one layer thick but I won't know for sure until I start grinding rivets.
 

jigngrub

Fleet Admiral
Joined
Mar 19, 2011
Messages
8,155
Re: Replacing The Floor On My 14 foot Starcraft

I just suggested the Dremmel for the hard to get to rivets, and angle grinder is the best tool for the easy to get to rivets and will make short work of them.
 

bananaboater

Ensign
Joined
Jul 27, 2009
Messages
932
Re: Replacing The Floor On My 14 foot Starcraft

The Dremel will work fine, just crank it up. The angle grinder seems like overkill unless you are doing a whole bunch. I just used a drill with a 1/4" bit. Sometimes the rivet would spin but I just angled the bit.
 

1988Starcraft

Seaman
Joined
Nov 30, 2011
Messages
72
Re: Replacing The Floor On My 14 foot Starcraft

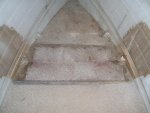
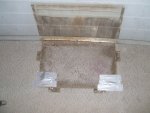
I've finally started dismantling my 1988 Starcraft. I've got the bow bench seat and the live well out. No big surprises. the seats are filled with hard styrofoam board but there is a little mouse damage. Is there something better than hard styrofoam boards that I should use when I put it back together? The floor has a bunch of what look like pop rivets in it but I'm not sure what they attach the floor to. I intend to just drill them out and see if that is all that holds the floor down once I get all the interior hardware out.

Next I'm going to work on the storage seat and the console. They present a couple problems. There are a few rivets that I think I'll have to drill out from the outside in because I can't get the grinder at them on the inside. The console is not riveted at all; just screws and bolts. I hope to be able to loosen it enough so I don't have to disconnect all the wires and cables to get the floor out. I'm not much of an electrician.

The live well plumbing will need to be replaced since the old fittings on the inlet and outlet pipes were brittle and both broke when I took the live well out. They're just pvc pipe fittings so I hope I can get replacements that are pretty close to OEM.

More updates soon I hope. 1988 Starcraft

Bow Seat Removed:

Bow Seat Removed.jpg

Live Well Removed:


Live Well Removed.jpg
 

bananaboater

Ensign
Joined
Jul 27, 2009
Messages
932
Re: Replacing The Floor On My 14 foot Starcraft

Is there something better than hard styrofoam boards that I should use when I put it back together?

A couple options many of us use. Pink or blue sheets of insulating foam or swimming float noodles. In your case I suspect the sheet foam would be best. It is closed cell and will not absorb water like the standard styrofoam you took out. If there is styrofoam under your decking it will likely be water logged. I would put back as much foam as you take out or more. Floating is better than sinking IMHO.
 

1988Starcraft

Seaman
Joined
Nov 30, 2011
Messages
72
Re: Replacing The Floor On My 14 foot Starcraft

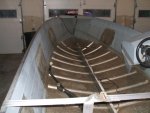
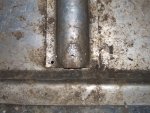
After a couple on and off months of effort the interior of my hull is stripped bare. I was able to grind all the rivets off with an angle grinder and got pretty good at it toward the end. That allowed me have the confidence to grind the round heads flat and drill them out from the outside if I couldn't get at the inside of the rivets without damaging the hull. Everything came out intact. As far as I know nothing got damaged in the process. As I suspected the floor was pretty rotten in spots. The non-skid floor material is dirty but in good shape. The only unexpected problem is that the rib where the rivet that started this whole project came out is cracked around the companion rivet on the forward side of the rib (see picture). I think I'll just add a couple new rivets when I replace the missing one and anchor the end of the rib down pretty well. If this is a bad idea, please let me know. No other ribs or rivets look in bad shape but I'll give them another inspection after the hull is cleaned. My next step is to thoroughly clean the inside of the hull so I can seal all the rivets with the Gluvit. The hull is dirty but not oily or greasy. Do I need to use any special cleaner or will a power washer with some serious soap do the trick? While I'm waiting for warm weather so I can apply the Gluvit, I'll be recreating the floor boards using the old ones as my pattern. Carpentry I can do.

As usual, Thanks for all the help. 1988 Starcraft

2-22-12 Floor All Out.jpg


2-22-12 Broken Rib Corner.jpg
 

jigngrub

Fleet Admiral
Joined
Mar 19, 2011
Messages
8,155
Re: Replacing The Floor On My 14 foot Starcraft

Looking good!

Scrub with some serious soap and then blast with the pressure washer and she should come pretty clean. Check for leaky rivets on the outside while washing and mark and replace any you find, I consider the Gluvit more of a preventive measure than a fix for rivets that are already leaking.

Inspect all the ribs once the inside is clean for a final examination. I'm sure you'll be ok if you just add a couple more rivets to the rib with the cracked flange.

Keep us updated on your progress, I kinda miss working on my tinny and threads like this are the next best thing.
 

1988Starcraft

Seaman
Joined
Nov 30, 2011
Messages
72
Re: Replacing The Floor On My 14 foot Starcraft

Here's another question. I've removed the old vinyl floor covering and am starting to accumulate the materials to replace the plywood floor. I didn't want to put the vinyl back so I was going to seal the edges, paint all the surfaces and use a final coat with non-skid grit in it on the top. I'm not sure what gave me the idea but I've discovered several sources of non-skid material similar to the materials used in truck beds. A couple of them discuss using their products in boats. This seems like a really tough material that would provide a permanent non-skid coating that would seal way better than paint. Are there any reasons not to use this kind of material on the deck top surface and edges? Can anyone recommend any particular brand if it's a good idea? Thanks, 1988 Starcraft.
 

jasoutside

Supreme Mariner
Joined
Dec 20, 2009
Messages
13,269
Re: Replacing The Floor On My 14 foot Starcraft

non-skid grit in it on the top.

How about sand? Waaaayyyy cheap at a couple bucks for a 50# bag. I laid it in the last layer of epoxy, painted, then put the other 48# in my kiddos sand box:)
 

jigngrub

Fleet Admiral
Joined
Mar 19, 2011
Messages
8,155
Re: Replacing The Floor On My 14 foot Starcraft

This is a non-skid coating made specifically for boats and marine use.

http://www.cabelas.com/product/Boat...=SBC;MMcat104794380;cat104706180;cat104227380

You'll need to order the primer that goes with it too.

I would strongly suggest that you apply this or any other coating on your decking before installation. This will leave your deck fasteners exposed so if you ever need to remove your decking for repairs to your boat you can do it without destroying your deck finish (coating).
 

1988Starcraft

Seaman
Joined
Nov 30, 2011
Messages
72
Re: Replacing The Floor On My 14 foot Starcraft

Thanks for the quick feedback. I was looking at a similar product called Grizzly Grip. The web site is www.grizzlygrip.com . I asked them about applying it to pressure treated plywood in a boat and they not only said it would work they said I didn't need primer. It costs a couple dollars less than the Cabela's product and winds up cheaper because there's no primer. In their testimonials section they show boats that have used it. I'm leaning toward that product if for no other reason than they've been really quick answering my questions and the price seems pretty good. It is a little more expensive than the exterior deck paint and primer I was going to use (I'm not sure what epoxy paint would cost but I bet it's more) but will last a lot longer I think.
I definitely intend to put on the deck sealant before the installation just to keep the hull clean, but like you said it also keeps the fasteners available, not that I ever intend to do this again but someone else might.
I'm starting to think about putting the floor back in and was wondering how I'm going to be able to line up the holes in the ends of the stiffening ribs where the old rivets attached the floor to them with new holes in the new floor boards. I think I can use the old wood as a template in most of the spots and have the old vinyl that I can use as a guide too. Are there any tricks of the trade that would make lining things up a more exact process?

As usual, this has been a great help. Thanks, 1988 Starcraft.
 

jigngrub

Fleet Admiral
Joined
Mar 19, 2011
Messages
8,155
Re: Replacing The Floor On My 14 foot Starcraft

Thanks for the quick feedback. ] . I asked them about applying it to pressure treated plywood in a boat 1988 Starcraft.
Do NOT use pressure treated plywood in your boat!!! At least not the ASQ pressure treated plywood from the big box home stores or lumber yards. The ASQ pressure treating formula will corrode/eat your aluminum!

There is one type of pressure treated plywood you can use, and it's called CCA pressure treated plywood. It is hard to find and only marine dealers carry it.

Use exterior grade plywood, the exterior grade is made with waterproof glue. Then seal your plywood with epoxy resin, or maybe your coating will be enough to seal it.

If you want to know more about the CCA plywood I can explain it a little further in detail if you'd like.
 

1988Starcraft

Seaman
Joined
Nov 30, 2011
Messages
72
Re: Replacing The Floor On My 14 foot Starcraft

Thanks. I had no idea that was a problem. I'll go look for marine grade and bring back the stuff I bought today. Fortunately, I didn't cut it up yet.
 

1988Starcraft

Seaman
Joined
Nov 30, 2011
Messages
72
Re: Replacing The Floor On My 14 foot Starcraft

Thanks again. I found Marine plywood but the dealer is an hour away. There is a Lowe's within 10 miles and is right near the Home Depot that I need to visit to return the stuff I already bought. The Arauco is about $25/sheet cheaper and I save lots of driving.

The old floor is beveled at a 45 degree angle to help it conform to the curve of the hull around the outside edges. There are also several small semicircular cut-outs on the edges to go around the rib stiffeners toward the forward end of the floor that are beveled the same way. I was expecting to cut the edges with a jig saw but is there a better woodworking tool out there that would do a cleaner job? The old floor looks perfectly smooth with nice straight cuts and I doubt I can make it come out that way by hand with a jig saw, but on the other hand it probable doesn't have to be that perfect.
 

jasoutside

Supreme Mariner
Joined
Dec 20, 2009
Messages
13,269
Re: Replacing The Floor On My 14 foot Starcraft

I like to set my Jig Saw on a slow setting and do my best to keep a nice even/slow pace when cutting. Never perfect but pretty good any way.

If you want it perfect you could always run a hole saw for the "scallops" and then just clip the corners with the Jigsaw.
 

1988Starcraft

Seaman
Joined
Nov 30, 2011
Messages
72
Re: Replacing The Floor On My 14 foot Starcraft

Thanks. That was pretty much my plan. I always consider the old saying that "better is the enemy of good enough" so I'll just go slow and easy and I'm sure it will be fine. It also gives me a good excuse to buy a new jig saw. I'll post pictures when the cutting is done. 1988 Starcraft
 

Cadwelder

Lieutenant Commander
Joined
Aug 30, 2010
Messages
1,780
Re: Replacing The Floor On My 14 foot Starcraft

A sprial bit and a steady hand with your dremel does well on small cut outs too. I use my Roto-Zip (just a dremel on steroids) quite a bit it boat repairs.
 

1988Starcraft

Seaman
Joined
Nov 30, 2011
Messages
72
Re: Replacing The Floor On My 14 foot Starcraft

One thing I've learned in this forum is to ask questions before I do anything permanent, so here's a couple more.
I put in three rivets today. One filled the hole where the original rivet came out and the other two are new ones about an inch inboard of the one that I replaced and the rivet just forward of it on the rib with the cracked corner I mentioned earlier. The two new ones are nice and tight. The one I used to fill the whole left by the missing rivet is tight but I wasn't able to pull the rib totally back down to the hull with the rivet so there's a narrow gap between the rib and the hull. I think this could be a problem when the hull flexes. If the gap opens and closes that rivet will not stay tight and I'll have another leak. I can think of a couple things I could do but want to get expert advice before I do anything else. One idea I had was to drill out the replacement rivet and open the hole up on the flange of the rib so that when I put a new rivet back in, it can squeeze tightly against the hull. The down side of this is that the end of the rib won't be supported by that rivet any more (kind of like the other corner of the rib where it's cracked I guess), but that would be better than another leak. The other idea I had was to leave the rivet alone and apply some kind of sealant or even epoxy between the rib and the hull where the gap exists in an attempt to fill the narrow empty space. I'm worried that I can't get in that gap to clean and whatever I put in there won't stick well and not form a good seal. I'm also not sure exactly what would be best to use to fill the gap. I'm wide open to suggestions concerning what I should do.
Another question I have is should I have put some kind of sealant between the rivets and the hull before I tightened them? The original rivets don't look like they have anything sealing them so I didn't use anything either. Like I said, the two new ones look as tight as the original rivets, but if I need to add something to seal them in, I can easily drill them out and do it right. If I need something to seal them with, what should I use? I do intend to apply Gluvit later.
Thanks in advance. 1988 Starcraft
 
Top