Replacing The Floor On My 14 foot Starcraft

jasoutside

Supreme Mariner
Joined
Dec 20, 2009
Messages
13,269
Re: Replacing The Floor On My 14 foot Starcraft

If it were me, I'd put a small stainless steel machine screw and nylon lock nut in that spot, all gooped up with 5200. Then you can tighten it down nicely. Some may consider that "hack" work but once the paint is on you'll never even notice.
 

jigngrub

Fleet Admiral
Joined
Mar 19, 2011
Messages
8,155
Re: Replacing The Floor On My 14 foot Starcraft

Remove your problem rivet and install another rivet with the end/body dipped in a generous amount metal epoxy like Loc-tite marine epoxy. This will bond the head of the rivet to the hull and the rivet won't loosen or leak.

The guy in this vid does this, but it doesn't actually show him dipping it... it just shows the epoxy on the rivet before he installs it.

http://www.youtube.com/watch?v=L0MA1-5NXjs&feature=related

The other rivets you installed should be fine since they're nice and tight, but you can redo them too if you want.
 

1988Starcraft

Seaman
Joined
Nov 30, 2011
Messages
72
Re: Replacing The Floor On My 14 foot Starcraft

Now I've got two opinions for adhesives: two part epoxy (Loc-Tite Marine) and an adhesive/sealant (3M 5200). My question is which would be better in my particular application. I can (and have) cleaned the exterior surface of the hull so anything should stick there. Inside the area between the rib and the hull is very small and other than washing with some kind of chemical cleaner, I can't really get anything in there to scrub or brush the surfaces very well. The Loc-Tite is aimed at sticking the rivet head to the hull and I guess the 3M is too. They both seem like good products so maybe it doesn't really matter.
Would the 3M 5200 be good for sealing the plastic plumbing fittings to the bottom of the aluminum live well when I get to putting it back in?
Thanks. 1988 Starcraft
 

jasoutside

Supreme Mariner
Joined
Dec 20, 2009
Messages
13,269
Re: Replacing The Floor On My 14 foot Starcraft

5200 is excellent for sealing up all sorts of stuff (including your fittings):)
 

jigngrub

Fleet Admiral
Joined
Mar 19, 2011
Messages
8,155
Re: Replacing The Floor On My 14 foot Starcraft

Use the much stronger epoxy on your rivet, and the sealant on your other stuff.
 

1988Starcraft

Seaman
Joined
Nov 30, 2011
Messages
72
Re: Replacing The Floor On My 14 foot Starcraft

Made lots of progress once I got the floor materials right. Attached pictures show all four floor panels set in and fit up. Nothing tied down yet but the fit is pretty good. I will need some longer grip range rivets to attach the floor to the ribs. The wood is 15/32 and the rib has some thickness to it plus there can be a small gap between the wood and where the rivet hits the rib. I'm thinking a grip range of .5" - .625" should do it. I also need to fabricate a joiner plate where I have a joint in the floor that wasn't in the old one. I'll just buy some aluminum strapping and rivet it along the edges like the original joints have. It falls under the live well and the console so there'll be lots of screws that span the two sheets too. The only place you'll even see it is in the narrow passageway in between them.

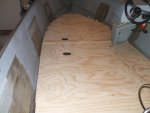
3-5-12 Floor All Fit In_A.jpg
3-5-12 Floor All fit In_B.jpg
My next thing to focus on is the live well plumbing. It looks like they used through hull fittings to join the pipe to the bottom of the well. I've looked on-line and I'm not sure I can buy the same types but I think I can make the modern ones work. In the old ones the cap on the inside of the live well threaded on and there was a locking nut on the outside. It would be easy to pull the pipe up with a nut on the inside but the fittings I've located all have the inside flange as a integral part of the threaded fitting with only the one nut. That means I'll have to install the live well with the pipe attached and fish the pipe under the floor to the stern. If I leave the stern section of the floor out until that's done, it shouldn't be too hard (I hope).

I'll going to redo the three rivets I put in and seal them with LocTite epoxy. I also still need to clean the interior of the hull and seal the floor boards. My garage isn't heated so I'll need to wait a little while for warmer weather for the sealing.

It feels great to be putting things together instead of taking things apart for a change.
Thanks for all your help.
1988 Starcraft.
 

1988Starcraft

Seaman
Joined
Nov 30, 2011
Messages
72
Re: Replacing The Floor On My 14 foot Starcraft

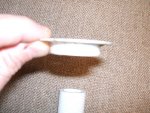
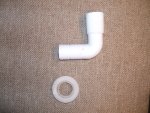
I'm having trouble finding fittings for my live well drain. The original equipment drain is a 1 inch system that includes what looks like an angled through hull fitting with a threaded end and a angled grip end. The treaded end had two pieces threaded onto it: a nut with a flange on the outside of the live well and a very thin threaded flange on the inside of the live well. The drain is in the bottom of the live well and there is an aluminum pipe that fits into it that serves as an overflow prevention system. You pull the pipe out to totally drain the live well. When I took the live well out the nut on the outside of the tank broke. The thin threaded flange was also damaged but may be salvageable. I'm not sure how the original outside nut accommodated the threaded portion of the inside flange so that it fit tightly against the tank wall which is very thin. All I've been able to find are 3/4" and 1-1/8" through hull fittings that even if they were the right size, wouldn't allow the tank to completely drain. Does anyone know where I might be able to get the 1" fittings I need to replace the original drain system fittings? Alternatively how about 1" through hull fittings of any kind? I've attached two pictures. One shows the inside flange and an angled fitting that looks like the original (except the original was black) and the other shows a close-up of the thin inside threaded flange. This is holding me up right now since I don't want to start putting in the floor before I get the plumbing problem figured out. Thanks. 1988 Starcraft


DSCF0459.jpgDSCF0458.jpg
 

GT1000000

Rear Admiral
Joined
Jul 13, 2011
Messages
4,916
Re: Replacing The Floor On My 14 foot Starcraft

Check the Iboats Marine Store for what are called thru-hull fittings...also look to your local marine stores...these are fairly common fittings..you should have no problem finding what you need...
 

1988Starcraft

Seaman
Joined
Nov 30, 2011
Messages
72
Re: Replacing The Floor On My 14 foot Starcraft

I have found lots of 3/4" and 1-1/8" fittings but no 1" versions. I'm guessing that they're the standard sizes now. I'll keep looking. Thanks. 1988 Starcraft.
 

GT1000000

Rear Admiral
Joined
Jul 13, 2011
Messages
4,916
Re: Replacing The Floor On My 14 foot Starcraft

Sorry, I was hoping you could find the right ones...any possibility of opening up the fittings to the 1-1/8" size, then maybe finding a reducer at the local hardware store to match it to the existing plumbing???
 

1988Starcraft

Seaman
Joined
Nov 30, 2011
Messages
72
Re: Replacing The Floor On My 14 foot Starcraft

That's kind of my default position assuming I could find a 1-1/8" to 1" coupling. At least that way I don't have to enlarge the through hull fitting on the transom. Thanks, 1988 Starcraft.
 

1988Starcraft

Seaman
Joined
Nov 30, 2011
Messages
72
Re: Replacing The Floor On My 14 foot Starcraft

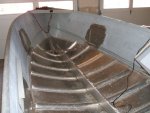
I've made a little more progress. I finally got the hull cleaned. It was harder than I expected but I shouldn't have been surprised that it was a lot of work. 24 years of crud build up takes a lot of cleaning. It looks good now.

3-27-12 Hull Cleaned.jpg

I cleaned everything with a power washer (which broke in the process) then used lacquer thinner (suggested by the Gluvit instructions) and a wire brush to clean around every rivet. I didn't find any loose rivets which is good. When it warms up outside again, I'll do a leak test.

I also came up with a combination of fittings that will let me get the bait well back together. I'm about ready to start installing the fittings on the live well and have bought 3M5200 as suggested earlier to seal them up. I know it's permanent but I really don't anticipate doing this again and want it as strong as possible. The 3M5200 package says that it's for fiberglass and wood and that it's great for through hull fittings. My fittings are plastic (like lots of through hull fittings) and my bait well is aluminum. Before I go with the 3M5200 I wanted to get confirmation that it's a good product for my application: What do you all think about plastic and aluminum joints???? The other thing the package says is that once you open it you should use it up because even if you cap the tube it's only good for 48 hours. Does anyone have any tricks that will extend the shelf life of the 5200? I'm glad I bought a small tube but it still seems like a big waste.


More progress soon. Our fishing season starts in a month. 1988 Starcraft
 

jasoutside

Supreme Mariner
Joined
Dec 20, 2009
Messages
13,269
Re: Replacing The Floor On My 14 foot Starcraft

Hey, your hull came out pretty clean there, nice:)

Yah, the 5200 is great for your application. I've used it a bunch for just what you are suggesting and it works perfect.

If you got the fast cure you'll want to get as much done as possible. Anything left over in the tube you'll need to poke random holes in it to get it out.

My favorite stuff is the 5200 regular cure in the cartridge. Less mess, easier to apply, and lasts a lot longer in the tube when capped, and only $11 at the local Home Depot.:)
 

1988Starcraft

Seaman
Joined
Nov 30, 2011
Messages
72
Re: Replacing The Floor On My 14 foot Starcraft

Thanks jasoutside. The 3M5200 I already have is from HD. It's in a 3 oz. tube and it says it cures in 7 days which doesn't seem fast but it still says you have to use it up in 48 hours. I'm sure I can get the bait well done faster than that so it isn't a big deal. I'm just cheap and wanted to be able to salvage the rest of it for future use if I could. I also have some Loc-Tite marine two part epoxy that says it's good for a lot of materials including aluminum and plastic. I've used it to seal the replacement rivets I've put in the hull. I could use that instead of it's a better choice, but it sounds like 3M5200 is your choice.
1988 Starcraft
 

1988Starcraft

Seaman
Joined
Nov 30, 2011
Messages
72
Re: Replacing The Floor On My 14 foot Starcraft

I did my leak test today and found one new rivet that slowly dripped. One of the rivets I replaced also had a slow dripping leak (UGH!). That rivet is in the spot where the original problem started. It's on the end of the rib and I couldn't get the rib pulled down tight to the hull with the rivet and I guess there wasn't enough epoxy around the rivet or in the hole to get a good seal. The leaks are slow and maybe Gluvit would seal it up, but I 'd rather have it watertight before I seal it up. Right now my plan is to drill it out again, and try to get something between the rib and the hull to make sure there's nothing blocking the rib from coming flush with the hull, then put lots of epoxy in the hole and put in another rivet. The newly discovered leaky rivet should be easy to drill out and replace. If anyone has a good trick to clean out between the rib and the hull, or pull the end of the rib back tight to the hull, please pass it on. Thanks, 1988 Starcraft.
 

1988Starcraft

Seaman
Joined
Nov 30, 2011
Messages
72
Re: Replacing The Floor On My 14 foot Starcraft

Quick update: I redid the two leaking rivets with more Loc-Tite and new rivets and retested the hull. They both were good and tight with not even a drop of leakage. I've treated my new floor with Grizzly Grip. It looks great. My next step is to apply the Gluvit. I'm planning on two coats: one Wednesday and one Thursday. After that I can start putting things back together this weekend: YAHOO!!!!!
1988 Starcraft
 

1988Starcraft

Seaman
Joined
Nov 30, 2011
Messages
72
Re: Replacing The Floor On My 14 foot Starcraft

The Gluvit is all done and the next step is putting the floor and seats/storage compartments back in. I need to replace some of the foam floatation that was in them (mouse nests) but not much. I'm thinking I'll put any extra closed cell foam board under the floor (there wasn't any floatation under there originally but I think more floatation can only be good) but was wondering if I should tie it down somehow or can it just lay loose under there? I could glue it to the underside of the floor but if I don't have to, it will save some work. Advise?????

Thanks, 1988 Starcraft
 

kfa4303

Banned
Joined
Sep 17, 2010
Messages
6,094
Re: Replacing The Floor On My 14 foot Starcraft

HI 1988. Looks great so far. You're right, extra flotation never hurts. Pool noodles and/or Pink and Blue insulation foam work great for below deck flotation. The dollar store will often sell pool noodles and you can get the insulation board at any home supply store.
 

jigngrub

Fleet Admiral
Joined
Mar 19, 2011
Messages
8,155
Re: Replacing The Floor On My 14 foot Starcraft

Just loose will be fine '88, 'bout the only way Iwould secure it would be to use some 2 part pourable foam to secure it... but nobody ever does that on here that I've seen.

How are you planning on fastening your decking back down? Screws or rivets? I'm thinking screws might twist and gob up that liner.
 

1988Starcraft

Seaman
Joined
Nov 30, 2011
Messages
72
Re: Replacing The Floor On My 14 foot Starcraft

I'm planning on using insulation boards to fill in the little spaces the mice created under and behind the seats and storage compartments. Whatever is left over, I'll stow under the floor.

The floor is going to be attached with rivets like it was originally. The Arauco plywood seemed to be a little softer than the original floor boards. When I tested rivets with standard sized heads they tended to pull themselves into the wood. I thought that would defeat my Grizzly Grip seal on the surface and let water in so I bought some wide flange rivets and they seem to work fine. The rivet source recommended by the people in this forum (Jay-Cee Sales - RivetsOnline.com) has been great, although if I had been able to anticipate everything I needed early on, I could have saved some of the shipping cost which was more than the cost of the rivets. Oh well, live and learn.

The floor goes in this weekend. Pictures to follow. Once again, thanks. 1988 Starcraft
 
Top