Over the last year I have been looking for information on Charger boats and in the mean time I started restoring what I had. After near finish I posted over on the boat forum pictures of what I had. It was suggested that I post on my restoration here. I wish that I had taken more pictures of the process, but here is the description of what transpired. The pictures that I have can be viewed at the link below.
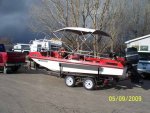
Here is a link to the pictures on the boat. It is a 1976 Charger All Family Craft, Center Console, Tri Hull, Deck boat.
http://s442.photobucket.com/albums/qq141/1_Richard/
Several posters on the boat forum seemed very impressed and suggested that I post on the restoration forum. So here goes.
A little history. About 4 years ago I had been looking at boats on Ebay when I spotted a red boat with railing all around, had a center console and I thought I might like to get it. Well the bidding went on and I got out bid. The winning bidder had stated that he only wanted the motor and the trailer. I contacted the seller and expressed my interest in the boat it self to no avail. I continued to look. I knew what I wanted at this point. Two years later there was a boat like the one I lost out on. I made bids on it and did get it. I had to drive from N E Wyoming to Eastern Nebraska to get it. Talking to the seller on this one I found out he had got the boat off of Ebay 2 years earlier and he wanted just the trailer and motor. Ahaa. My second chance.
I was picking up the boat with a lighter 2-wheel trailer that I used to carry my 59 Crestliner Aluminum boat on. It took two farm tractors with front loaders on them to life the boat to set it on my trailer. They first tipped it up and let quite a bit of water drain out. They still needed both of the tractors. I really sweated the 7-hour trip back home. There was a lot of weight behind me. Shortly I found the tandem trailer that it currently sets on and started to work on her.
The floor was rotten, the console was being held up by 1 screw into rotten wood. It was full of junk and had been about 12 full of water. It set out in the field that I retrieved it from for 2+ years. I cleaned it out and set to work taking it apart.
Pulled the plastic insert out of the rub rail exposed the screws attaching the rub rail channel. Got those removed and found the screws holding the deck onto the hull. Got some buddies to help lift the deck off and carry it around to the back of the house. Won?t need it for a while. I removed the old semi rotted carpet and found rotted plywood floor. Very soft. The old floor was 1/2" plywood. I set my circular saw to just less than 1/2" so I wouldn't cut thru the floor and into the hull. Once all of the cuts were made I was able to break out the plywood in small pieces. I then used a wood chisel to remove the plywood from under the 1 1/2 fiberglass lip that was left from cutting the floor out. Once the floor was out I found expanded foam between the stringers. While removing the floor every time I stepped on the foam it squished. When I kneeled on it my knees got soaked.
I started cutting the foam out with a long kitchen knife in about 2" pieces about 15" wide. This is going to take forever. I went on another forum and asked for suggestions on a quicker method. It was suggested to use a shovel, now that made short work of the removal.
The stringers were in good shape being all glassed in and did not have water ingress into them. Got really lucky there. After a lot of sole searching I decided on 3/4" Hardwood Plywood to replace the floor.
I started the floor by getting some very large cardboard boxes. Ones from refrigerators. I measured cut and trimmed a pattern of what I needed to replace the floor. Made sure before I started cutting the ply. Once the ply is cut ready to lie in place, I took my router and cut lap joints for all of the seams and where the ply would slide under the fiberglass lip that I left along all of the edges. The next step was to resin seal the entire ply. 4 separate layers of resin painted on all surfaces and allowed to set up. Then fit the pieces of the puzzle in place. Once fit in place I screwed the edges and seams to add to the stability of the joints. Then glassed all seams to reinforce. Then 1 more coat of resin over everything.
Is the foam between the floor and hull really necessary? There are about the same amount of opinions as there are people out there. I called Charger and talked to one of the people that built that particular boat. Got really lucky there! Discussed the necessity of the foam. It was used for two main reasons. One is to muffle the sound of the water and hull contact. The most important is to add strength to the structure. Now that made sense.
From suggestions of those who supported the use of foam, I waited until the floor was installed, then drilled1 1/4" holes about 2' apart running the length of the stringers. I used a hole saw for this step so I could save the centers of the holes.
I found a supplier, Aero Marine Products, to get the closed cell Coast Guard Approved pour able expanding foam from. I ordered 5 gallons. It is a two-part material so you get 2 five-gallon containers. You mix equal parts and pour and it expands in the area it was poured. Simple huh,,,,,, . You have about 40 seconds from the time the 2 parts are poured together to get them mixed and poured into the hole. Look at your watch......wait for forty seconds.....hmmm,,,,that was a long wait. It is not so long if you are having fun,,,,or pouring foam.
I set the tongue on the trailer up and braced it so the floor of the boat was on about a 15 to 20 degree incline from stern to bow. This was done so when the pour is made it will initially flow towards the stern and fill from there forward as you go.
I picked up a bunch of plastic cups from Wal-Mart. 2 sizes. 9 ounce and 18 ounce. I used 1 each of the 9 ouncers for each part of the foam. I then poured the 2 parts into the 18 ouncer to mix. I took an old metal coat hanger and cut a long piece off of it and bent a loop in one end. The other end went into an old 12V drill that I had. Poured the two parts together, grab the drill, mix for 10 seconds, get over to the hole and start pouring. Careful, don't miss the hole. There were several times that the foam started to expand as I was pouring. I used a pattern to make the pours, as there were 24 holes in the area that needed the foam. I started on one side and moved across to the other side through a course of four holes between the stringers and the sides, four areas. I then went back to the starting side and moved up 1 row of holes and made the pass across again and followed that up through the rest of the holes. That gives the foam enough time to expand in the area under the floor while you pour the rest of the row. Once I covered all of the holes I started back at the first one pouring some foam to finish filling the cavity. On this step you will have some foam expand out of the hole. Once set up you can trim it down inside of the hole to the bottom of the plywood.
Then you can mix up some resin and cover the hole centers to seal them. Now you can drop them back into the holes for plugs, liberally apply resin over the holes so it will run down the cut area. Let that set up then using a brush fill the rest of the cutout edges with resin. You are resealed again. Lay out your first layer of fiberglass cloth over the whole floor and resin it down making sure you are saturating the cloth with the resin. Depending on how thick you want your fiberglass to be keep laying down layers. I put down 6 layers of cloth each resined separately being very careful to overlap any seam in the cloth.
Next step was to cut the carpet. I went with a gray indoor/outdoor type as was not able to get marine carpeting in Wyoming. I used just enough carpet glue to hold down the edges and hold it in place.
I got the deck set back onto the boat and reattached it and built new supports for the seating around the sides and bow. I used pieces of the same carpeting around them. Carpeted a new resin sealed piece of plywood for the console to attach to and the same with the pedestal mount for the seat at the helm. I used a 15-inch spoke pirate?s wheel for the steering wheel just to add a little personal touch.
I had yet another stroke of luck. The gel coat was still in good shape and just needed a good polishing. Then time to start adding the necessities, the pole holders the shade top, the downrigger, and other little goodies.
I tried the boat out late last summer with a Mercury 50 HP on it and was not totally satisfied with the performance. I got a 90 hp Mercury and put it on this spring. A lot of difference. It idles down nice for trolling if I am not using the electric motor and at WOT I am able to get across the water at 37 to 40 MPH according to the GPS.
With one thing left. I have to figure out how to stop just fishing and start CATCHING!!