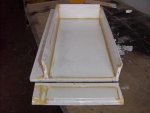
After doing a fair amount of reading on this forum and others, I decided that I was going to mold some hatch covers for the new deck I'm putting in my 1988 Donzi R-23. So naturally, I made a test piece to try out the process and see what would happen, before I get too deep.
Well let me tell you, it couldn't have turned out better. I'm super happy with the results of this first test piece. I made the mold using the following:
- 12"x24" white melamine covered particleboard (basically, a white shelf bought from HD)
- a length of plastic baseboard (also from HD)
- some wood putty
- clear lacquer spray
- nail gun
I cut the baseboard to length in order to make the 4 side walls. These walls were nailed onto the melamine slab and to each other. The inside corners were then filled with wood putty and a 1/4" round pipe was used to radius the corners. After the putty was dry, a light sanding cleaned up any rough edges. Once that was done, a few coats of clear lacquer spray were applied. When the clear lacquer was dry, the mold was ready.
I first applied 3 coats of carnuba paste wax. Afterwards, I sprayed on a couple coats of PVA mold release (using the $15 gravity feed spray gun I got from Harbor Freight). After the PVA was dry, I applied the first coat of unwaxed polyester resin. I added white pigment to this first coat, and brushed it on lightly so I wouldn't tear the PVA film. I then added a layer of light cloth (maybe 6oz? I don't know) and resin, then a layer of 1.5oz mat and resin, a piece of 1/2" plywood for a core, then a final layer of 1.5oz mat and waxed resin.
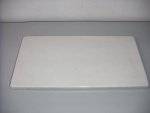
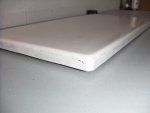
Once the piece hardened fully, I popped it out of the mold. I set up the fence on my table saw and cut the flanges to 5/8" length.
The surface finish turned out super smooth and glossy. I had some runs in the PVA (I applied it too thick and too fast) and those showed up in the final product (but they're barely noticeable). That's why this was a test piece")
Some observations I made:
- need to spray the PVA in lighter coats in order to build it up
- waiting for the first layer of pigmented resin to become tacky before applying the first layer of cloth worked great to avoid any print through of the pattern
- 1/2" plywood core is WAY too thick for something of this size. The piece is super strong and stiff. A 1/4" core would have been just fine.
- The edges of the wood core need to be rounded in order for the mat to be able to lay flat and not lift at the edges.
Well let me tell you, it couldn't have turned out better. I'm super happy with the results of this first test piece. I made the mold using the following:
- 12"x24" white melamine covered particleboard (basically, a white shelf bought from HD)
- a length of plastic baseboard (also from HD)
- some wood putty
- clear lacquer spray
- nail gun
I cut the baseboard to length in order to make the 4 side walls. These walls were nailed onto the melamine slab and to each other. The inside corners were then filled with wood putty and a 1/4" round pipe was used to radius the corners. After the putty was dry, a light sanding cleaned up any rough edges. Once that was done, a few coats of clear lacquer spray were applied. When the clear lacquer was dry, the mold was ready.
I first applied 3 coats of carnuba paste wax. Afterwards, I sprayed on a couple coats of PVA mold release (using the $15 gravity feed spray gun I got from Harbor Freight). After the PVA was dry, I applied the first coat of unwaxed polyester resin. I added white pigment to this first coat, and brushed it on lightly so I wouldn't tear the PVA film. I then added a layer of light cloth (maybe 6oz? I don't know) and resin, then a layer of 1.5oz mat and resin, a piece of 1/2" plywood for a core, then a final layer of 1.5oz mat and waxed resin.
Once the piece hardened fully, I popped it out of the mold. I set up the fence on my table saw and cut the flanges to 5/8" length.
The surface finish turned out super smooth and glossy. I had some runs in the PVA (I applied it too thick and too fast) and those showed up in the final product (but they're barely noticeable). That's why this was a test piece
Some observations I made:
- need to spray the PVA in lighter coats in order to build it up
- waiting for the first layer of pigmented resin to become tacky before applying the first layer of cloth worked great to avoid any print through of the pattern
- 1/2" plywood core is WAY too thick for something of this size. The piece is super strong and stiff. A 1/4" core would have been just fine.
- The edges of the wood core need to be rounded in order for the mat to be able to lay flat and not lift at the edges.