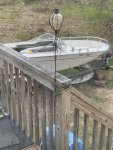
Sea Ray SRV 1971 restoration

Szabee

Cadet
Joined
May 18, 2020
Messages
15
Hi guys,

I've been following this forum for a while now , and I absolutely love it . Hopefully I'll be around , and get to know a lot of you great people. I recently purchased my first boat ever, a 16' -1971 Sea Ray bow rider for very very cheap. I knew it would be a lot of work , but I will love the process. It has a 1991 Mercury 115 HP 2 stroke 4 cylinders outboard in very good condition.
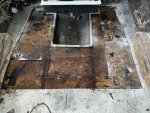
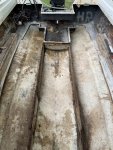
I removed all the upholstery , and the wood they used was completely rotten , they didn't even waterproof it . I thought it was just the outside , because the deck seems really solid, no soft spots, but I think I was wrong.
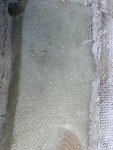
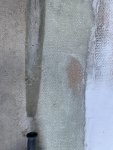
I found two holes in the back after I removed everything , I'm assuming they poured the foam there and never capped it . The foam is soaked under the deck and the bottom of the plywood is rotten . I will remove the deck and the foam little by little until I reach some dry foam . Or should I just redo everything while I'm at it ?
I'm attaching some pictures about what I've started , and let me know if you think I'm doing something wrong .
 

Attachments

  • photo330204.jpg
    photo330204.jpg
    368.6 KB · Views: 3
  • photo330205.jpg
    photo330205.jpg
    468.7 KB · Views: 3
  • photo330206.jpg
    photo330206.jpg
    264.3 KB · Views: 3
  • photo330207.jpg
    photo330207.jpg
    479.2 KB · Views: 2
  • photo330208.jpg
    photo330208.jpg
    424.6 KB · Views: 2

alldodge

Moderator
Staff member
Joined
Mar 8, 2009
Messages
42,559
No idea why the holes are there but do agree it all needs to be ripped out and start fresh
 

CrazyFinn

Petty Officer 1st Class
Joined
Dec 12, 2016
Messages
357
I rebuilt a '69 SRV185 a couple of years ago, and am currently in the later stages of doing the same (or more) with a '74 SRV240. Both were completely rotten to the hull. On the '74, some of the stringers under the floor had never been sealed/encapsulated with anything. They were complete mush. No sign of fiberglass or anything around them... The foam was holding the floor up. Yours is probably similar under the floor. Clean it all out of there and build it all new. I don't think you will reach dry foam if it's anything like what I found!
 

Szabee

Cadet
Joined
May 18, 2020
Messages
15
I rebuilt a '69 SRV185 a couple of years ago, and am currently in the later stages of doing the same (or more) with a '74 SRV240. Both were completely rotten to the hull. On the '74, some of the stringers under the floor had never been sealed/encapsulated with anything. They were complete mush. No sign of fiberglass or anything around them... The foam was holding the floor up. Yours is probably similar under the floor. Clean it all out of there and build it all new. I don't think you will reach dry foam if it's anything like what I found!

Thank you for the response. I took some foam out to check the stringers, they are incredibly rotten, and like you said, they never been sealed. I'll remove absolutely everything and start from scratch, then I'll know the boat was built the right way .

I checked out your 69 Sea Ray , and wow. What an awesome job !! The boat was beautiful !!
Good luck on your current project as well !

I'll post more pictures as I progress with the rebuild.
 

CrazyFinn

Petty Officer 1st Class
Joined
Dec 12, 2016
Messages
357
Thanks! It was a lot of work, but worth it. Was hoping to get the ‘69 back in the water this weekend, but have to do some dock repair first...
 

Szabee

Cadet
Joined
May 18, 2020
Messages
15
Small update. I wasn't able to do too much this weekend, we had some family coming over .
I removed all the foam and this is what the boat looks like now .
It might be a stupid question but when I see guys remove foam , it's kind of a orange, red color under it before they start grinding. Mine came out almost white, there was a lot of fiberglass and resin stuck to the foam . How much will I have to grind this ?
 

Attachments

  • photo330822.jpg
    photo330822.jpg
    412.9 KB · Views: 2
  • photo330823.jpg
    photo330823.jpg
    436.6 KB · Views: 2

alldodge

Moderator
Staff member
Joined
Mar 8, 2009
Messages
42,559
No need to grind the foam unless something under it needs attention. The foam doesn't need to stick to everything but doesn't hurt either
 

kcassells

Fleet Admiral
Joined
Oct 16, 2012
Messages
8,738
For your new layups you will want to grind until you get to clean glass. That's what makes the bond.
If there are {and it looks like it} foam in the small pockets of that woven roven glass the bond will not be so good.
-See if acetone takes it out.
-Maybe a wire brush on a drill to take it out.
-Probably more grinding if non of the above gets to glean glass.
 

CrazyFinn

Petty Officer 1st Class
Joined
Dec 12, 2016
Messages
357
Where it's only foam, it doesn't matter as much - I wouldn't grind those areas a whole lot, just clean them well with acetone to remove junk stuck to the surface. Once you have the stringers out, however, you will need to grind a few inches on both sides of where the new stringer goes to get to clean glass, and then wipe that down with acetone so there isn't any dirt, oily deposits, etc. to ensure the new glass and resin sticks properly. Here's a shot of the bottom of my '69 once I was down to grinding and getting ready for new stringers...


bottom_ground.JPG
 

Szabee

Cadet
Joined
May 18, 2020
Messages
15
Thank you guys for the advice . Much appreciated , I will most likely remove the old stringers this weekend and clean it up a bit , and I’ll post more pictures.
 

Szabee

Cadet
Joined
May 18, 2020
Messages
15
Okay , so I don't want to annoy anyone with stupid questions lol but I want to have the right materials for the job .
I'm looking to order the materials so I can have them whenever it's time for glassing. I'm planning to use 1708 for the stringers and transom , and chopped strand mat for the deck . My question is , is a couple of layers of 1.5 OZ CSM will be enough for the deck? Is the 1708 a good idea for the stringers and transom ? Also I'm planning to use Poly resin to save cost. WIll these work?
 

alldodge

Moderator
Staff member
Joined
Mar 8, 2009
Messages
42,559
Looks good to me
Might need some cab-o-sil for making peanut butter for gaps maybe
 

Szabee

Cadet
Joined
May 18, 2020
Messages
15
Hey folks ,
It's been a while, couldn't do much the last couple weeks, had a lot of things to do
I need a little bit of help , I’m starting the grinding process , and I am just still not sure if I’m taking too much away . Posting a couple of pictures, I grinded a bit the top of the woven till it got a little cleaner , and I grinded a little bit deeper at one spot till I got to a part that is red ish .
I know I should grind till I get to clean glass, I'm a little bit embarrassed about it , but I'm not sure how to recognize when I got to clean glass. Please let me know if I need to go all the way down to the red part, or just grind the roving a little .
 

Attachments

  • photo332411.jpg
    photo332411.jpg
    378.7 KB · Views: 2
  • photo332412.jpg
    photo332412.jpg
    405.3 KB · Views: 2
  • photo332413.jpg
    photo332413.jpg
    371.8 KB · Views: 2

kcassells

Fleet Admiral
Joined
Oct 16, 2012
Messages
8,738
That looks like woven roven over the boats mold. Your current grinding looks good cause the roven appears intac. I don't see any fraying or bubbles for that matter.
If the roven is that good after a grind you should be good to go. The red is fine, the new glass will fill right over it.
Justa slight bevel of the edges a little bit for the glass to transition and no bubbles. Square edges blow.
Get rid of any paint and hollow spots. If they get too bad ad some pb with chopped glass.
 

Szabee

Cadet
Joined
May 18, 2020
Messages
15
That looks like woven roven over the boats mold. Your current grinding looks good cause the roven appears intac. I don't see any fraying or bubbles for that matter.
If the roven is that good after a grind you should be good to go. The red is fine, the new glass will fill right over it.
Justa slight bevel of the edges a little bit for the glass to transition and no bubbles. Square edges blow.
Get rid of any paint and hollow spots. If they get too bad ad some pb with chopped glass.

Thank you ! Yes no bubbles , it looks good so far. But that's good news. I'm using a flap disk , it does a very good job !
Thank you for your help !
 
Top