Serpentine Belt Issue

Tafflad

Chief Petty Officer
Joined
Oct 23, 2007
Messages
544
Volvo 4.3 280hp (2020)

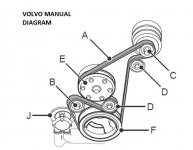
Went to fit serpentine belt, had not taken phot of it prior to removal for winterizing ….. as I knew it was displayed in the manual.
Unfortunately what is in the manual does not match the engine …

If you look at manual diagram it has an idler pulley DBelt Run.jpgThe 2nd
Whereas in actuality it has 2 idler pulleys – the extra one is not shown in Volvo maintenance book diagrams, diagram shows the position of extra idler pulley in RED
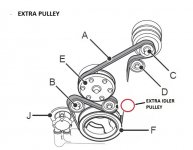
Extra Pulley.jpg

My guess is Volvo decided the longest belt run … between C+D to F was too long and added another idler to prevent belt flapping.

In the picture I have shown how I fitted belt …. – makes sense to me.

Belt tensions OK, and it does not impact the direction of rotation of any pulleys.
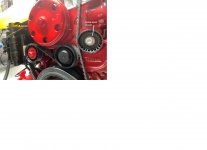
as re-fitted.jpg

Anybody any comments ?
 

saaristo

Petty Officer 2nd Class
Joined
Sep 22, 2017
Messages
190
See if the extra idler pulley is spring-loaded? If it is, see to which direction it is trying to release the tension - on that side the belt should be
 

Nashville

Petty Officer 2nd Class
Joined
Sep 3, 2012
Messages
100
Should be left of that idler if your engine has been identified correctly. Keep in mind, with Volvo Penta, it's best to use serial numbers for the engine and drive to confirm. There are too many "flavors", and serial numbers provide accuracy.
 

Tafflad

Chief Petty Officer
Joined
Oct 23, 2007
Messages
544
See if the extra idler pulley is spring-loaded? If it is, see to which direction it is trying to release the tension - on that side the belt should be
No it's fixed, the only one moveable is the auto tensioner.
 

Tafflad

Chief Petty Officer
Joined
Oct 23, 2007
Messages
544
Should be left of that idler if your engine has been identified correctly. Keep in mind, with Volvo Penta, it's best to use serial numbers for the engine and drive to confirm. There are too many "flavors", and serial numbers provide accuracy.

I contacted VP ..... with the serial number of engine, they provided me with link to download the Maintenance manual ... so unless they provided wrong link, I have the appropriate manual.
My assumption is there has been a service update to add this extra pulley to take out the long run.
I have filled in the request form with VP ... but they take a long time to respond.
 

Nashville

Petty Officer 2nd Class
Joined
Sep 3, 2012
Messages
100
I contacted VP ..... with the serial number of engine, they provided me with link to download the Maintenance manual ... so unless they provided wrong link, I have the appropriate manual.
My assumption is there has been a service update to add this extra pulley to take out the long run.
I have filled in the request form with VP ... but they take a long time to respond.
In the V6-240 and 280 series, there was a change during the -J model and later. With what’s posted, cannot tell if your motor is earlier or later, but later is likely.
 

Tafflad

Chief Petty Officer
Joined
Oct 23, 2007
Messages
544
The motor is V6-280-C-n
ser. A1101422
production date Dec 2019
 

Nashville

Petty Officer 2nd Class
Joined
Sep 3, 2012
Messages
100
The motor is V6-280-C-n
ser. A1101422
production date Dec 2019
Thank you. -N is later. The belt routes to the left on that idler. Should the need arise, the idler part number is 22928779.
 

Tafflad

Chief Petty Officer
Joined
Oct 23, 2007
Messages
544
Good to know I hac figured it out OK - Thnx
Is there an updated diagram … or maintenance manual ?


unrelated … what a fiddle to put put back in the water pump impeller, due to seat back it’s at arm stretch … ended up compressing vanes with a cable tie to get it in.
 

Nashville

Petty Officer 2nd Class
Joined
Sep 3, 2012
Messages
100
Good to know I hac figured it out OK - Thnx
Is there an updated diagram … or maintenance manual ?


unrelated … what a fiddle to put put back in the water pump impeller, due to seat back it’s at arm stretch … ended up compressing vanes with a cable tie to get it in.
There is a mechanical manual that can be purchased, but I've not checked if current. Cable tie is perfect, and long arms helpful. FWIW. Be careful with that pump. (1) The jacket is easily damaged when removing the impellor if a screwdriver, wrench or lever is used. The body doesn't have enough cross section (a.k.a. "meat") to withstand force. The impeller is threaded; use a bolt. (2) In an effort to save $1, but sacrifice $1,000's, a cheap chinesium sealed ball bearing was used instead of a quality SKF, FAG or Timken/Torrington. When it begins to fail, it creates an air leak that progresses. The first sign is typically an exhaust temperature alarm port side. The telltale is a faint thrown grease line on the bilge perpendicular to the body. Confirmation, once the pump is removed, loose shaft.
 

Tafflad

Chief Petty Officer
Joined
Oct 23, 2007
Messages
544
There is a mechanical manual that can be purchased, but I've not checked if current. Cable tie is perfect, and long arms helpful. FWIW. Be careful with that pump. (1) The jacket is easily damaged when removing the impellor if a screwdriver, wrench or lever is used. The body doesn't have enough cross section (a.k.a. "meat") to withstand force. The impeller is threaded; use a bolt. (2) In an effort to save $1, but sacrifice $1,000's, a cheap chinesium sealed ball bearing was used instead of a quality SKF, FAG or Timken/Torrington. When it begins to fail, it creates an air leak that progresses. The first sign is typically an exhaust temperature alarm port side. The telltale is a faint thrown grease line on the bilge perpendicular to the body. Confirmation, once the pump is removed, loose shaft.
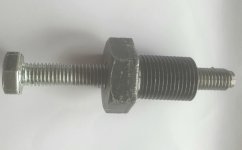
I made myself up a proper puller …bolt to fit impelller and internal
There is a mechanical manual that can be purchased, but I've not checked if current. Cable tie is perfect, and long arms helpful. FWIW. Be careful with that pump. (1) The jacket is easily damaged when removing the impellor if a screwdriver, wrench or lever is used. The body doesn't have enough cross section (a.k.a. "meat") to withstand force. The impeller is threaded; use a bolt. (2) In an effort to save $1, but sacrifice $1,000's, a cheap chinesium sealed ball bearing was used instead of a quality SKF, FAG or Timken/Torrington. When it begins to fail, it creates an air leak that progresses. The first sign is typically an exhaust temperature alarm port side. The telltale is a faint thrown grease line on the bilge perpendicular to the body. Confirmation, once the pump is removed, loose shaft.


i realised trying to lever out impeller Like some suggested was likely to cause damage …. So made myself a puller using 2 machine screws.
Also threading in just main bolt gave a nice point to gently tap home the impeller. I did smear housing & impeller with correct grease.
 

Attachments

  • 7A4A3A46-33DC-4A52-A157-01034F915A4C.jpeg
    7A4A3A46-33DC-4A52-A157-01034F915A4C.jpeg
    1.4 MB · Views: 1

Nashville

Petty Officer 2nd Class
Joined
Sep 3, 2012
Messages
100
I made myself up a proper puller …bolt to fit impelller and internal


i realised trying to lever out impeller Like some suggested was likely to cause damage …. So made myself a puller using 2 machine screws.
Also threading in just main bolt gave a nice point to gently tap home the impeller. I did smear housing & impeller with correct grease.
Great job.
 

BRICH1260

Lieutenant
Joined
Jul 6, 2011
Messages
1,381
As a general rule, if the pully is grooved, the belt inside rests on it. if it is smooth, the outside of the belt will rest against it.
 

Tafflad

Chief Petty Officer
Joined
Oct 23, 2007
Messages
544
Had an answer from VP …. The belt run is not as shown in the manual, it should be fitted as I had fitted it.
The additional idler pulley was added to prevent the belt ‘panting’ on the long run between alternator and crank pulley.
There is no updated manual or Tech bulletin.
 
Top