(Somewhat) New to boating, New to the forum.

das_army_life_yah

Petty Officer 2nd Class
Joined
Apr 3, 2020
Messages
122
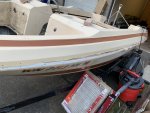
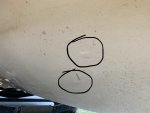
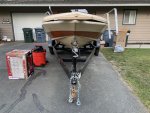
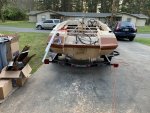
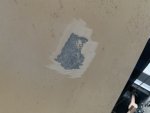
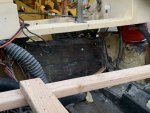
Archbuilder, here’s the blisters I was referring to earlier. I decided to get up under the beast today to get a really thorough look at it, and discovered a lot more blisters. There’s gotta be about 40-50 of them in total from bow to stern (maybe more, idk), all of them below the water-line........:mad-new:. Most of the blisters are 1/4” in diameter or smaller, with about 10 or so being about 3/4”. I checked the keel and strakes while I was down there and luckily there isn’t any signs of a hook to be found as far as I can tell.

I want this thing to last as long as possible because I have no intention of getting rid of it. I couldn’t imagine it being very feasible to grind out all the blisters and fill them in individually, especially since a good amount of osmosis has clearly set in and more blisters are bound to pop up if it’s not handled correctly. This brings me to my first MAJOR question so far in this build.....What should I do? I’ve listed a few options that I came up with. Change them or give me other options....I’d love to hear your opinions and ideas.

OPTION 1:
Sand everything down and give it a guide coat. Grind out all the blisters I can find and let them dry out for 4-6 weeks. Fill them in with resin/putty and glass. Sand the rest of the Gelcoat that wasn’t blistered and fix any imperfections and give it a few layers of rolled/tipped Gelcoat. If any more blisters started showing up, fix them as they appear.

OPTION 2:
Strip the entire lower-half of the boat (everything but the cap). If I go this route, I plan to take the whole thing down to glass. I’d let it sit for at least 4-6 weeks to “dry out” before I touched anything. I’d then give it a skim-coat or two of vinylester resin to seal the laminate and prevent/delay blistering in the future. From there, I’d give it 2-3 layers of Gelcoat with a dump gun to build it back up.

OPTION 3:
The only difference between this and option 2, is that I would be looking for a 2-part vinylester paint/coating to make the boat/finish a little more hydrophobic than Gelcoat. If I went this route, I’d plan to do the cap the same way as well, except I’d just sand/fix imperfections in the existing Gelcoat instead of taking it down to glass.

OPTION 4:
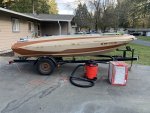
Given the design of the hull (see pics), remove all the Gelcoat from about 2” above the water-line and do something similar to what I mentioned in options 2 & 3.

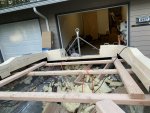
I plan to bed/glass-in the stringers and transom before I attempt any of these options. I’m gonna hold off on the decking until I can finish the exterior, just in case I need to have access to the interior of the hull for repairs. I was REALLY hoping to have this thing seaworthy for this season, but it’s looking like it won’t see water until next year at the very soonest......:facepalm:
 

Attachments

  • photo327935.jpg
    photo327935.jpg
    205.5 KB · Views: 0
  • photo327936.jpg
    photo327936.jpg
    451.3 KB · Views: 0
  • photo327937.jpg
    photo327937.jpg
    502 KB · Views: 0
  • photo327938.jpg
    photo327938.jpg
    488.7 KB · Views: 0

kcassells

Fleet Admiral
Joined
Oct 16, 2012
Messages
8,738
Sand some of those out and take pic. Is that aslo prior repair work in the 1st pic below left of those circled blisters?
Maybe bondo patching going on from prior.
 

sphelps

Supreme Mariner
Joined
Nov 16, 2011
Messages
11,475
Bondo is a possibility ... but if original gell more likely blisters .. Only one way to find out ...
 

archbuilder

Vice Admiral
Joined
Sep 12, 2009
Messages
5,697
What they said. Do some grinding and lets take a look at it. If you do go full on, I would figure out a way to flip the hull over. your back (and most of your body) will thank you later! If you do grind it down, lets chat before you go gung-ho on grinding the entire thing down.....getting it to look right afterward is a challenge, if not done with some thought it can be wavy as heck.
 

das_army_life_yah

Petty Officer 2nd Class
Joined
Apr 3, 2020
Messages
122
I have to wait for the weather clears up today before I can grind out those blisters. I plan to do so today so I can get pics up later for you guys. In the meantime, I'm trying to figure out my measurements for these stringers but I'm getting a little confused. The width between the inside edges of the stringers goes from 18.25" at the transom to 16.5" between the ends of the stringers at the bow. I've measured the distance in multiple places along the length of the stringers, and they all are right around 18" until I get to the foremost bulkhead. Both bulkheads measure 17 7/8" between stringers. From the foremost bulkhead the measurements between the stringers go from about 17 7/8" down to the bow-end of the stringers which measure 16.5". I'm so lost right now. Is it "normal" for stringers to be angled inwards like this as they move from stern to bow? Would it be a reasonable thought to just install them at 18" apart up to the fore-most bulkhead and then 16.5" the rest of the way towards the bow?
 

sphelps

Supreme Mariner
Joined
Nov 16, 2011
Messages
11,475
That’s only 5/8” ... Not uncommon at all for there to be a little variance...
‘Sometimes they follow a strake along the bottom of the hull which usually tapered inward toward the bow ..
Just get them as close to the same spot as you can and it will be fine ....
 

das_army_life_yah

Petty Officer 2nd Class
Joined
Apr 3, 2020
Messages
122
Kcassells, as far as I can tell it’s not a patch job, just a bit dirtier from where I didn’t brush it off. Here’s pics of the blisters after sanding. I couldn’t find my sanding discs for my DA sander, so I used my grinder with a flap disk. The one has ridges from the grinder bc of the angle I was at. I readjusted how I was sitting when I sanded the other, making sure to just remove the Gelcoat. No moisture came out and none seemed to be in there at all (probably from sitting in a garage for two years), but there’s circles in the laminate from what looks like moisture once being present. I can see a bit of fibers poking through as if it ate some of the resin away.

Archbuilder, I’ll definitely hit you up if I decide to go full send and strip the whole thing down. I have a lot of experience with drywall and bodywork, so I can’t imagine it being much different.

All-in-all, I didn’t really get a chance to work on it today. By the time the weather cleared up, the wife was out running around with a friend and I had to tend to the kiddos. By the time she got back, there was just enough daylight left to sand those blisters real quick. I did manage to get a ton of measuring done for the stringers and bulkheads. I’m hoping after the kids are done with their Easter baskets tomorrow that I’ll have enough time to sneak away before dinner to cut the stringers, battery shelf’s, and float boxes out at least.
 

Attachments

  • photo328012.jpg
    photo328012.jpg
    149.3 KB · Views: 0
  • photo328013.jpg
    photo328013.jpg
    133.2 KB · Views: 0

das_army_life_yah

Petty Officer 2nd Class
Joined
Apr 3, 2020
Messages
122
I plan on redoing the Gelcoat anyways in a different color, so based on the pics of the blisters I ground out, you think it’d be better just to strip it all to glass? I was thinking if I did it, I’d lay a layer of .8oz CSM with some vinylester after I faired the hull to act as a barrier coat before I started the gel.
 

das_army_life_yah

Petty Officer 2nd Class
Joined
Apr 3, 2020
Messages
122
I managed to get the transom out in one piece today. Only took me about 3 hours of cutting the tabbing and using shims to separate it from the hull. What a nightmare. So happy it’s done so I don’t have to worry about it anymore.

I also managed to wake the motor up after two years of hibernation. Dropped her in the test tank, ran some fogging oil in the cylinders, and gave her a few turns by hand. Gave her a couple sprits of starting fluid and voila. Took me all of 15 minutes and I had her going. Ran her for about 2-3 minutes at idle once she warmed up, and then let her cool off for about 2.5 hours. Came back out when she was cool, cranked twice and turned right over with no choke. Even running on old gas and plugs, she ran smooth as could be. I gotta admit, an in-muffled 2-stroke V4 sounds mean. Gonna put in an order today for new powerhead seals, plugs/wires, and new seals for the gearcase and exhaust housing. I’m hoping they’ll be delivered by the end of May or early June. It’s my goal to get this thing on the water by the 4th of July, even if the interior isn’t quite where I’d like it to be. I’ll have all of this winter to go through and get it done the way I want.

I decided that I’m just going to sand the whole hull down to glass. Since I planned to change colors and redo the Gelcoat anyway, I might as well give it a fresh slate to bond to so it has a better chance of lasting a long time. It’ll give me a chance to take care of the all the blisters as well. Once I get her sanded down, I plan to fair it out and give it a coat or two of vinylester resin to help seal it and fill in any pits. From there, it’s just a matter of shooting the gel. Planning to do a couple coats of color followed by a couple coats of clear.

For tomorrow, I’m hoping to remove the stringers/bulkheads, floatation boxes, and any remaining wood. I’m hoping to be able to start grinding/sanding on Thursday. Crazy to say, but I never realized how excited I would be to know that I’m going to be able to grind/sand the hull soon.
 

Attachments

  • photo328209.jpg
    photo328209.jpg
    277.6 KB · Views: 0
  • photo328210.jpg
    photo328210.jpg
    510 KB · Views: 0

archbuilder

Vice Admiral
Joined
Sep 12, 2009
Messages
5,697
Sounds like you have a plan. I am less concerned now if you have done a fair amount of body work. Just remember keep sharp paper on it and keep it flat on the surface where you can.....you wouldn't want it "friendly" that is what we called it when I worked in the body shop....when the body work was so wavey it looked like it was waving at you lol....."Friendly" Have fun with the gelcoat....if you haven't dug into it, you might want to. It shoots like an orange peel, and you will want a dump gun. We had a guy spray one with a hand held wagner sprayer back around 10 years ago on here.....spend most of his time unclogging the gun, then they next forever sanding out the orange peel. It is a great finish, but a ton of work. You may already know that. You might check into Duratec by Hawkeye industries. I have toyed with spraying gelcoat, but always went the automotive route. They used to make an additive that would help the gel flow out much smoother. I think they may make actual gelcoats now but don't quote me. Haven't used it but for sure worth looking into. Hopefully someone else with more info will chime in.
 

Timr71

Petty Officer 1st Class
Joined
Jul 19, 2012
Messages
326
Congrats on getting the motor going and getting the transom out! I'm tagging along for the ride too, but not sure what I can contribute. Also, thank you for your service. You're going to love this boat when you're done...if you don't hate it by then. :)
 

das_army_life_yah

Petty Officer 2nd Class
Joined
Apr 3, 2020
Messages
122
kcassells, I’m hoping I’ll truly be cruising by the 4th of July. My kiddos have never been on a boat, so I want their first time to be very memorable. Hopefully the weather plays nice with me so I can keep this pace up. I got my fingers crossed.
archbuilder, I’ve found the best way to do any bodywork is to start with a thicker coat of compound and spread it with the biggest flexible trowel you can find. Then follow up with skimcoats and the same trowel. I try to find the biggest board sander I can and use long, even strokes to limit digging in too deep. I try to keep overlap to a minimum. I also use a light at the end of the panel in between coats to look for any “friendly” spots that need more attention.
 

archbuilder

Vice Admiral
Joined
Sep 12, 2009
Messages
5,697
yep, that is a good approach to fairing. On the sanding I was mainly talking about on the removal of the gel, If you take off an even amount, you will have a lot less fairing on the backside.
 

das_army_life_yah

Petty Officer 2nd Class
Joined
Apr 3, 2020
Messages
122
I finally got the thing completely gutted. Got the huge chunks of foam out as well as all the remaining wood. I wound up using and electric carving knife and cutting it up like a birthday cake to get the majority out. Followed up with an oscillating tool with a chisel attachment to get the majority of the rest. There’s still a bunch of thin layers of foam throughout the hull. Any ideas to get them off? I plan to start grinding tomorrow as long as the weather treats me right. I got my fingers crossed that I can finish all the grinding in a single day.
sphelps I’m sure it was. :laugh: I don’t see my experience being any less tiring. Worse yet, I’m horrible with a spray gun. After I fair this thing, I’m thinking of just rolling it out. I’ll have to sand it either way. What I’m thinking is that I’ll do 3 unwaxed coats followed by a waxed coat. Lay it on kinda thick so I can let the DA sander handle the ripples when it cures. Lol. That and with this being a one-man job, flipping the hull is out of the picture. I can’t leave my boat out overnight due to the housing policies on base. Since it’s on the trailer, I was planning on working around the bunks and building a jacking plate for my floor jack to get to the stuff I missed once the stuff I can get to dries. That, or painting the bottom first. I’m not terribly concerned with the finish on the bottom since it will be in the water anyways.
kcassells, i finally understand what you were getting at with supporting the hull. As you can tell by the pic of the exterior, the middle section of the hull was fine, but towards the bow it flexed out. Gonna have to have the neighbors/coworkers help me push it back into place so I can get the top back on and support the bow better. If I can get the cap seated back down on the hull properly before bracing the bow, do you think that will be fine? Is all hope lost? My measurements mid-ship are still spot on because of the bracing I already have in place.
 

das_army_life_yah

Petty Officer 2nd Class
Joined
Apr 3, 2020
Messages
122
Just realized I forgot the pics.....
 

Attachments

  • photo328328.jpg
    photo328328.jpg
    336 KB · Views: 0
  • photo328329.jpg
    photo328329.jpg
    346.2 KB · Views: 0

sphelps

Supreme Mariner
Joined
Nov 16, 2011
Messages
11,475
Was thinking if you have trouble getting the front section of the cap back on . Brace a 2x4 on both sides vertically in the trouble spot . Let it stick up past the cap a bit . Tie the bottoms of the 2x's to the trailer frame .. Fasten a peice of plywood scrap as a spacer that will rest against the hull sides under the cap a few inches on the 2x's ..
Then use a ratchet strap to pull the top of the 2x's together forcing the hull inwards then the cap should fall right on ..
Just an idea ....Or you and your buddy can just push really hard on both sides at the same time .. LOL! It may go on without much effort ..
 

das_army_life_yah

Petty Officer 2nd Class
Joined
Apr 3, 2020
Messages
122
sphelps i was thinking of just hopping in and lifting the cap from the inside while they pushed. I like your idea though. Lift the front of the cap. Drop in a piece of ply to separate it from the hull, then ratchet the sides in and remove the ply? That sir, is genius. If my measurements are correct for the midship, you think it’ll be fine to drop everything in once the cap in back on? Also, how do you feel about the rolling fresh gel over the hull when I strip it down?
 

das_army_life_yah

Petty Officer 2nd Class
Joined
Apr 3, 2020
Messages
122
Any ideas on how to retain the HID number when I go to strip all the gelcoat? It’s located on the starboard exterior of the stern. I’m wondering if I can just relocate it somehow.....
 

Attachments

  • photo328340.jpg
    photo328340.jpg
    1.8 MB · Views: 0
Top