I am moving my Post from the General section to this section. Didn't realize there was section just for Starcraft boats.
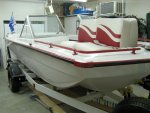
I am almost finished rebuilding a 70/71 Starcraft TR-150 (I have been clued in), even though my registration lists it as a '69. The manufacturer's plate is missing although I do have a HIN which is 093315. I do not know what that converts to if anything at all. Anyway, as promised, here is my elaboration on the rebuild which is rather lengthy.
Two years ago I was looking for a relatively cheap boat to ?fix up a little? for local reservoir fishing. I was checking locally (Twin Falls) and in the Boise area on Craigslist and other newspaper and website ads. My son who lives in Boise saw this Starcraft, went to take a look and convinced me to purchase it for $500. The boat had an ugly camo-style paint job, the 40 HP Johnson was a short shaft and incorrect for the boat, and the trailer had a bent axle. Not the greatest way to start but you get what you pay for. I debated for a year on which direction to go; either selling the motor and boat/trailer separately or jumping in with both feet for a rebuild. My best friend told me to bring the boat to his house and we?d put it in his garage and start working on it. We started the rebuild in July ?12 and should be finished in the next few weeks.
We started disassembling the boat and found more problems than we had bargained for. There were miles of wiring that led nowhere and the transom was full of holes from various owners attaching whatever they needed at the time. So much silicone had been used over the years that we filled up a small box of remnants by the time we were finished. The dash on both sides and been cut up and replaced with wood pieces to cover the holes and hold instruments. Then we started sanding the ugly off and what a chore that was. There were many coats of paint including red and blue. Once that was finished we took the boat off the trailer and turned it on one side so we could patch a couple of gouges with fiberglass filler and paint the bottom. The paint was a bottom paint I purchased from Jamestown Distributors and we decided to paint both the top and bottom with it. Overall we patched probably 30 holes with the fiberglass filler and then sanded everything down smooth. We then primed the boat before painting. We rolled the paint on in small sections but it didn?t smooth out as much as we thought it would. We put two coats of paint on both top and bottom. Still, it looks better than before.
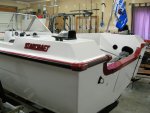
It was interesting that the boat was not built with stainless steel screws. Some were so rusted that we had to cut them off. The aluminum rub rails were a little rough but not horrible and the corner trim pieces in front were missing. I decided to have new transom pieces and the front corner pieces made and then had them and the bow rails all powder-coated to hide the imperfections. The rubber inserts for the rub rails were good overall so I cleaned them with soap and water and dyed them with a black vinyl dye. Inside the boat was another aluminum trim piece and we decided not to remove it but paint it with a matching red Krylon spray paint. The Starcraft emblems were in good condition so we cleaned them and sprayed them with the red Krylon as well.
The floor was sagging in a few places so rather than cut out the fiberglass and start over I elected to use a spray foam expanding sealer sprayed through several holes in the floor. The floor leveled out nicely and the foam will add extra buoyancy if, God forbid, we start to sink. I used five tall cans of foam when all was said and done.
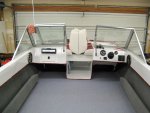
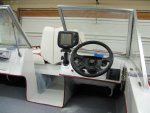
Probably 85 ? 90% of the new parts and gauges came from/through Amazon because they had the best prices. Only equipment they didn?t have came from elsewhere. We used stainless steel screws for everything as well. We cut new dash pieces to fit what had been butchered before and I added a small glove box with a stereo and enclosure mounted above it on the passenger side. The driver?s side holds a speedometer, fuel gauge, switch panel, power point, and horn button. I also installed my Humminbird fish finder as well. To do this we shortened and moved the window support brace from the front of the dash to the top. The window is actually sturdier with this modification. I added new infinity speakers where the old speaker holes had previously been cut out. The floor is now vinyl with carpet up the sides. We built new storage pockets on each side with 1 X 4?s on the bottom and 1 X 6?s for the sides and carpeted them. We mounted the 1 X 6?s to the 1 X 4?s (board to board) with liquid nails and several stainless steel screws. They are better than the originals or, should I say, what was left of the originals.
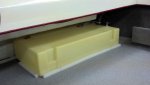
Last year I purchased another $500 boat; a ?73 Sierra with a ?73 65 HP Mercury long shaft. I had the motor checked out and tuned up and will move it to the Starcraft in a week or two. We?ll have to build a mount for the motor controls once the motor is moved. We also installed a low profile 17 gallon Moeller gas tank above the deck in the back. It will be interesting to see how fuel efficient this motor will be.
My main concern with this boat is the transom. After spending all this time working on the rebuild, we discovered the transom was not in the best of condition. I already had new transom pieces made for additional strength. When we were installing new U-bolt tie downs on the transom we discovered the wood inside was pretty much rotted. Apparently this boat either sat out in the weather without a cover or was partially submerged for some time. I decided to add a steel plate to the outside center of the transom where the motor will mount and a corresponding smaller steel plate inside the transom behind the gas tank for extra strength. Once we get this boat on the lake we will find out if we?re good to go or have to rebuild the transom. My fingers are crossed.
The trailer was replaced as well. I found a nice trailer in Utah that was straight but needed wheels/tires, wiring and lights. I put larger wheels and tires on and rewired the trailer and put new homemade 3 ? foot bunks on the back with Ve-Ve rollers in the center, front, and as guide-ons on each side. Turns out the center rollers are not needed so we?re going to pull those off and lower the bunks in the back for a better fit.
We can see the light at the end of the proverbial tunnel at this point. We need to touch up a few paint nicks as we?ve been working over the winter. We will add side decals and the boat name to the back. When the motor and controls are installed we?ll put the gas tank back in and install the seats. The last order of business will be to have a back curtain made to hide the gas tank and battery, new cushions for the bow seating, and a new Bimini top to replace the torn top that came with the boat.
This rebuild has been an adventure and a real learning experience. I don?t believe I?ll be tackling a project of this magnitude anytime soon. It takes away from time spent fishing, camping, and relaxing on the lake. LOL! Your thoughts and comments are welcome. Happy boating!
LBT
I am almost finished rebuilding a 70/71 Starcraft TR-150 (I have been clued in), even though my registration lists it as a '69. The manufacturer's plate is missing although I do have a HIN which is 093315. I do not know what that converts to if anything at all. Anyway, as promised, here is my elaboration on the rebuild which is rather lengthy.
Two years ago I was looking for a relatively cheap boat to ?fix up a little? for local reservoir fishing. I was checking locally (Twin Falls) and in the Boise area on Craigslist and other newspaper and website ads. My son who lives in Boise saw this Starcraft, went to take a look and convinced me to purchase it for $500. The boat had an ugly camo-style paint job, the 40 HP Johnson was a short shaft and incorrect for the boat, and the trailer had a bent axle. Not the greatest way to start but you get what you pay for. I debated for a year on which direction to go; either selling the motor and boat/trailer separately or jumping in with both feet for a rebuild. My best friend told me to bring the boat to his house and we?d put it in his garage and start working on it. We started the rebuild in July ?12 and should be finished in the next few weeks.
We started disassembling the boat and found more problems than we had bargained for. There were miles of wiring that led nowhere and the transom was full of holes from various owners attaching whatever they needed at the time. So much silicone had been used over the years that we filled up a small box of remnants by the time we were finished. The dash on both sides and been cut up and replaced with wood pieces to cover the holes and hold instruments. Then we started sanding the ugly off and what a chore that was. There were many coats of paint including red and blue. Once that was finished we took the boat off the trailer and turned it on one side so we could patch a couple of gouges with fiberglass filler and paint the bottom. The paint was a bottom paint I purchased from Jamestown Distributors and we decided to paint both the top and bottom with it. Overall we patched probably 30 holes with the fiberglass filler and then sanded everything down smooth. We then primed the boat before painting. We rolled the paint on in small sections but it didn?t smooth out as much as we thought it would. We put two coats of paint on both top and bottom. Still, it looks better than before.
It was interesting that the boat was not built with stainless steel screws. Some were so rusted that we had to cut them off. The aluminum rub rails were a little rough but not horrible and the corner trim pieces in front were missing. I decided to have new transom pieces and the front corner pieces made and then had them and the bow rails all powder-coated to hide the imperfections. The rubber inserts for the rub rails were good overall so I cleaned them with soap and water and dyed them with a black vinyl dye. Inside the boat was another aluminum trim piece and we decided not to remove it but paint it with a matching red Krylon spray paint. The Starcraft emblems were in good condition so we cleaned them and sprayed them with the red Krylon as well.
The floor was sagging in a few places so rather than cut out the fiberglass and start over I elected to use a spray foam expanding sealer sprayed through several holes in the floor. The floor leveled out nicely and the foam will add extra buoyancy if, God forbid, we start to sink. I used five tall cans of foam when all was said and done.
Probably 85 ? 90% of the new parts and gauges came from/through Amazon because they had the best prices. Only equipment they didn?t have came from elsewhere. We used stainless steel screws for everything as well. We cut new dash pieces to fit what had been butchered before and I added a small glove box with a stereo and enclosure mounted above it on the passenger side. The driver?s side holds a speedometer, fuel gauge, switch panel, power point, and horn button. I also installed my Humminbird fish finder as well. To do this we shortened and moved the window support brace from the front of the dash to the top. The window is actually sturdier with this modification. I added new infinity speakers where the old speaker holes had previously been cut out. The floor is now vinyl with carpet up the sides. We built new storage pockets on each side with 1 X 4?s on the bottom and 1 X 6?s for the sides and carpeted them. We mounted the 1 X 6?s to the 1 X 4?s (board to board) with liquid nails and several stainless steel screws. They are better than the originals or, should I say, what was left of the originals.
Last year I purchased another $500 boat; a ?73 Sierra with a ?73 65 HP Mercury long shaft. I had the motor checked out and tuned up and will move it to the Starcraft in a week or two. We?ll have to build a mount for the motor controls once the motor is moved. We also installed a low profile 17 gallon Moeller gas tank above the deck in the back. It will be interesting to see how fuel efficient this motor will be.
My main concern with this boat is the transom. After spending all this time working on the rebuild, we discovered the transom was not in the best of condition. I already had new transom pieces made for additional strength. When we were installing new U-bolt tie downs on the transom we discovered the wood inside was pretty much rotted. Apparently this boat either sat out in the weather without a cover or was partially submerged for some time. I decided to add a steel plate to the outside center of the transom where the motor will mount and a corresponding smaller steel plate inside the transom behind the gas tank for extra strength. Once we get this boat on the lake we will find out if we?re good to go or have to rebuild the transom. My fingers are crossed.
The trailer was replaced as well. I found a nice trailer in Utah that was straight but needed wheels/tires, wiring and lights. I put larger wheels and tires on and rewired the trailer and put new homemade 3 ? foot bunks on the back with Ve-Ve rollers in the center, front, and as guide-ons on each side. Turns out the center rollers are not needed so we?re going to pull those off and lower the bunks in the back for a better fit.
We can see the light at the end of the proverbial tunnel at this point. We need to touch up a few paint nicks as we?ve been working over the winter. We will add side decals and the boat name to the back. When the motor and controls are installed we?ll put the gas tank back in and install the seats. The last order of business will be to have a back curtain made to hide the gas tank and battery, new cushions for the bow seating, and a new Bimini top to replace the torn top that came with the boat.
This rebuild has been an adventure and a real learning experience. I don?t believe I?ll be tackling a project of this magnitude anytime soon. It takes away from time spent fishing, camping, and relaxing on the lake. LOL! Your thoughts and comments are welcome. Happy boating!
LBT