tn28 flywheel removal, what am i doing wrong

greenygreen

Seaman Apprentice
Joined
May 13, 2014
Messages
48
Re: tn28 flywheel removal, what am i doing wrong

the points are not burnt but that one black spot on the green thing next to the coil appears to be burnt, .
 
Last edited:

Don Hansen

Petty Officer 1st Class
Joined
Sep 17, 2007
Messages
230
Re: tn28 flywheel removal, what am i doing wrong

Sure looks like the flywheel has been rubbing on that upper arm of the left coil. If so, that coil is probably shot. Check the inside of the flywheel to see if some thing has been rubbing on it. Don't put the flywheel back on until someone here tells you how to set the spacing between the coils and the flywheel. I would but I'm not sure of my memory.

DLH
 

cajuncook1

Chief Petty Officer
Joined
Sep 3, 2009
Messages
559
Re: tn28 flywheel removal, what am i doing wrong

The coil with the black coating is the coil that goes to the bottom cylinder. It is the laminate coating and the coil should be ok, but you need to test your ignition. Test the coil and the ignition system using the videos I provided. They are a good walk by walk of the ignition evaluation and diagnostics.

Cheers,

David T.
 

greenygreen

Seaman Apprentice
Joined
May 13, 2014
Messages
48
Re: tn28 flywheel removal, what am i doing wrong

it is the grinding culprit that has been haunting me for 2 years
 

Attachments

  • CAM00090.jpg
    CAM00090.jpg
    133.8 KB · Views: 0

greenygreen

Seaman Apprentice
Joined
May 13, 2014
Messages
48
Re: tn28 flywheel removal, what am i doing wrong

trying to hold throttle and steer while holding light
 

greenygreen

Seaman Apprentice
Joined
May 13, 2014
Messages
48
Re: tn28 flywheel removal, what am i doing wrong

guys i thank you so much. i wouldnt even attempt this and this poor old motor would rot away somewhere if it werent for you all.. ill check the vids tonight and check back in laters thanks for now
 

greenygreen

Seaman Apprentice
Joined
May 13, 2014
Messages
48
Re: tn28 flywheel removal, what am i doing wrong

thanks for your help guys im gonna check the vids and figure out whats up tomorrow. Cajuncook did you mean the coil that is burnt goes to the bottom cylinder.. bottom wire was firing. hmmm
 

greenygreen

Seaman Apprentice
Joined
May 13, 2014
Messages
48
Re: tn28 flywheel removal, what am i doing wrong

i went and had a look at that wire and it is ok, just an optical illusion.. while i was there i stuck the ohm reader in the top plug wire and to the screw on top of coil and had a reading so does that mean the wire is good.. idk i gotta watch cajuns videos tonight
 

HighTrim

Supreme Mariner
Joined
Jun 21, 2007
Messages
10,486
Re: tn28 flywheel removal, what am i doing wrong

If you test from the spark plug lead, to the top wire on the coil (ground), you should get around 3000 to 8000 ohms resistance. That is the secondary winding, the one that usually fails. It is longer, and much thinner than the primary. The primary is tested from the ground lead, to the lead that runs to the points. You should bury the needle on that one. It rarely fails though.

Now these tests only show a complete failure, they will not test for failure under load, you will need fancier equipment for that.

That coil will need to be pushed in some. See the mounting boss beneath it? There will be a slight bevel at the top of it. The edge of the coils laminations (burned spot), needs to be flush with the top edge of the mounting boss. Run your nail up the mounting boss. It should not catch on the coils laminations.

That coil does not look good at all burned like that. May affect its abililty, but not certain.
 

cajuncook1

Chief Petty Officer
Joined
Sep 3, 2009
Messages
559
Re: tn28 flywheel removal, what am i doing wrong

Your going to need to inspect your point, condenser and coils. They are located under the flywheel. Hopefully all you need to do is clean and regap your points and you might be in business. Still check your coils and condensers and plug wires.


Here is how to pop your flywheel off and it gives you information about re-torquing you flywheel nut.

How to Change Coils and set points on old OMC's?/ 294072


Here are two link to show you how to test your coils and condensers.

How to test a coil in an antique outboard engine - YouTube

Antique Outboards and all about condensers - YouTube


How to replace your coils, points and condenser. Please take digital pictures as you go, so it will help you return everything back in the right order. Keep cheap zip lock bags available to put your parts in so you don't lose them. They are small.

If your coils are good, but your points and or condensers are bad, then you can certainly order a set of points and condenser here from iboats. Easy breezy.

Here is some information I put together for a guy on another forum, but the information should help you out just the same.


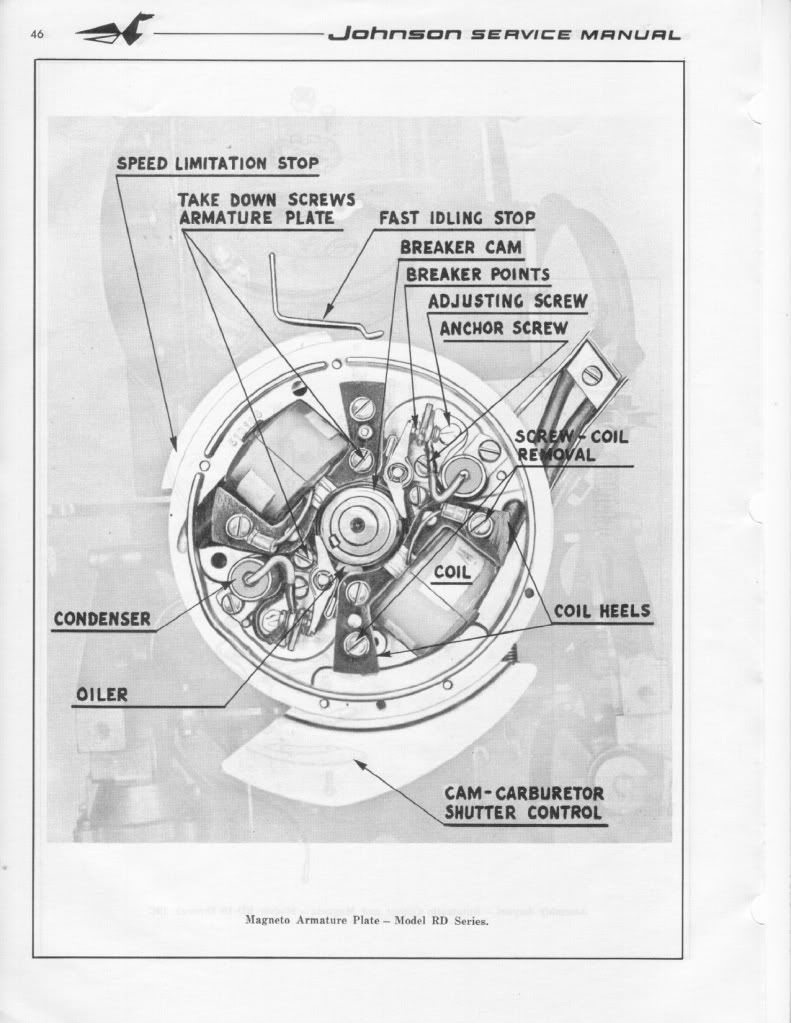
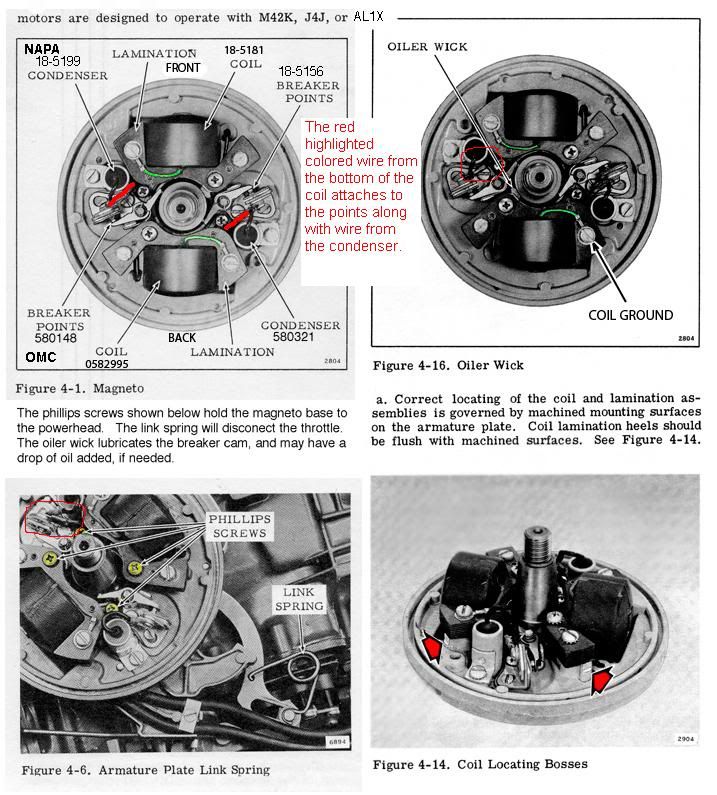
Here is a diagram of a generic OMC (Johnson/Evinrudle/Gale) ignition assembly. You will have to remove the coil designated for the top cylinder and put the oil wicker in. It should be already be coated with a very light oil. (not grease). The purpose of the oil wicker is to lightly lubricate the outside riding surface of the cam so the point shoes do not prematurely wear. If you look at the points they have little shoes that ride along the cam. Please make sure the (breaker)points cam is on the correct side or the ignition will be out of timing. It should have the word [highlight]top[/highlight] machine written on the side facing up.

Ignitionplateandoilwick.jpg


FYI: You can only set(gap) one set of points at a time. Put the flywheel nut back on(turn with a wrench or ratchet clockwise) to allow you turn the crankshaft. (Please remove both spark plugs to make it easier to turn the crankshaft and prevent accidental starting)

You gap the point to 0.020 when the point shoes is at the top(high point of the cam). It should have a mark along with the word top. Then you will turn clockwise to the next set of point 180 degrees and set those points the same way. You will notice that the point of the previous set will be closed and when you come around again they will open up. *** When they are open no current is allow through. This is how you set your timing with the points.***

When you go to set the point's gap. Very gently snug the anchor screw, then adjust the gap with adjusting screw and the feeler gauge until the feeler gauge is sliding through with slight resistance only. Then tighten the anchor screw. Repeat procedure with second set of points. Please make sure your hands are clean and the feeler gauge is clean, because oil on the points can foul them up and create resistance....poor or no no spark. ALways use a spark check to evaluate spark. It should jump minimum 1/4 inch. Blue sharp snappy spark.

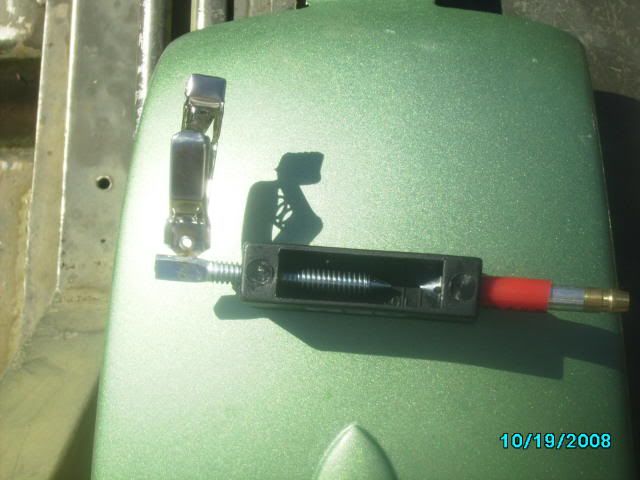
Here is a picture of a spark check...Cheap $6

sparktesterpic.jpg


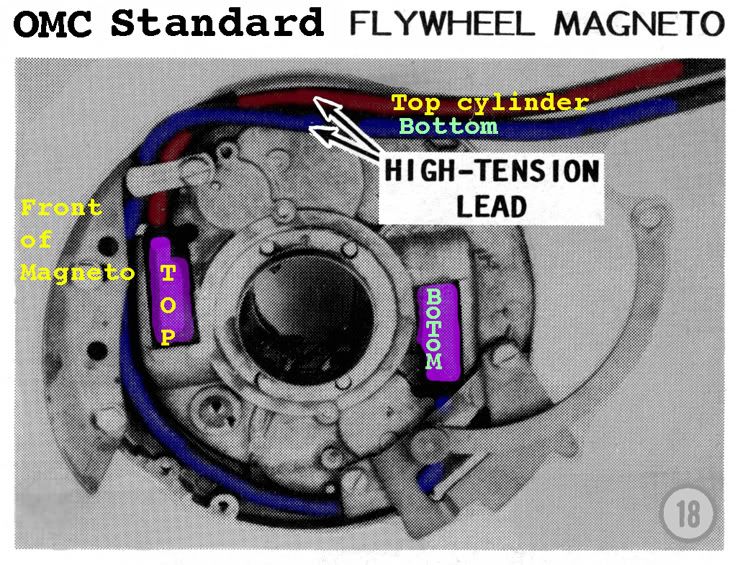
Here is a picture of how to tell which wire is going to the correct cylinder. Thanks to Garry for providing the picture on other post.


TopCyl.jpg


If your using the existing wires then cut about 1/4 inch of end going the coil, so you have clean un-oxidized copper contacting the spiking in the coil. Twist the end of the spark plug wire onto the coil spike. If you have replaced the wires, make sure they are 7mm copper metal core and not the automobile stuff.

***** Please make sure two things*****

1.) Make sure all the wires are tucked away under the flywheel and not rubbing up against the cam or crank, because with will eventually get damage and create a short, then no spark!!

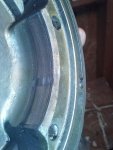
2.) Make sure the coil heels (ends) are evenly lined up with the mounting boss.

Here are some pictures. (Compliments of JBJennings..nice fella)

wrongcoilmount.jpg


rightwaytomountcoil.jpg


Lining up the coil heel with the mounting boss prevent damage of the coils and the flywheel magnet, prevent rubbing as the flywheel turns.

[highlight]*** Make sure the throttle is advanced to that start position***[/highlight]


Here is another picture that Garry (thanks Garry!!) supplied on another post with some modification.

OMC_Stdwithwirecolors.jpg


Both diagrams, should answer your questions.
 

greenygreen

Seaman Apprentice
Joined
May 13, 2014
Messages
48
Re: tn28 flywheel removal, what am i doing wrong

well it looks like its the plug wire in top. both coils passed with flying colors but the wire is shot for sure.
 

greenygreen

Seaman Apprentice
Joined
May 13, 2014
Messages
48
Re: tn28 flywheel removal, what am i doing wrong

i take that back i took the wire off and dug a little deeper and got a strong reading.. maybe just the tip of the wire.
 

nwcove

Admiral
Joined
May 16, 2011
Messages
6,293
Re: tn28 flywheel removal, what am i doing wrong

have a good look at the "prong " in the coil, if its not corroded, clip about a half inch off the plug wire, and twist it back into the coil and give it a go.
 

greenygreen

Seaman Apprentice
Joined
May 13, 2014
Messages
48
Re: tn28 flywheel removal, what am i doing wrong

i think it was at the prong in the coil. im gonna give her a once over and see.. is there any way to test actual spark without putting flywheel back on?
 

cajuncook1

Chief Petty Officer
Joined
Sep 3, 2009
Messages
559
Re: tn28 flywheel removal, what am i doing wrong

No, the flywheel must be on. You only have to snug the flywheel nut down for spark testing only. It will make it easier to remove if necessary. I would still clean the points and make sure they are gapped correctly and make sure the coil heels line up evenly on the bosses. Your flywheel and coil for bottom cylinder is still good. Make sure the coils heels are on correctly. THE VIDEO shows you how.

Remember to properly torque down the flywheel nut when you are all done with ignition or you could really do some damage to the ignition while running it.

Please don't forget to add a couple drops of light oil (3 in 1 or light regular 30wt motor oil to the oil wick to lubricate the cam to prevent premature ware of TH point shoes.

All in the diagrams and videos
 
Last edited:

greenygreen

Seaman Apprentice
Joined
May 13, 2014
Messages
48
Re: tn28 flywheel removal, what am i doing wrong

copy that will do.. also have a corroded in half plug clip in the boot in the same wire.
 

greenygreen

Seaman Apprentice
Joined
May 13, 2014
Messages
48
Re: tn28 flywheel removal, what am i doing wrong

spark confirmed on both wires. grinding is gone . all is well in tn28 land. i think
 
Top