Transom repair

Joined
Jan 16, 2014
Messages
17
Re: Transom repair

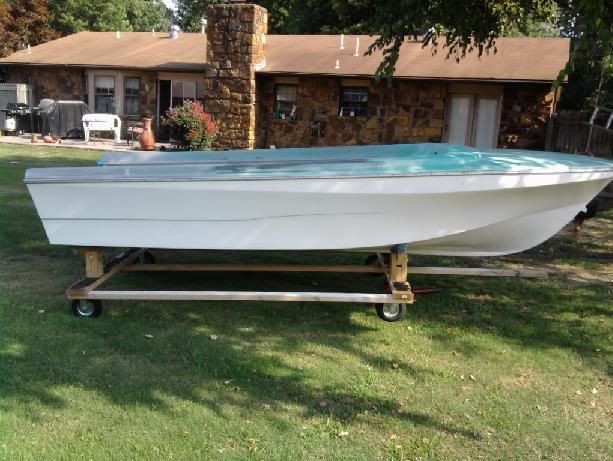
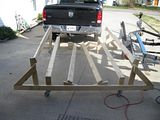
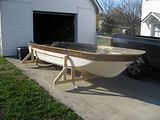
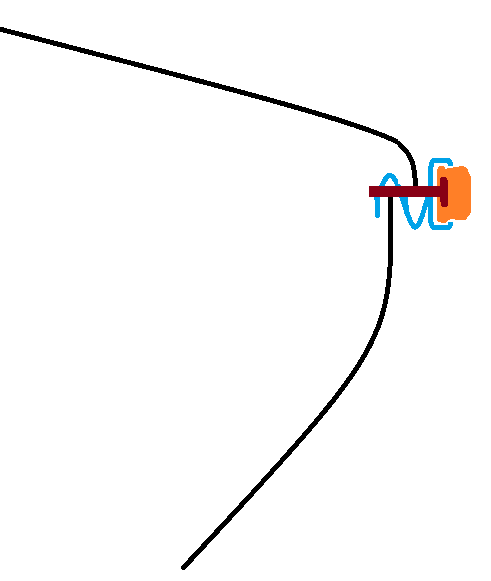
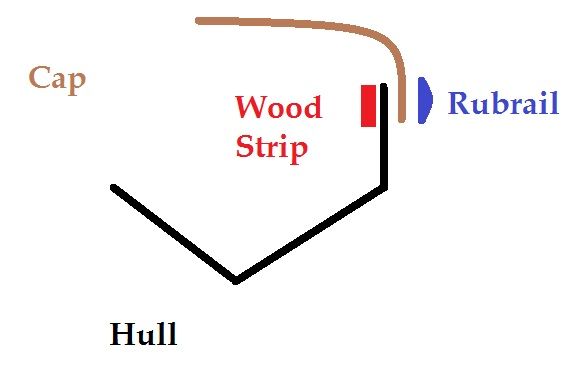
oldboat1, that is exactly what I had come up with over the weekend for installing the transom wood back in the boat. the outside fiberglass is fine around the motor holes and the drain plugs. I figured cutting the correct arch and angle out of a 2x8 on its side, use the convex cut off on the inside and the concave piece on the outside. Then use carraige bolts or all tread and nuts to sandwich the new perfectly formed transom plys with kerfing cut into the plys to bend a little easier, thru the existing engine holes I would think there would be adaquate pressure across. To keep pressure at the bottom I think i could do the same thing but use the drain plug hole. I'd have to get a closer look at that I guess. Across the top I will just use some wood clamps I think should be sufficient. After the wood is laminated correctly in place, the plan was to reglass the inside, tab it all the way around and use a piece of 1708 over the top to seal it off and give a bit of extra strenght. Does this sound correct?

After the transom is finish, I figured I'd take the advice from the other threads I've seen and over drill the motor and water drain holes then fill will PB and redrill them the correct size. I relize I will need to set the drain plug with more PB to seal correctly.
 

Woodonglass

Supreme Mariner
Joined
Dec 29, 2009
Messages
25,929
Re: Transom repair

My Cradle
Upright.jpg
is prolly not what you want. I did NOT replace my stringers so it was mainly used for flipping the boat. You'll need one to support the hull. A Full Bunk style like this one.
th_IMG_2432.jpg
th_IMG_2435.jpg
 

jbcurt00

Moderator
Staff member
Joined
Oct 25, 2011
Messages
25,164
Re: Transom repair

WOG's transom clamps will help a great deal, even w/ a curved transom & your convex/concave 2X6 'form'. You'll just need wider opening jaws.
 
Joined
Jan 16, 2014
Messages
17
Re: Transom repair

ok, what I am seeing now is what I envisioned was underneath your picture I found. yep, that is a great help. thanks I'll try and get more pics over the weekend. Now that I've started working on this thing I am feeling pretty good about it and pretty excited. Kinda like a kid in a candy store again. can't wait for the next piece.

Thanks to everyone for all your help, it is priceless.
 

oldboat1

Fleet Admiral
Joined
Apr 3, 2002
Messages
9,612
Re: Transom repair

think you have it in hand, stickermandan. Kerfed joints will be the potential weak spots, so will need to pay special attention there -- remain a strong believer in epoxy and mechanical fasteners (ok, drywall screws), but will shut up about that. The drain tube should be removed, then replaced when wood transom insert is in place -- redrill and replace with a new tube, seated with epoxy or 5200.
 

jbcurt00

Moderator
Staff member
Joined
Oct 25, 2011
Messages
25,164
Re: Transom repair

Kerf'd joints will be the potential weak spots, so will need to pay special attention there --
You can slather the kerfs w/ PB and clamp them in place prior to final installation to the hull. When cured, the PB & laminated layers of ply will hold their shape. No voids ~ no weak spots.
 

Woodonglass

Supreme Mariner
Joined
Dec 29, 2009
Messages
25,929
Re: Transom repair

There won't be any "Kerfed Joints' in your transom that I'm aware of???
 

jbcurt00

Moderator
Staff member
Joined
Oct 25, 2011
Messages
25,164
Re: Transom repair

I took it to be kerf's, to help make the curve. Not joints per se....
 

Woodonglass

Supreme Mariner
Joined
Dec 29, 2009
Messages
25,929
Re: Transom repair

There won't be any kerfs needed to make the curve either.
 
Joined
Jan 16, 2014
Messages
17
Re: Transom repair

Transom Broken.jpgTransom Broken.jpgSerial plate.jpg
some pics of the transom after I removed the last bolt from the splashwell. it is bad no question there. also is a picture of the serial plate, is there anyone that has information about these glaspars from this info??? or know where to look for some more info?

Woodonglass- I measured the thickness at the drain plug and it is 1 1/2". you think I can bend the 3 layers of exterior grade plywood without kerfing? I would definately prefer that. I will try it that way first then. I believe you if you think it can be done. Thanks for turning me toward US Composites, they are even more affordable yet. Makes my budget a little easier to achieve and finish sooner. Heck, it may be on the water this summer.

One question on the floor, once I get the stringers finished and the new wood down I was thinking I would use a 6oz cloth to cover the floor with. Is that too much? I would also like to not use carpet again. Is there some sort of addative to put in the final coat of resin to make a light texture to walk on(no slip surface basically.)
 
Joined
Jan 16, 2014
Messages
17
Re: Transom repair

oh yeah, replying to the kerfing. I wasn't going to have any joints, just kerfing to help bend the wood into the curve shape.
 

mercurymang

Master Chief Petty Officer
Joined
Jul 14, 2012
Messages
853
Re: Transom repair

View attachment 222367View attachment 222367View attachment 222368
some pics of the transom after I removed the last bolt from the splashwell. it is bad no question there. also is a picture of the serial plate, is there anyone that has information about these glaspars from this info??? or know where to look for some more info?

Woodonglass- I measured the thickness at the drain plug and it is 1 1/2". you think I can bend the 3 layers of exterior grade plywood without kerfing? I would definately prefer that. I will try it that way first then. I believe you if you think it can be done. Thanks for turning me toward US Composites, they are even more affordable yet. Makes my budget a little easier to achieve and finish sooner. Heck, it may be on the water this summer.

One question on the floor, once I get the stringers finished and the new wood down I was thinking I would use a 6oz cloth to cover the floor with. Is that too much? I would also like to not use carpet again. Is there some sort of addative to put in the final coat of resin to make a light texture to walk on(no slip surface basically.)

Fogetaboutit. That transom looks a-ok to me :D

Seriously though, that is one bad looking transom.
 

Woodonglass

Supreme Mariner
Joined
Dec 29, 2009
Messages
25,929
Re: Transom repair

Ok, here's my recommendation on how to fabricate your transom. Once it's all out and the outer skin is all prepped and ready to go, you'll build a interior bracing wall about 3ft aft of the stern. (I'll provide a drawing when the time comes) You'll use this wall to place flex bracing on the 3/8" ext. Grade plywood to get it to conform to the curvature of the transom skin as well as hold the skin in place. (Again we'll discuss further when the time comes.) Once the first layer of plywood has been PB'd into place it's a piece of cake to do the rest. You can use PB and Screws to put the rest of the plys in place.
 
Joined
Jan 16, 2014
Messages
17
Re: Transom repair

update on the repair. I have gotten my Grinding/Sanding room built with some scrap MDO plywood and heavy plastic. pics added below. I used some string between the uprights to hold tension on the verticals and plastic. It is built in 3 sections so I can take it up and down as needed with relative ease. I have used a shop vac with high quality small particle filters to help keep down the dust inside also. worked well so far, I am not finding fiberglass dust in the garage or inside. My wife has not had to complain yet, trying everything I can to avoid that!

I made a stringer template using backing paper from my sign shop. It is cut to the shape of the original floor with the stringers marked and located in the proper position on the hull. I figured I could build my stringers and get them really close with this template then be able to make final corrections inside the boat once I've got them close. It lessens my need to be in and out of the boat and I figured and saves my knees from some unneeded pain. Also it will give me a good first rough cut of the floor plywood. In the end I did leave the boat on the trailer for restoration. I built some extra support off the trailer around the edges, seems pretty solid now. It will need to come off eventually for some work on the bottom of the hull but that will take place when its a little warmer and I can have a little extra room without leaving my trialer in a mud pit from snow meltoff. Progress inside, I have the transom sanded down and most of the resin around the transom sanded.

Question 1, should I just go ahead and cut out the original inside tabbing that I had originally left from cutting out the original transom and from around the edges? I am thinking in the end new and stronger tabbing will be better anyways. It will also make installing the new transom ply much easier.

question 2, I have gotten the trim off around the edge of the boat and taken out the rivets holding the top and bottom together. I still cannot budge the top from the bottom. Its still very solid. Did they apply glue around the edges before installing the top of the boat to the bottom. In that case what is my best way of removing the top from the bottom without damaging either?


Plastic room.jpg
Plastic room frame.jpgFloor Template.jpg
 

jbcurt00

Moderator
Staff member
Joined
Oct 25, 2011
Messages
25,164
Re: Transom repair

Q1) Yes remove old glass so you can run new tabbing

Q2) maybe glued together at the lip or the inside joint could be glassed over. My fireflites hull was 100% glassed to the back side of the cap. It all had to be cut loose. The splashwell is also usually 100% tabbed to the transom, and at the top edge of the transom, the splashwell lip that the motor clamps over, is often filled w/ PB to ensure a solid surface for the motor to 'hang' from when it's mounted. That can keep the cap stuck to the hull.............
 

Woodonglass

Supreme Mariner
Joined
Dec 29, 2009
Messages
25,929
Re: Transom repair

Take some pics on the inside of the hull where the hull and the cap meet. We'll be able to tell you if they're glassed or glued together. I agree all tabbings should be removed to make room for new.
 
Joined
Jan 16, 2014
Messages
17
Re: Transom repair

I'll take some pictures tonight after our cub scout meeting if I can and post them. I don't believe it is glassed over. It looks to me like the trim is attached to the top then slid down onto the hull. I'll get some pics for you to look at though.
 
Joined
Jan 16, 2014
Messages
17
Re: Transom repair

Here are some pictures of the trim from the inside of the boat. Like I said, the rivets are all out but it still is not budging. My guess is glue but I'm not sure how to go about removing it without damaging the hull or the top or the trim itself. Any ideas?
Inside rim trim side top.jpgInside rim trim from stern looking forward to bow.jpg Inside corner rim cap Transom side top.jpg
 

jbcurt00

Moderator
Staff member
Joined
Oct 25, 2011
Messages
25,164
Re: Transom repair

In this pix:
attachment.php

The rub rail is still in place. Did the aluminum channel remain on the boat after you took all the screws & rivets out?

Because it looks like a piece of metal (inner part of the rubrail) in the center top portion of this pix, at the hull cap joint:
attachment.php


And the far left end of the metal piece in this pix looks to have PB or adhesive of some type dripping down the inside face of the hull:
attachment.php


So you may have some adhesive between the hull & cap.

The metal inner portion of the gunwale also leads me to believe that your cap is sitting in a channel on the back side of the rubrail AND the rubrail has a downward facing channel that slides down over the top lip of the hull:
Captiverubrailchannel_zpsb97ee053.png


There may be sealant/adhesive/PB in either the hull channel, the cap channel, or it's just well stuck after XXyrs....

May just take some gentle persuasion to get it lifted off. The some not so gentle persuasion...... Once it starts to lift, I don't think it will be too difficult to fully remove, unless it is glued......


Yours is probably not the more typical rubrail channel and shoebox type hull/cap joint:
RubrailCapHullJoint_zpse05cbb89.jpg
 
Joined
Jan 16, 2014
Messages
17
Re: Transom repair

In this pix:
attachment.php

The rub rail is still in place. Did the aluminum channel remain on the boat after you took all the screws & rivets out?

Because it looks like a piece of metal (inner part of the rubrail) in the center top portion of this pix, at the hull cap joint:
attachment.php


And the far left end of the metal piece in this pix looks to have PB or adhesive of some type dripping down the inside face of the hull:
attachment.php


So you may have some adhesive between the hull & cap.

The metal inner portion of the gunwale also leads me to believe that your cap is sitting in a channel on the back side of the rubrail AND the rubrail has a downward facing channel that slides down over the top lip of the hull:
Captiverubrailchannel_zpsb97ee053.png


There may be sealant/adhesive/PB in either the hull channel, the cap channel, or it's just well stuck after XXyrs....

May just take some gentle persuasion to get it lifted off. The some not so gentle persuasion...... Once it starts to lift, I don't think it will be too difficult to fully remove, unless it is glued......


Yours is probably not the more typical rubrail channel and shoebox type hull/cap joint:
RubrailCapHullJoint_zpse05cbb89.jpg

I believe you are correct on the metal rail that has the channels. That is what I thought it looked like. Now that you pointed it out I see the PB/adhesive you are talking about by the transom behind the metal channel. I hadn't noticed that before. Looks like I will use a metal shim or something to slide up in there and try and use a little elbow grease to tap it off with a hammer possibly. Hoping it's not adhesive. That may make it complicated and a little frustrating.
 
Top