I'D RATHER B FISHN
Seaman
- Joined
- May 5, 2009
- Messages
- 70
Hello to all who view this thread, and most importantly thank you to those who offer up sound (FREE) advice.
Background
I picked this beauty (w/ trailer; no motor) up in the beginning a January 2012 for $200 off of craigslist. I already have a boat so why would I need another (as my wife asked)? Well, my other boat is a 21? Osprey (same hull design as a Cape Horn), with a 9? beam. Very stout boat and takes some work to get her on the water (& out of the water) by myself with my wingman Connor (3 yr old son). So I decided I would like to have something a little smaller in addition to my other boat. Also I thought, it will be a long time before Connor will be tall enough to stand against the leaning post on my Osprey and man the helm. So again, a smaller boat would present that opportunity in a more present fashion.
When I called about the boat, the young guy told me he had 4 calls already and all were coming to look at it the next day. So I told him I could do better and wanted to come right then. It was around 8pm and the temp was dropping fast, and was expected to bottom out around 27-28 degrees. Good thing he was only 15 minutes north of where I lived. I picked my brother in law up, went by the bank to pick up some cash and rode up to see her. It was dark so I did a lot of banging, poking, and visual on her with a flashlight. I knew she was going to need a lot of work, regardless of what I was being told by the seller. I went ahead and paid for her and had a bill of sale signed. We couldn?t get her that night since the trailer had only one tire so my father in law and brother in law delivered her the next day.
The young man who sold me the boat didn?t know anything about her, so the first thing I wanted to do was find out as much as I could about the hull so I could get her properly registered in my name. The plate on the boat is pretty shot, with the info being non-legible, but the hull # was readable. I started with an internet search and came up with the first 3 digits of the hull # indicating the manufacturing company being Custom Fiberglass Manufactures (CFM). I tried a google search on this company, only to find they had been out of business for some time. After a few more google search?s trying to find some information I decided to hand it over to the pros of iboats.com. After posting a thread with a picture several replies provided me with more than enough suggestions and information on how to find out what I needed to know about my boat. However one reply in particular supplied me with the name of the owner of CFM. I was able to track him down through a web search. He now owns another boat company in Statesboro, GA. I called the company and spoke directly with him. He asked that I email a picture of the hull and he could tell me all he would be able to recollect since he didn?t have any physical data from his original business (CFM). So I did just that, and here is what he generously supplied me with,
This Custom Craft is a model 1672S (The S designates a side console). It had the following specifications: Max HP 75, approx weight of 550 lbs, center line length 15ft 3in, beam 72 in. It looks like one that we added a ?fantail? to the transom. The hull looks to be in good shape. Hope this info is helpful. Good luck with your restoration.
It?s a good feeling knowing that this man took the time to review this boat and reply to me, especially since he ?didn?t know me from Adam?.
I have since taken the information and sent in the registration and am awaiting for my new numbers.
Project begins
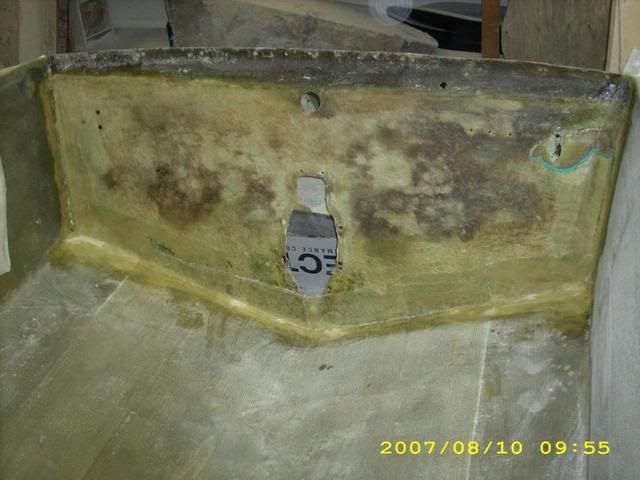
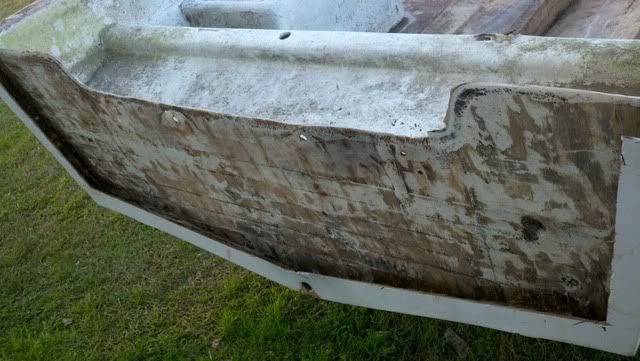
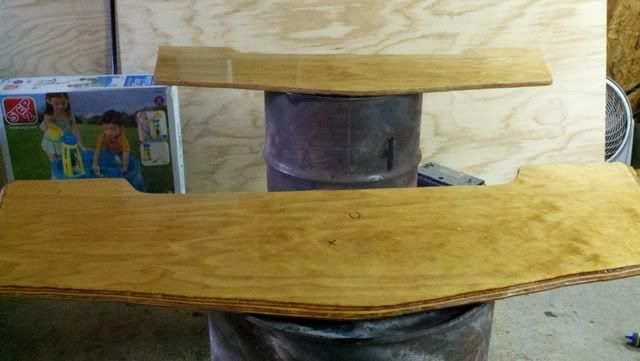
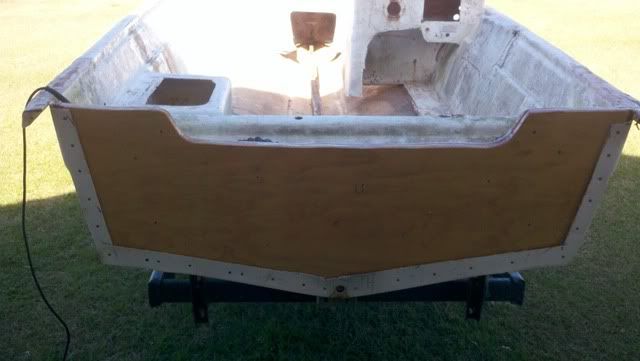
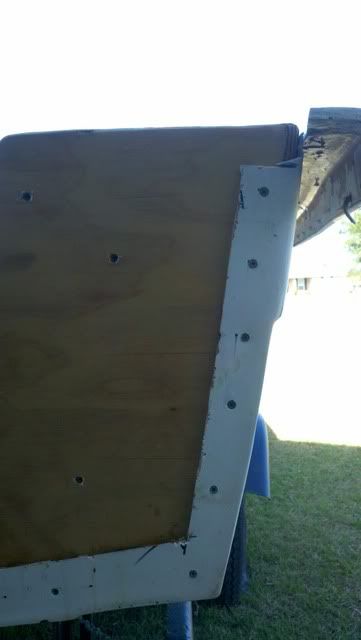
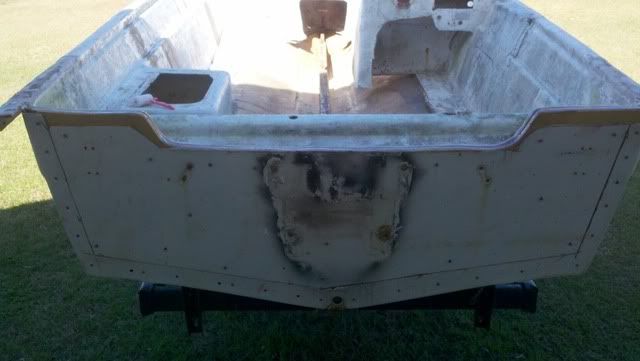
After my father & brother in law delivered her, I put her in my shed. I began to assess the situation and plot out a plan of attack. It was easy to determine what I needed to do first and that was to get all of the saturated foam and saturated wood that was in the hull out. And that is what I did. But before I started pulling wood out, I removed any and all hardware that would be in the way. After that was completed, I started with the floor of the boat, stern to bow pulling out foam and wood. What a mess it was. I?m glad I bought a good mask and wore protective clothing because the stuff I pulled out of that hull looked to be disease ridden. Once all of the wood and foam was removed I turned my attention to the transom. I knew the night I looked at her (before I bought her) that there was some glass separation and water had made its way in, but I didn?t think it penetrated to the degree that it had which I discovered after I cut the glass of the top of the transom. The transom is 1.5? thick, made up of 2- 3/4? pieces of plywood. The piece that was closest to the inside skin of the transom was shot. It crumbled with the slightest touch. The piece attached to the outer skin of the transom was shot also, but not to the degree as the first piece described. I was going to try the whole seacast approach and remove the wood in the transom in between the inner and outer skins. I began by doing what seacast had suggested which was take a paddle bit and drill holes in succession into the wood of the transom. Starting at the top of the transom and pushing down through the transom wood. After the holes was drilled, take a chainsaw and began cutting out the wood left. After about 20 minutes of that fiasco I said nope, I?ll just cut the outer skin off of the boat to remove the wood. And that is what I did. I drew a cut line, 2? in from the outermost part of the transom all the way around. I then cut the skin out with a grinder using a cutoff wheel. I separated the skin from the wood using a pry bar. The skin came off in one piece. I then used a skill saw to cut the exposed wood along the same perimeter which I used to remove the skin. After I pulled that wood out I had to chisel out the remaining wood that was embedded in the 2? perimeter of outer skin. That process took about 2 hours. I now have all of the foam and wood that was in the boat completely removed, with the exception of the bow deck which is in decent shape and can be left alone. I now will begin the daunting task of sanding every inch of her. I will also be reaching out for advice going forward, especially with the transom repair.
I have some pictures I would like to share, but I there are to many to post in this thread. Is there a way for me to post them all at once???
Thanks for reading.
IRBF.
Background
I picked this beauty (w/ trailer; no motor) up in the beginning a January 2012 for $200 off of craigslist. I already have a boat so why would I need another (as my wife asked)? Well, my other boat is a 21? Osprey (same hull design as a Cape Horn), with a 9? beam. Very stout boat and takes some work to get her on the water (& out of the water) by myself with my wingman Connor (3 yr old son). So I decided I would like to have something a little smaller in addition to my other boat. Also I thought, it will be a long time before Connor will be tall enough to stand against the leaning post on my Osprey and man the helm. So again, a smaller boat would present that opportunity in a more present fashion.
When I called about the boat, the young guy told me he had 4 calls already and all were coming to look at it the next day. So I told him I could do better and wanted to come right then. It was around 8pm and the temp was dropping fast, and was expected to bottom out around 27-28 degrees. Good thing he was only 15 minutes north of where I lived. I picked my brother in law up, went by the bank to pick up some cash and rode up to see her. It was dark so I did a lot of banging, poking, and visual on her with a flashlight. I knew she was going to need a lot of work, regardless of what I was being told by the seller. I went ahead and paid for her and had a bill of sale signed. We couldn?t get her that night since the trailer had only one tire so my father in law and brother in law delivered her the next day.
The young man who sold me the boat didn?t know anything about her, so the first thing I wanted to do was find out as much as I could about the hull so I could get her properly registered in my name. The plate on the boat is pretty shot, with the info being non-legible, but the hull # was readable. I started with an internet search and came up with the first 3 digits of the hull # indicating the manufacturing company being Custom Fiberglass Manufactures (CFM). I tried a google search on this company, only to find they had been out of business for some time. After a few more google search?s trying to find some information I decided to hand it over to the pros of iboats.com. After posting a thread with a picture several replies provided me with more than enough suggestions and information on how to find out what I needed to know about my boat. However one reply in particular supplied me with the name of the owner of CFM. I was able to track him down through a web search. He now owns another boat company in Statesboro, GA. I called the company and spoke directly with him. He asked that I email a picture of the hull and he could tell me all he would be able to recollect since he didn?t have any physical data from his original business (CFM). So I did just that, and here is what he generously supplied me with,
This Custom Craft is a model 1672S (The S designates a side console). It had the following specifications: Max HP 75, approx weight of 550 lbs, center line length 15ft 3in, beam 72 in. It looks like one that we added a ?fantail? to the transom. The hull looks to be in good shape. Hope this info is helpful. Good luck with your restoration.
It?s a good feeling knowing that this man took the time to review this boat and reply to me, especially since he ?didn?t know me from Adam?.
I have since taken the information and sent in the registration and am awaiting for my new numbers.
Project begins
After my father & brother in law delivered her, I put her in my shed. I began to assess the situation and plot out a plan of attack. It was easy to determine what I needed to do first and that was to get all of the saturated foam and saturated wood that was in the hull out. And that is what I did. But before I started pulling wood out, I removed any and all hardware that would be in the way. After that was completed, I started with the floor of the boat, stern to bow pulling out foam and wood. What a mess it was. I?m glad I bought a good mask and wore protective clothing because the stuff I pulled out of that hull looked to be disease ridden. Once all of the wood and foam was removed I turned my attention to the transom. I knew the night I looked at her (before I bought her) that there was some glass separation and water had made its way in, but I didn?t think it penetrated to the degree that it had which I discovered after I cut the glass of the top of the transom. The transom is 1.5? thick, made up of 2- 3/4? pieces of plywood. The piece that was closest to the inside skin of the transom was shot. It crumbled with the slightest touch. The piece attached to the outer skin of the transom was shot also, but not to the degree as the first piece described. I was going to try the whole seacast approach and remove the wood in the transom in between the inner and outer skins. I began by doing what seacast had suggested which was take a paddle bit and drill holes in succession into the wood of the transom. Starting at the top of the transom and pushing down through the transom wood. After the holes was drilled, take a chainsaw and began cutting out the wood left. After about 20 minutes of that fiasco I said nope, I?ll just cut the outer skin off of the boat to remove the wood. And that is what I did. I drew a cut line, 2? in from the outermost part of the transom all the way around. I then cut the skin out with a grinder using a cutoff wheel. I separated the skin from the wood using a pry bar. The skin came off in one piece. I then used a skill saw to cut the exposed wood along the same perimeter which I used to remove the skin. After I pulled that wood out I had to chisel out the remaining wood that was embedded in the 2? perimeter of outer skin. That process took about 2 hours. I now have all of the foam and wood that was in the boat completely removed, with the exception of the bow deck which is in decent shape and can be left alone. I now will begin the daunting task of sanding every inch of her. I will also be reaching out for advice going forward, especially with the transom repair.
I have some pictures I would like to share, but I there are to many to post in this thread. Is there a way for me to post them all at once???
Thanks for reading.
IRBF.
 009.jpg")
 002.jpg")
 005.jpg")
 006.jpg")
 007.jpg")
 011.jpg")
 012.jpg")
 013.jpg")
 015.jpg")
 018.jpg")
 019.jpg")
 021.jpg")
 022.jpg")
 024.jpg")
 025.jpg")
 026.jpg")
 029.jpg")
 032.jpg")
 035.jpg")
 036.jpg")
 037.jpg")
 038.jpg")
 039.jpg")
 043.jpg")