V4 rebuild 84 crossflow 100hp Photos of old parts

edfishing2

Petty Officer 2nd Class
Joined
Mar 6, 2011
Messages
144
1st warm weekend was in Feb. and that is when I tore into my 1984 Evinrude 100hp. Here are some photos of old parts including sparkplugs that look like two new and two old but that is how they came out of block. 3 of the pistons look coked up but no wear. One is toast, well you can see what it looks like. I think one of the needle valve keepers was left off of during rebuild of carb and it was only running on two cylinders. ~4000 rpm was max.
Do the bearings show any clues to you guys about symptoms. I hope not to have to do this again.
 

Attachments

  • 100_1146.jpg
    100_1146.jpg
    151.4 KB · Views: 0
  • 100_1311.jpg
    100_1311.jpg
    122.8 KB · Views: 0
  • 100_1300.jpg
    100_1300.jpg
    143.1 KB · Views: 0
  • 100_1305.jpg
    100_1305.jpg
    136.8 KB · Views: 0
  • 100_1314.jpg
    100_1314.jpg
    96.7 KB · Views: 0
Last edited:

edfishing2

Petty Officer 2nd Class
Joined
Mar 6, 2011
Messages
144
Re: V4 rebuild 84 crossflow 100hp Photos of old parts

Here are the other three pistons.
 

Attachments

  • 100_1302.jpg
    100_1302.jpg
    121 KB · Views: 0
  • 100_1303.jpg
    100_1303.jpg
    127.3 KB · Views: 0
  • 100_1304.jpg
    100_1304.jpg
    134.6 KB · Views: 0

emdsapmgr

Supreme Mariner
Joined
Dec 9, 2005
Messages
11,551
Re: V4 rebuild 84 crossflow 100hp Photos of old parts

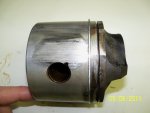
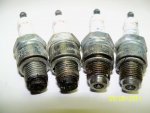
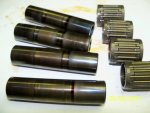
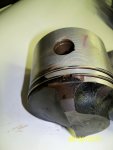
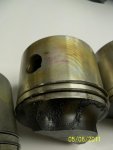
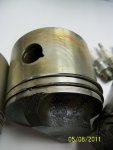
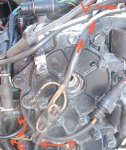
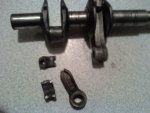
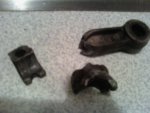
The wrist pins show some sign of heat distress, with the bluish color on them. The sides of the pistons are scuffed and a couple of the top rings have let go. A combination of too much heat and not enough lubrication. A couple of things to look for regarding the failure: 1. Check the rubber water diverters by each cylinder in the block. It's hard to see that area from the pictures you posted. If crud/debris builds up in that area, it will restrict water flow and can overheat one cylinder-even though the powerhead overheat horn did not go off. I'd check the wrist pin area of each rod for any similar heat blue color, like on the wrist pins. 2. There is some slight coking around the rinsets. That carbon buildup will prevent the cooling incoming fuel/oil charge from reaching to top ring from the back (intake side of the crankcase) side and the top ring will run hot and eventually break in half then disintegrate and blow through the combustion chamber then out the prop. It's good to run a can of Bombardier Engine Tuner through a crossflow engine every 100 hours, or annually-to reduce the carbon buildup on the pistons. 3. I'd pull apart your carbs, esp those that feed the two bad cyls. Pull out the jets, esp the high speed ones. Check for debris or restrictions, like dried fuel or small bits of black disintegrated fuel hose. If a cyl runs lean due to insufficient fuel flow/delivery, it will overheat and trash a ring. Is this a commercial model? I see you are running the QL16V plugs, normally found in the commercial engines. The recreational engines normally use the L77JC4.
 

edfishing2

Petty Officer 2nd Class
Joined
Mar 6, 2011
Messages
144
Re: V4 rebuild 84 crossflow 100hp Photos of old parts

The motor is commercial E100WTLCRS but only used for pleasure. I have bored/honed all cylinders (deburred passages and relieved aluminum under sleeve). 3 are .044 over (all were .020) and one is now .064 over. This odd piston was spot faced on inside to make its weight the same as the other 3. I have cleaned all water passages (all removed all carbon) and installed new deflectors. I have rebuilt carbs with all new original size jets. NOTE: one of the needle keepers (little spring clip) that attached float to needle was missing upon disassembly. The connecting rods looked ok and I installed all new bearings full complement OMC style. All new wrist pins. New crank bearings (except top). Tested all of the themisters and the all worked fine. All new BRP/OMC thermostat kit. (note: one of the old thermostats had crap stuck in it and one of the small holes in the plate they seat into also had crud.)

Note: it wont help it run better but I was supprised at how well carb cleaner works at getting that old paint off and leaving the original paint alone.

Also lapped reed cages and will install BRP/OMC reed valves. Also all new bushings in linkages/manifold/stator area. New hoses everywhere and recirculation 5 way TEE busted and new one on the way. Previous recirc hoses were not correct and the one on the block had pulled off of the barb.
 

edfishing2

Petty Officer 2nd Class
Joined
Mar 6, 2011
Messages
144
Re: V4 rebuild 84 crossflow 100hp Photos of old parts

Reed valves I have heard that flipping them over is not a good idea.
 

Dhadley

Supreme Mariner
Joined
Feb 4, 2001
Messages
16,978
Re: V4 rebuild 84 crossflow 100hp Photos of old parts

Classic, classic, classic results from lugging. Combustion temps too high, the locating pin for the ring migrates in, the ring moves and gets sheared off in a port. I'd bet the top possible rpm was closer to 5000 than closer to 5800.
 

edfishing2

Petty Officer 2nd Class
Joined
Mar 6, 2011
Messages
144
Re: V4 rebuild 84 crossflow 100hp Photos of old parts

The RPM before the previous rebuild was 5500 or so. I mentioned to him about the RPM being lower and his only reply was "I didn't do anything to change the RPM". I am stupid for not getting this looked at elsewhere or even with him.
 

edfishing2

Petty Officer 2nd Class
Joined
Mar 6, 2011
Messages
144
Re: V4 rebuild 84 crossflow 100hp Photos of old parts

The vacuum switch has one lead that goes to ground. The other lead goes to an insulated lug on the bracket. The wiring has twin tan (labeled V) wires with a ring terminal that goes to this insulated lug. The wiring diagram shows one tan wire on the boat side wiring harness and 3 tan wires on motor side wiring harness. One tan wire is very clear it hooks to one of the thermal sensors in the head on the starboard side (not shown in photo). The diagram shows a low oil sensor but I do not know of a low oil sensor in my outboard. If you look at the photo it looks like one of the thermal sensors was not even hooked up (marked with a T). The diagram shows the port thermal sensor in-series with this vacuum switch.

Here is the question. Where does this in-series happen as it looks like there are two of the blade type connectors. Has someone (previous mechanic/owner) hooked up the low oil sensor to one leg of the vacuum incorrectly or the thermal switch wire ? Pin out of motor side red connector may help me out.
 

Attachments

  • Tan Wires.jpg
    Tan Wires.jpg
    122.1 KB · Views: 0

jonesg

Admiral
Joined
Feb 22, 2008
Messages
7,198
Re: V4 rebuild 84 crossflow 100hp Photos of old parts

It sounds like the springclip that attaches the needle to the float being absent let the needle stick in the jet, no fuel.
 

edfishing2

Petty Officer 2nd Class
Joined
Mar 6, 2011
Messages
144
Re: V4 rebuild 84 crossflow 100hp Photos of old parts

100_2280.jpg100_2281.jpg100_2282.jpg100_2283.jpg100_2284.jpg
Here are the after photos. 10 hour break in is done. It is working but I have a backfire about every 20 minutes. I think I need to set the timing. I tried not to change any of the linkages on the carbs. One other symptom is kind of hard to start. It takes like 8 tries when cold but once warmed up it starts fine. Joe Reeves method is what I plan to do to set the timing. Any down sides to this method?
 

1946Zephyr

Vice Admiral
Joined
Oct 21, 2008
Messages
5,556
Re: V4 rebuild 84 crossflow 100hp Photos of old parts

Nice work. You have a new motor again. :D

Fortunately, things didn't look this bad. I love the looks of mangled metal. No two pieces look the same.
\/ \/ \/ \/ \/
 

Attachments

  • 111120_172917.jpg
    111120_172917.jpg
    140 KB · Views: 0
  • 111120_172946.jpg
    111120_172946.jpg
    142.1 KB · Views: 0

edfishing2

Petty Officer 2nd Class
Joined
Mar 6, 2011
Messages
144
Re: V4 rebuild 84 crossflow 100hp Photos of old parts

Am I correct that a backfire(I think/hope) every so often above 3200 is from timing being off?
 

edfishing2

Petty Officer 2nd Class
Joined
Mar 6, 2011
Messages
144
Re: V4 rebuild 84 crossflow 100hp Photos of old parts

I got some carb cleaner on the throttle arm decal and it smeared the information. Does anyone know the correct timing advance degrees 28 degrees ?at max?

Are these decals available anywhere?
 
Top