Volvo duoprop

PJWENNING

Cadet
Joined
Sep 15, 2021
Messages
8
7B347DE7-45F5-4DED-97AD-A4E4F10262BF.jpegB48E74CF-CEB7-4EBA-A095-0DFEC3FB8777.jpeg884019D5-F210-4A6C-9ABF-48810F715791.jpeg
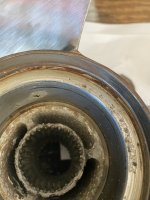
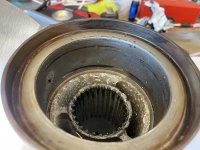
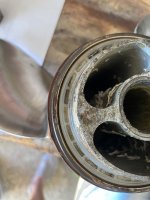
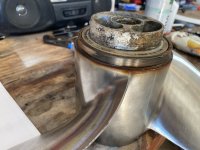
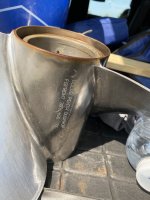
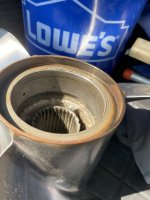
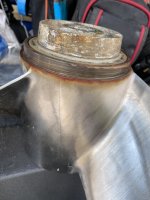
This year I bought a new to me 2008 cobalt 252 with a Volvo 8.1 GI-J.:.I left lake george this year with a blueing where the two props come together on the shaft.. The props came off fairly easy with a decent amount of grease still left on the shaft and no obvious issues with the shaft itself.. The duoprop had obviously wear on the hub where the blueing occurred and was looking
for any insight as to the cause of the wear and blueing… I’m fairly concerned that this amount of heat still occurred while in 70 degree water.. Thanks
 

Scott Danforth

Grumpy Vintage Moderator still playing with boats
Staff member
Joined
Jul 23, 2011
Messages
50,245
Props are rubbing on each other. Are you missing hardware between the props?
 

PJWENNING

Cadet
Joined
Sep 15, 2021
Messages
8
No idea that’s why I’m asking when I took it aPart I ended up with one forward prop nut one rear prop nut two props .. lol
 

alldodge

Moderator
Staff member
Joined
Mar 8, 2009
Messages
42,559
Each prop has a thrust washers on the shaft. Is there 2 washers?
 

PJWENNING

Cadet
Joined
Sep 15, 2021
Messages
8
I assume that the props are in bad enough shape that they should be replaced or should this remedy my issues
 

alldodge

Moderator
Staff member
Joined
Mar 8, 2009
Messages
42,559
This hould fix the issue. Dont know which one your missing but think its the front
 

PJWENNING

Cadet
Joined
Sep 15, 2021
Messages
8
So I got a few part #s and the two prop numbers are 3851466 and 1851476 both are f6 7K don’t know if this helps at all as most diagrams I’ve seen don’t typically have a thrust washer?
 

alldodge

Moderator
Staff member
Joined
Mar 8, 2009
Messages
42,559
No expert with VP, but thrust washers don't normally come with any prop
 

Nashville

Petty Officer 2nd Class
Joined
Sep 3, 2012
Messages
100
So I got a few part #s and the two prop numbers are 3851466 and 1851476 both are f6 7K don’t know if this helps at all as most diagrams I’ve seen don’t typically have a thrust washer?
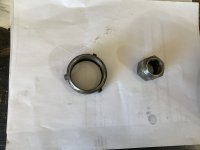
Please check the part number that begins with 185… and repost (better, post a picture of that prop with the engraved markings visible). 185… is not correct. This should be an F6 set with straight splines on a DPS-A drive. No thrust washers on this series like the 280/290’s. Please post a picture of both nuts. It’s possible the inner nut is incorrect, a shaft is floating, the hub slipped, one was under torqued or one wickedly over torqued. Cause remains to be determined. Thank you.
 

PJWENNING

Cadet
Joined
Sep 15, 2021
Messages
8
004188E8-F893-47CB-B55E-B9D7684DA58B.jpeg51DB93ED-B32E-4E74-96A5-81B4E39F8ACE.jpeg16A9369B-4A30-477C-8718-84797E64F962.jpeg11BD8B02-CE86-4168-906A-744C58C6A5EE.jpeg6A0D61FB-E52D-4C92-B544-437EDAD9CF0B.jpegEA525E45-8B89-4AB1-8694-CAB8DF8B1690.jpeg
I was able to hopefully get a. Few better pictures of the engraving and heating..The 2nd and 3rd show the ring it’s starting to create the 4th shows the opposite side the others show where it is also creating some sort of friction Finalized by the 2 nuts I took off..Thank you everyone
 

Nashville

Petty Officer 2nd Class
Joined
Sep 3, 2012
Messages
100
View attachment 350086View attachment 350087View attachment 350088View attachment 350089View attachment 350090View attachment 350091
I was able to hopefully get a. Few better pictures of the engraving and heating..The 2nd and 3rd show the ring it’s starting to create the 4th shows the opposite side the others show where it is also creating some sort of friction Finalized by the 2 nuts I took off..Thank you everyone
Thank you. Looks like contact on the face of the front nut (larger of the two props). A few initial matters to look at. (1) The nylon insert seems to have a gap between it and the I.D. based on the new picture of the smaller of the two props. It might be the picture though. So, please inspect. There’s a machined taper, but should be no gap. (2) Since the props are off the drive, grab the inner shaft and move it laterally and then in/out. Do the same with outer shaft. Let us know what you find. There should be near zero movement (a couple thousandths). It’s best to use a dial indicator, but if you don’t have one, do your best and see if there’s gross movement. (3) Look at the drive and see if there’s wear on the housing at the root.
 
Top