VP 280 Transom Plate Removal

adamkat22

Petty Officer 2nd Class
Joined
Jul 12, 2015
Messages
140
Hey all,
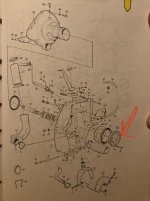
I have to repair my rotten transom and have a few questions. I have a Volvo Penta 280. So far I have gotten the drive off. The engine is disconnected but I haven't pulled it yet. I'm assuming that to drop the steering fork I take the nut off in the engine compartment and then try and wedge open the steering thing and the fork will drop? After that I just take out the carriage bolts and the plate should pull away?

Also, wondering what things I should be ordering ahead of time, for when I'm ready to put everything back together. Looks like there is a rubber seal for the outside of the transom shield. I did bellows last season but might as well replace again? Anything else that it would be good to freshen up/replace while I'm this deep into it?

Thanks so much for any thoughts!
 

Scott Danforth

Grumpy Vintage Moderator still playing with boats
Staff member
Joined
Jul 23, 2011
Messages
50,233
Stop, read the manual

Fork remains

Pull 6 bolts from PDS clamp. Use 3 of them in the threaded holes to jack off the clamp

Remove motor and PDS aas a unit. Then remove the 6 nuts from the studs and pull the transom bracket from behind the boat
 

adamkat22

Petty Officer 2nd Class
Joined
Jul 12, 2015
Messages
140
Oh dang. Thanks for the save Scott. We had disconnected the engine at the bell housing, because that's how I had pulled the engine prior. Is the PDS clamp the part that I've noted with a red arrow to in the attached pic? If so, we just take that off and then pull the engine back with everything else attached and then remove the shield?

I have the 'Workshop Manual for Aquatic 280-290-290A-and Duoprop' but i wasn't finding much info on this part of the procedure in there.
 

Attachments

  • IMG_5034.jpg
    IMG_5034.jpg
    843.2 KB · Views: 14
Last edited:

adamkat22

Petty Officer 2nd Class
Joined
Jul 12, 2015
Messages
140
Can you confirm if that part I notated with the arrow is the clamp you are referring to? Also, I’m not sure what you mean about using three of the bolts to “jack off the clamp” but maybe that will make sense once I’m out there looking at it

Anything else I should look into R&R on while I have this all out? Thanks!
 

Scott Danforth

Grumpy Vintage Moderator still playing with boats
Staff member
Joined
Jul 23, 2011
Messages
50,233
Can you confirm if that part I notated with the arrow is the clamp you are referring to? Also, I’m not sure what you mean about using three of the bolts to “jack off the clamp” but maybe that will make sense once I’m out there looking at it

Anything else I should look into R&R on while I have this all out? Thanks!
yes

get the manual

there are 6 thru-holes that you currently have bolts in. under the washer plates are 3 tapped holes the same threads as the bolts.

you take out the 6 bolts, lube up 3 and stick in the 3 threaded holes. then tighten the 3 bolts evenly to jack the clamp off.

otherwise it isnt coming off.

its a simplistically simple and robust design
 

adamkat22

Petty Officer 2nd Class
Joined
Jul 12, 2015
Messages
140
Well this is going just about as rocky as I should have figured. Of the 6 bolts only 5 were installed (other hole is just filled with silicon). Two are totally mangled and im still trying to extract them. 1 of them I got out. And the other 2 snapped.

I’m trying to find specs on those bolts..and some other parts I asssume I will have to replace before this is done and over. Is the only manual for this outdrive the ‘Aquamatic Workshop Manual’? If so, the only reference im seeing to this task is the schematic on pg 89…but it doesn’t tell names of parts or any sort of specs
 

Scott Danforth

Grumpy Vintage Moderator still playing with boats
Staff member
Joined
Jul 23, 2011
Messages
50,233
Those bolts have nearly full threads.

eBay or direct from VP.

After you get it cleaned up. Use permatex aviation sealant on the threads to prevent corrosion
 

adamkat22

Petty Officer 2nd Class
Joined
Jul 12, 2015
Messages
140
Is the “aquamatic workshop manual” the only manual to reference all this?
 

mvn

Petty Officer 1st Class
Joined
Jul 25, 2007
Messages
204
Need more info on what you're working on.
 

72fj40

Petty Officer 2nd Class
Joined
Jul 16, 2013
Messages
142
I went thru a lot of what you are going thru about 6 or 7yrs ago. We had to repower, rebuild the PDS and go thru a lot of the drive and bellows. I think I found it was easier to install the drive without the upper gear box on then bolt it on later. The previous owner of our 1977 CC Lancer with an AQ280 had lost most the same bolts you are having problems with. I don't remember the length of them. I'm pretty sure they were SAE 3/8-16 fully threaded bolts. I found a lot of the drives fasteners are SAE. I purchased 6 regular SS bolts and ran a 3/8-16 die to make them fully threaded. VP's part # is 191844. I seem to recall they a had a locking sheet metal tab/strike plate VP #806624 under them that was folded against the hex head to lock them. I use the factory manual. the search function here, and any other web site I could find. There are a several Volvo Penta Factory Parts Diagrams that are extremely helpful that show how everything in order goes together and has all their part #'s. 1. Connecting Componets AQ Drive 280, 2. Upper Gear Unit, 3. Intermediate Housing AQ drive unit 280, 4. Lower Gear Unit Drive 280. Those diagrams make the manual make sense. There's also one for the engine too, that I never used. I found a lot of good used parts on the Ebay & new at the VP dealers along with this website.
 

adamkat22

Petty Officer 2nd Class
Joined
Jul 12, 2015
Messages
140
I just ordered a Clymers and a Seloc manual today…seems like those might have some more info in them. Right now I have been working off a “workshop manual” that just has one exploded view but doesn’t reference part names or numbers so I’m sort of shooting in the dark when I try and Google a part.

Looking at the part number for the bolts you shared, I now realize that the PO used off the shelf 3/8 bolts with a shoulder on them. I only got one out..the rest snapped or were so mangled that I had to drill the heads off them.

Right now I’m just trying to get that clamp off. I got some fresh 3/8 bolts to try and jack that clamp off as Scott danforth had said, but only one of the 3 jacking holes accepts a bolt. The second one seeems like the threads are stripped out inside it, and the third one seems like it has a bolt snapped off inside it.

I assume there is no other graceful way to get that clamp off? I’m not coming up with much on my Google search. Maybe once these manuals arrive in the mail I’ll get a better idea of an alternate approach…
 

Scott Danforth

Grumpy Vintage Moderator still playing with boats
Staff member
Joined
Jul 23, 2011
Messages
50,233
I just ordered a Clymers and a Seloc manual today….........
I assume there is no other graceful way to get that clamp off?
So you have 2 knee pads coming?

Buy a used clamp off eBay. Use a drill and chisel and split the old clamp
 

adamkat22

Petty Officer 2nd Class
Joined
Jul 12, 2015
Messages
140
Scott…what’s the name of the manual I should order?

And yeah just read on another forum about breaking the clamp to get it off. Also wondering if pulling the engine forward and out would just separate the clamp…but sounds like it’s best to just break it and buy a fresh one ?
 

Scott Danforth

Grumpy Vintage Moderator still playing with boats
Staff member
Joined
Jul 23, 2011
Messages
50,233
The clamp is a pressed fit over the PDS and is drawn on with the 6 bolts. Removal usually requires tension on all 3 jacking bolts to make it pop off

Regarding a manual, I would have to call a VP dealer as the VP website no longer lists manuals older than 20 years
 

adamkat22

Petty Officer 2nd Class
Joined
Jul 12, 2015
Messages
140
just to update…I finally got that clamp off. Unfortunately in my drilling escapades I damaged the mating surface of the bellhousing, so now I know not to go too deep. Yikes. In the end I had to use a small bottle jack (even my car jack couldn’t do it) to get the damn thing off. I drilled and tapped some fresh 3/8” holes in the clamp , and put some long pieces of threaded rod into them. The other ends of the rod ran through a short piece of 2x8. With the bottle jack on the snout of the pds (with some wood blocking for padding) I was finally able to jack against the 2x8 and pop the clamp off . Was a total beast. Thanks for everyone’s help.

Also got the engine pulled and the exhaust y pipe off. Tomorrow I will look at removing the shift cable (I assume I just loosen the nut on the inside of the transom shield?) and the tilt mechanism. I’m wondering if I don’t actually need to pull the tilt mechanism in order to remove the transom shield from the boat? Almost seems like I will be able to maneuver the transom shield off with it still in place ?

Thanks for all the help and guidance!
 
Last edited:
Top