Work Begins Soon

*EdC*

Senior Chief Petty Officer
Joined
Oct 31, 2007
Messages
661
Re: Work Begins Soon

Bob,
I haven't forgot ya...... I'll get those pics out soon.
Also Send me an email and I can help you out a bit with the transom. Mine is 99% removed. I made a couple of cool tools that helped alot!

Regards,
Ed
 

vwfoolwhy

Seaman
Joined
Jun 26, 2008
Messages
58
Re: Work Begins Soon

WOW! The transom repair looks like a tuff job especially without removing the Splash well. My Westfield has a bolt on splash well that I have removed for ease in floor replacement.

*EdC* your right around the bend from me. Do you ever Boat the Merrimack? I've adventured into Salem Harbor and Danvers Port a few times in my days on the water.

My Boat came from Lynn.

Mike
Methuen, MA
 

Landscaping Wiz 808

Chief Petty Officer
Joined
Jun 29, 2008
Messages
498
Re: Work Begins Soon

Yeah, I sure wish I had a bolt on transom Mike. I did save the cap piece I cut off though and it should all go back together ok. "SHOULD":eek:! *EdC*, I could definitely use your help, especially if you know how I can get the wood out of the bottom of the transom without going through the fiberglass.

I got lucky in that my floor and stringers are 100% fiberglass. Although the floor has a million holes in it that I'll need to fix. BOB
 

*EdC*

Senior Chief Petty Officer
Joined
Oct 31, 2007
Messages
661
Re: Work Begins Soon

Guys,
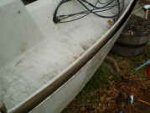
Doing the transom is not too difficult. I have mine about 98% removed.
It does take a bit of time. As I worked mine, I kept reminding myself how much money I was saving! :rolleyes: 
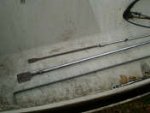
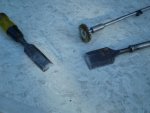
I found the chainsaw method was too aggressive. I used a wood boring bit with extensions to get most of it. A good shop-vac is a must. I also made some simple tools... Went to Home -Cheapo and picked up a 3' piece of 3/4" flat steel and a piece of 1/2" round steel.
I then welded an old 1" wood chisel (handle removed) to the end of the round stock, sharpened it up good... and away I went scrapping and chiseling down deep
The flat stock got a chisel blade ground on both ends, and then one end was bent in a vise to 90 degrees, about 4'' up. Makes a good hook tool for those stubborn pieces. A couple of tricks I learned were.........
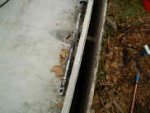
1. I put depth marks on the tools. That way I knew I wouldn't go through the bottom
2. I ground the point off the wood boring bit when I was down about 19". It's a bit squirrely to control, but I sure didn't want to put a hole in her.
Lastly, be very careful of the through hull fittings. I gotta change all three of mine!:mad:
I still have to finish mine up this summer. I got involved in rebuilding an old 80hp Merc for her and it's taking allot longer than anticipated.
Let me know if I can help you in any other way
Regards, Ed
 

Attachments

  • small tools.jpg
    small tools.jpg
    3.9 KB · Views: 0
  • PC060218small transom.jpg
    PC060218small transom.jpg
    3.8 KB · Views: 0
  • PC060220small transom.jpg
    PC060220small transom.jpg
    3.9 KB · Views: 0

vwfoolwhy

Seaman
Joined
Jun 26, 2008
Messages
58
Re: Work Begins Soon

I thought about that one last night and the plan of attack I came up with dead on with Ed's approach.

It definitely would be a time consuming job but when it's all done it'll look the best with little to no visible repair.

Good luck and definitely keep this going as I plan to watch this one all the way through.

Also how do you like the Merc. 400?

I've had my eye on a Gypsy down the street from me with a 500 on it with controls & Power tilt in really good shape. I've turned it over by hand and it seems it'll be a runner. The guy was down to $200.00 and now it's just B/O .

Thought are to swap my 63 Evenrude 40HP Big Twin on my Westfield for the Merc. 500.

Mike
Methuen, MA
 

*EdC*

Senior Chief Petty Officer
Joined
Oct 31, 2007
Messages
661
Re: Work Begins Soon

Hi Mike,
I see you are just up the road form me...that's cool. Got a place in NH. I run her on the lake there. Might be good to hook up sometime!

Regards,
Ed
 

Soundslikefun

Seaman
Joined
Apr 22, 2008
Messages
70
Re: Work Begins Soon

The one centered, higher, and accessible from the in side is the drain for the bilge area. "this should be plugged from the out side as water pressure will aid in helping it stay in the boat"

The lower one off centered is for "Hull Drainage" or better know for draining all the unwanted water that accumulates under the floor. " this should be plugged from out side as well"

Standard transom plugs found at any Marine Supply Store or even Wall Mart can be used. Just measure the diameter of the hole to aid in plug sizing.

Mike
Methuen, MA

I was wondering the same thing too. Where does this water get into the hull that needs to be drained?
 

pduquette

Ensign
Joined
Jun 22, 2007
Messages
999
Re: Work Begins Soon

can be from seepage from hull fittings ,or through the topside deck fittings etc , but most will be from condensation . Make sure you are sealed tight with 3M 5200 below the water line and your plugs fit tight too.
 

vwfoolwhy

Seaman
Joined
Jun 26, 2008
Messages
58
Re: Work Begins Soon

Water always finds a way anywhere on an older boat.

"EdC" I've boated a many lakes in the southern to mid NH area.

Unfortunately most campground won't allow non-seasonal campers to launch or morn boats any more. I do have a friend on "Big-Island" so I still can boat there.

Would be nice to meet up some time. I'll bring the PWC along.


Mike
Methuen, MA
 

Landscaping Wiz 808

Chief Petty Officer
Joined
Jun 29, 2008
Messages
498
Re: Work Begins Soon

WOW, you guys have been busy while I was gone. First off let me say that when I got home and pulled the mail out, there was the envelope *EdC* promised that contained the 1968 sales brochure with my Westfield in it. Thanks Ed, I definitely owe you a few beers and a ride in the completed boat next year when I'm up there. I'm also going to use the tools and techniques you're using on your transom for mine as well. Thanks again!:)

vwfoolwhy - I actually sold the Merc400 and controls. I put it on craiglist but it wasn't generating any interest. So I changed the spark plugs and lower unit oil and gave it some fresh gas, hooked it up to a battery and VROOM! fired right up. It was even pumping good water without changing the impeller. It sold in less than an hour after the second posting. I thought twice about selling it though after I got it running so easily. I think if you can get one for a good price you should definitely go for it. There is a website that sells all the parts you'll ever need for it too. I have always had OMCs and I've never had any huge problems so I think I'm going to stick with them.

Tomorrow I'm going to Baltimore after work to look at a 1997 Johnson 50hp and controls that I think would work well on the Westfield. If I buy it I'll post some pictures of it. The boat will hold a 70hp but I think a 50hp will work fine for fishing purposes.

Lastly, while on vacation I got to take my 1 year old nephew Henry on his first boat ride. Here are a couple pictures of what the next generation of boaters looks like. Oh Yeah, that's my sister Mary holding him. BOB

HPIM0220.jpg

HPIM0222.jpg
 

Landscaping Wiz 808

Chief Petty Officer
Joined
Jun 29, 2008
Messages
498
New "er" Power

New "er" Power

I went up to Baltimore today after work to look at a motor I saw listed on craigslist. The motor is a 1997 Johnson 50spl long shaft. and was mounted on the back of a rotted McKee Craft. The motor is in amazing cosmetic shape and when I pulled the cowling off it looked brand new under the hood. I hooked the earmuffs up, primed it and it started right up and purred like a kitten. Before I started it I felt both cylinders to make sure they were cool and that it hadn't been warmed up. I also did a compression test in both cylinders and they both showed up right around 145lbs. It also pumped water like a racehorse and shifts well into F/N/R.

Very impressed with the motor I gave a low-ball offer of $900.00 and to my amazement...HE ACCEPTED!!!:eek: I happily drove away with the motor, VRO tank, complete wiring harness and the throttle control.

I will build a stand for it and place it near the garage door where I can see it as inspiration for when I'm grumbling and cursing while removing the old transom. Talk about inspiration! Also, besides the investment for Seacast, this is the last MAJOR initial investment to get the 'ol girl running. YES!

As always, here are some pictures. BOB

HPIM0241.jpg

HPIM0242.jpg

HPIM0243.jpg

HPIM0244.jpg

HPIM0245.jpg
 

pduquette

Ensign
Joined
Jun 22, 2007
Messages
999
Re: Work Begins Soon

Great deal!! Just remember to lock it to the bench + keep the door closed +locked when your not home too.....:D:eek::D:D BTW You didn't need another boat /trailer???? Guess you havent caught M.B.S yet:D
 

vwfoolwhy

Seaman
Joined
Jun 26, 2008
Messages
58
Re: Work Begins Soon

"M.B.S."

Multiple, Boat, Syndrome !!! LMFAO!!!


Man I know that one all to well. I have tree in the drive way right now. That?s down from five,


I haven't picked up that Gypsy with the 500, 50HP Mercury yet but I don't see it going any where (also I needed to get those other two out of the yard first).

The 40HP Evinrude runs like new. So for now it's doing the job. I believe the Mercury would be a little better on the top end but where my plans go for the MFG I need all the low grunt I can muster up, and from all the power point write ups I've read the "Big Twin" beets ot the "500".

The Power trim would be nice though!

Mike
Methuen, MA
 

Landscaping Wiz 808

Chief Petty Officer
Joined
Jun 29, 2008
Messages
498
Re: Work Begins Soon

M.B.S. - HAHAHA!:D:D

I have four boats in two states! If I buy any more I'm going to have to start renting all of my friend's driveways and garages - HAHA! I have a funny feeling that when the MFG is complete I'll start getting that "itch" again. My friends call my house Bob's Marina...which I consider a compliment! Besides the MFG they are all operable though.

I found a nice outboard stand online that is rated for up to 115hp/315lbs and is relatively inexpensive so I went ahead and ordered it. I figured I would have spent at least half that much in materials on a homebuilt one anyway. Another boat tool for the marina I guess. I will definitely keep it locked up and the door shut when I'm not there. Thanks guys - here's a picture of the stand. BOB

outboard-motor-carrier-2.jpg
 

Andy in NY

Commander
Joined
Oct 25, 2007
Messages
2,109
Re: Work Begins Soon

any more updates?


I am getting ready in a month or so to start my 73 gypsy 14 project...
 

Landscaping Wiz 808

Chief Petty Officer
Joined
Jun 29, 2008
Messages
498
Re: Work Begins Soon

Hi Andy - Only a couple of updates. I'm currently working on removing the old wood from the transom so that I can pour Seacast. My goal is to have the wood removed by the end of September so that I can pour before it gets too cold. I can only hope that this is a realistic goal as some of the outer laminates are pretty difficult to remove. I got about 25% of it out in one day, but I realize the rest will become more and more difficult as I get further from the top. I've also been having nightmares about drilling through the fiberglass in multiple places.:eek: Luckily *EdC* sent some pictures of the tools he's using which I've re-created and they are really helping. *EdC* - If you read this, How did you get all of the wood out near the two top corner caps of the transom? I drilled in as far as I dared and then tried to pry out the remaining pieces. After an hour with little success I decided to let it wait until another day. Any suggestions?

According to the UPS website my engine stand should be arriving tomorrow. I want to get it assembled and mount the motor before this weekend. If I can get that done I'll hook up the battery, give it some gas and start it. I'll take some pictures of it running and post them here too.:D:D Thanks - BOB
 

Landscaping Wiz 808

Chief Petty Officer
Joined
Jun 29, 2008
Messages
498
Moving the Motor to the Stand

Moving the Motor to the Stand

Today I went to Harbor Freight and got a 1 ton engine hoist so that I could move the motor to the engine stand. It seems to be very stable and makes moving the motor around much easier. I added a plywood shelf on the bottom to hold the VRO tank and throttle control. It takes up much less room in the garage now that it's upright. I didn't start it as all of my gas tanks are already mixed with TCW-3. I will get a new tank and take some pictures of it cleaned up and running soon.

Once I had all of that done I went back to work on the transom. Here are some pictures of the motor transfer as well as the progress so far on the transom. BOB

HPIM0248.jpg

HPIM0249.jpg

HPIM0250.jpg

HPIM0251.jpg

HPIM0252.jpg

HPIM0253.jpg
 

*EdC*

Senior Chief Petty Officer
Joined
Oct 31, 2007
Messages
661
Re: Work Begins Soon

Hi Bob,
Yea, gettin' in those corners was a stinker. To get the majority of it out, I used a spade bit with the point ground off, and a couple of really sharp chisels. I used the chisels to peel away the plywood laminations one at a time. I also found a small 1" drum sander at the hardware store. Mounted in an extention on a drill worked pretty good. Lastly I finished it up with a wire wheel. Here a some photos ... the port side is done, Just a bit more to go on the starboard side.
Hope that helps! :)

Regards
Ed
 

Attachments

  • port side.jpg
    port side.jpg
    12.1 KB · Views: 0
  • starboard side.jpg
    starboard side.jpg
    17.9 KB · Views: 0
  • transom tools.jpg
    transom tools.jpg
    15.9 KB · Views: 0

Mark42

Fleet Admiral
Joined
Oct 8, 2003
Messages
9,334
Re: Work Begins Soon

Nice work Bob! Always great to see another MFG being saved from the landfill!

Mark
 
Top