Re: Unintentional stringer job
Erik, your boat is looking great, really looking forward to seeing it progress.
Got the message on making sure to resin the entire Transom prior install.
The through hull fittings and engine mount bolts have me trying to decide what to do, I have read about over sizing and filling with resin, then redrill, what do you do, I know I want them sealed with resin thoroughly, and I was going to use 5200 when the bolts go through too, my transom has 11 holes to deal with.
Good call. That's the reason most transoms are rotten in the first place, they got drilled into and the holes didn't get sealed.
I tend to use the pre-drill and fill technique for relatively shallow or easy to get to holes... it would have been really hard to use on my stringers for mounting those fuel tank shelves, there was too much chance of wandering with the drill bit.
Just remember the important thing is to keep the water away, or if it gets in to limit its spread. Bear in mind that the main thing that keeps boats in good condition isn't the build or materials, it's the maintenance. Don't be afraid to check on your work next year, and fix anything that's wrong.
Found the nicest mixing cups today, they have all the ratios marked out, and only .30cents each, I will use them until I gain confidence in the pumps dispensing the correct volume for a 2:1 ratio.
I used a company called John greer and associates for the Resins and Pour Foam, do you know anything about this stuff?
I haven't used that company, and I've only poured foam on one boat, not mine. It's pretty simple to use, just be ready to pour when you mix it
")
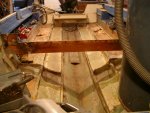
I am building a mock up now to represent a stringer and Bulkhead, need lots of practice with applying the cloth.
How large of a section do you lay up at a time, and how do you know how much resin to mix? I was going to do a 4 foot section first, both sides of stringer, perform fillet then two layers of 1708 overlapped and then one layer 1708 over the top, is the a reasonable area, or is it too much? Got a bunch more acetone today, takes quite a bit to do the serious cleaning required.
The strongest stringers will be made by doing one layer at a time.. instead of doing a 4 foot section, consider doing the whole thing in steps... glue in place one time, fillet the next time, glass the first layer next, finish glassing next. It's ideal (and strongest) to work wet on wet epoxy, but if you do the prep between steps (over 24 hours sand and acetone) it'll still be really strong.
I've been typically mixing my resin in batches as large as I comfortably can, which usually amounts to 20 ounces at a time - that's one 16 oz cup of resin and one four oz. measure of hardener. The stuff hardens slowly enough if I keep it in the paint roller tray that I can just mix more as I go and it's still wet on wet.
For my stringers, I used about 20 oz. of epoxy mixed with about a half pound of wood flour to glue each one in place. The fillets took about 60-70 ounces of epoxy plus a pound of wood flour each.
I'd suggest you just mix up about a 20 oz. or whatever cup size batch and see how far it gets you.. you won't take long to get a rough idea how much resin goes how far. You can't mix a big batch of it anyway without risking overheating.
Roughly the steps (each one evening, 2-3 hours) I took to do my stringers were:
*Cut stringer to size (port), Laminate with peanut butter
*coat with spare epoxy from other tasks over time
*Glue stringer in place with peanut butter (measure 3x-4x)
*Fillet and glass port stringer (4 hours)
*fillet and glass aft stringer (2 hours)
*cut stringer to size(starboard), laminate
*Glue stringer in place
*Fillet and glass starboard stringer
*Fillet and glass aft stringer
I assume by one of your last messages to me, when you said sanding and grinding on the transom, this was so the Resin/cloth has something better to grip to? Do you just Rough Sand it? I seriously scuffed up the inner parts of the Transom with the Grinder, for sandwiching them, but I had not planned on doing that to the exterior of the Ply, or the Stringers for that matter, should I?
It depends on how long it is since you epoxied it. If your wood has a coat of something on it, epoxy or otherwise, you need to rough sand it and preferably wipe with acetone to make sure it's clean. Epoxy will bond anyway, but it'll bond better with clean stuff.
If you've never epoxied a given piece of wood, it's a judgement call. I like to at least acetone the wood in case there's grease or something else on it from the manufacturing process. It only takes a few minutes, and it's good insurance. If the acetone soaks in you may want to let it dry a few minutes before coating or glassing.
One more thing, I am seriously considering using the PL for adhering the Transom wood and the stringer bedding, the 28oz tubes are a bargain, and that stuff really grabs, what do you think?
Sorry for hogging your space, I am charging on here and am finalizing things then doing it, I am fortunate to be semi Retired and have plenty of time and energy.
Sure, go for it with the PL. It's gaining popularity here fast, and some of the more knowledgeable folks (eg. Tashasdaddy) have been using it a while.
More power to ya... I wish I could be semi retired... I'm actually thinking of working building fishing boats when I do that, although it's just a dream at this point, I've got a long time to go.
Erik