1968 Starcraft Mariner V - Winter rebuild

Azonic

Petty Officer 1st Class
Joined
Aug 18, 2009
Messages
279
Re: 1968 Starcraft Mariner V - Winter rebuild

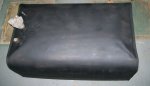
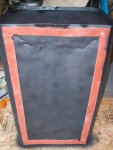
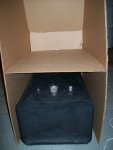
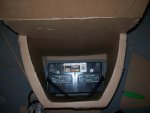
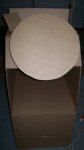
I was thinking about making the cooler a preminent cooler in the boat...
I am not sure still.. The ability to remove the nasty thing and clean outside the boat has advantages...Mostly I was going to make a giant chest to fit a cooler in and then drop one in, also serve as major storage if needed...

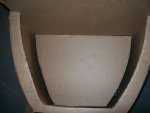
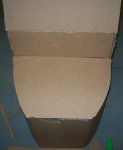
Considering I fish with my kids mostly, I am keeping the main deck as the only deck. To avoid tipsies....

I was going to add padding to the top of the cooler box to make a nice seat for me if I wanted... but I like the idea of adding a "seat" seat....
 

vegasphotoman

Lieutenant
Joined
Jul 13, 2009
Messages
1,411
Re: 1968 Starcraft Mariner V - Winter rebuild

Got ya....kid friendly! lol
yeah Ive got 2 little tikes too 3 and 4 year old girls.....safety first!

Iboats sells these pontoon seats, fllip flop seats are what they are called
wd125_1012_2.jpg


Maybye a custom version for a one person (custom is way cool!!), or one of these pontoon ones from Iboats

(they also have em with coolers built in) click here for the iboats boat seat webpage

then you could flop the seat back fwd enough to lean against the steering wheel and clear the padded lid...so you can access the inside...atleast you'll have a backrest....

I wouldnt be without a backrest while driving anything...thats just me tho!
 

Azonic

Petty Officer 1st Class
Joined
Aug 18, 2009
Messages
279
Re: 1968 Starcraft Mariner V - Winter rebuild

Got a few things done today...

Took an old steel fuel tank out of a junk boat I had here
(guy I bought a trailer from told me he would discount the trailer by $50 to get rid of the boat - $150 total)
Now the boat has saved me $175 for a tank. And it fits in the console...

I am in the process of stealing a railing from another boat I had here.
I paid $200 for it and had sold a non running 90HP evinrude for $200...

I also stole the marine radio out of it....

Got the transom out of the starcraft today also..

Made some significant changes to the console to fit a battery and the tank in there...

post pictures later...
 

Azonic

Petty Officer 1st Class
Joined
Aug 18, 2009
Messages
279
Re: 1968 Starcraft Mariner V - Winter rebuild

Got the wood off the back of the transom.
That took forever. There are 20+ holes in the transom from various things...
6 for the knee brace
4 for the rear transom wood.
and way to many for other stuff...

Got the cap off... that was easy.. just little nails, and the wood was soft so easy to pull those..
Inspection looks like the wood is good. But I know better, it is very soft...

The corner came off looking good too...

Now, that last picture, the 2 dangling mounts.... what are those for?
There was already holes for handles that I had already taken off....
 

Attachments

  • 100_2411.jpg
    100_2411.jpg
    88.8 KB · Views: 1
  • 100_2413.jpg
    100_2413.jpg
    69.2 KB · Views: 1
  • 100_2414.jpg
    100_2414.jpg
    96.2 KB · Views: 1
  • 100_2416.jpg
    100_2416.jpg
    84.3 KB · Views: 1
  • 100_2415.jpg
    100_2415.jpg
    84.6 KB · Views: 1

Azonic

Petty Officer 1st Class
Joined
Aug 18, 2009
Messages
279
Re: 1968 Starcraft Mariner V - Winter rebuild

Then time to get the transom out...

Pretty standard...

Drill little holes, place hooks....

Found a nice set of screws up under the gunwale in the back holding it to the boat... ended up drilling out the rivets holding that in place and will make it work later when I reinstall everything...

Little prying some banging and she came out...

Looks okay.. but I know it is soft, while prying her out I proved that several times.....
 

Attachments

  • 100_2417.jpg
    100_2417.jpg
    92.8 KB · Views: 0
  • 100_2418.jpg
    100_2418.jpg
    79.3 KB · Views: 0
  • 100_2419.jpg
    100_2419.jpg
    81.9 KB · Views: 0

Azonic

Petty Officer 1st Class
Joined
Aug 18, 2009
Messages
279
Trailer and Paint line

Trailer and Paint line

okay trailer first...

New trailer has rollers on it. It does have center V roller also. The rear portion of the trailer is also a tilt unit. The roller crossmembers and roller arms all tilt back and down....

Makes it so flexible, I can load the boat from the ground... very nice!!

Much better winch and bow stop. It has a safety chain also!!

I really like how long the tongue is too. My truck is a crewcab long bed dually. Talk about hard to get broke over. The tongue will help with the control and ability to make small adjustments while backing... Just hope I can see her back there still...

now for the paint lines..

The bottom line in the first picture is the water line..
That line is going to change some, as I am shifting more wieght to the front.
The top line is the proposed paint line...
I am thinking white bottom, black above that, and black bow/keel.
Plan to run a nice 1/2" red pinstipe down the whtie/black tape line...
 

Attachments

  • 100_2420.jpg
    100_2420.jpg
    97.6 KB · Views: 1
  • 100_2421.jpg
    100_2421.jpg
    83.3 KB · Views: 1
  • 100_2423.jpg
    100_2423.jpg
    87 KB · Views: 1
  • 100_2420 copy.jpg
    100_2420 copy.jpg
    89.9 KB · Views: 1
Last edited:

Azonic

Petty Officer 1st Class
Joined
Aug 18, 2009
Messages
279
Now for a couple problems...

Now for a couple problems...

These nice little ledges...

I have 4 total in the boat, as pairs...
One pair in the rear just forward of the transom about 20"

and another pair just aft of the bow about 20"

How do I get rid of them without creating a new set of holes??

Plus, I would like to use one pair of them for my fold down seats at the console, just don't know how to get them out the right way...

Second issue...
these remaining pulleys from the ole cable steer this boat must have had at one point...

They have to go... I could just cut them off, however once again, they are rivet through the hull and would be best to take the hange portion off as well...

The other issue I see is the Starcraft logo. It is riveted on..
(BTW, those are the rivets I am used too!!)

I had planned to make a graphic of the logo and replace it that way, however once again, I am left with "holes" that need filled.

I have enough holes in the transom to deal with...


I need some help here guys, how do I deal with these issues?
 

Attachments

  • 100_2425.jpg
    100_2425.jpg
    64 KB · Views: 1
  • 100_2424.jpg
    100_2424.jpg
    70.5 KB · Views: 1
  • 100_2429.jpg
    100_2429.jpg
    69.5 KB · Views: 1
  • 100_2430.jpg
    100_2430.jpg
    69 KB · Views: 1
  • 100_2426.jpg
    100_2426.jpg
    87.1 KB · Views: 1
Last edited:

Azonic

Petty Officer 1st Class
Joined
Aug 18, 2009
Messages
279
Re: 1968 Starcraft Mariner V - Winter rebuild

So looks like a "Gulvits" gulley!!

Does that whole area need to be filled or just coated?


Also, what kind of rivets are these?

The only ones I have ever used before were the pull through kind that left a hole...

I have never seen a set that had a casing like this..

Thanks
 

Attachments

  • 100_2434.jpg
    100_2434.jpg
    77.9 KB · Views: 1
  • 100_2431.jpg
    100_2431.jpg
    61.3 KB · Views: 1

Azonic

Petty Officer 1st Class
Joined
Aug 18, 2009
Messages
279
Salvaged fuel tank

Salvaged fuel tank

This is the fuel tank I salvaged from another boat...

I paid $150 for the boat and trailer...
The trailer is the one in the above pictures...

So this tank puts me ahead of the game an easy $150-$175...

It is steal and was kind of beat up..

I had to patch a few pin holes in the bottom where is had rubbed though..

That is why I added the strips of rubber..
To prevent the tank from rubbing against the deck and causing more issues..
Just stripped a few pieces and glued them on...

And the last is the tank sitting in it's new hypothetical home!
I changed a few things on the console to make her fit in there the right way..
I am going to turn her around so the fill port is on the front or side of the console...and the vent will be on the opposite side...
 

Attachments

  • 100_2436.jpg
    100_2436.jpg
    86.2 KB · Views: 0
  • 100_2435.jpg
    100_2435.jpg
    95.6 KB · Views: 0
  • 100_2451.jpg
    100_2451.jpg
    89.4 KB · Views: 0

Azonic

Petty Officer 1st Class
Joined
Aug 18, 2009
Messages
279
Console Changes

Console Changes

I realized that I forgot I wanted the main battery for the boat in the console..
(the starter battery will be aft between the livewells...)

So, I changed a few things...

I made a "firewall" between the tank and the under seat storage...
Placed the battery in there
Made a shelf in the storage area about 3" over the battery..
This will still give me 8" or more of storage under that seat...
I plan to vent the battery area also to prevent any fumes that may build up in there over time...

Then then the nice little seat cover...
(I know, my wife says it looks like a toilet in that shape)

Then last shot is of the console with the shelf over the tank, the firewall, and the kick panel... Still alot of storage in there!!
 

Attachments

  • 100_2446.jpg
    100_2446.jpg
    96.2 KB · Views: 1
  • 100_2448.jpg
    100_2448.jpg
    88.7 KB · Views: 1
  • 100_2447.jpg
    100_2447.jpg
    79.2 KB · Views: 1
  • 100_2453.jpg
    100_2453.jpg
    79 KB · Views: 1

reelfishin

Captain
Joined
Mar 19, 2007
Messages
3,050
Re: 1968 Starcraft Mariner V - Winter rebuild

If that fuel tank is going to be completely enclosed, you may want to add some sort of positive ventilation to that console, maybe an additional blower?
 

Azonic

Petty Officer 1st Class
Joined
Aug 18, 2009
Messages
279
Re: 1968 Starcraft Mariner V - Winter rebuild

If that fuel tank is going to be completely enclosed, you may want to add some sort of positive ventilation to that console, maybe an additional blower?

The tank area is going to have the tank vent that it should have,
and I was going to add something similar to a bilge vent to it.
Just not as big...

Do you think it will need something on the lines of a bilge fan?
 

Azonic

Petty Officer 1st Class
Joined
Aug 18, 2009
Messages
279
Re: 1968 Starcraft Mariner V - Winter rebuild

Does anyone know of a particular chain of lumber supply companies that carry 5x10 ply wood?

THe sheet from my floor is 52" X 9' in total size.. that means the uncut board was BIGGER??!
 

Azonic

Petty Officer 1st Class
Joined
Aug 18, 2009
Messages
279
Re: 1968 Starcraft Mariner V - Winter rebuild

my initial investigation was no...

They may special order it though...
 

Captmills

Petty Officer 1st Class
Joined
Aug 22, 2009
Messages
374
Re: 1968 Starcraft Mariner V - Winter rebuild

You can order 5X10 but it is high price. better to use the 4X8 it will be much cheaper. If you order it see if there is a distributor in your area...like Champion and pick it up that will save you some $$$
 

Azonic

Petty Officer 1st Class
Joined
Aug 18, 2009
Messages
279
Re: 1968 Starcraft Mariner V - Winter rebuild

the only thing I do not like about the 4x8 sheets is the 2 joints it greats and their locations.

The one will be almost exactly where I am going to be standing at the console...

However, I will not spend like 50% more for the sheets... or something like that...

Have another question...

I am getting a fish/depth finder and need to mount it to the transom. What is the best technique on a tin can to mount this and prevent yea ole leaks?
 

bananaboater

Ensign
Joined
Jul 27, 2009
Messages
932
Re: 1968 Starcraft Mariner V - Winter rebuild

I had a similar problem, needed 10 feet of running deck.

Two things I did, scarf jointed/glued the 1/4" ply and put the joint over a rib.

If you google scarf joint you will find info on how to do it. I only had to deal with a board about 24 inches wide so it was not too hard but not easy either.

If you were able to do just a 45 degree joint it might be better than a simple butted joint.

Some detail pics on my photobucket.
 

evildocrsx

Petty Officer 1st Class
Joined
Aug 1, 2009
Messages
244
Re: 1968 Starcraft Mariner V - Winter rebuild

How are you planning to do the livewells?
 

Azonic

Petty Officer 1st Class
Joined
Aug 18, 2009
Messages
279
Re: 1968 Starcraft Mariner V - Winter rebuild

How are you planning to do the livewells?

I need to draw up the livewell plans...

I was intending to do a simple little 1/4 plywood pair of boxes on each side of the transom, then fiberglass them on the inside. Resin the outsides. Foam insulate them, then 1/4 covers for the exterior then more fiber glass.

They will be small, but funtional for minnows and crappie...

I intend to plumb them together for fill and drain, and use one bilge pump to fill, recurculate, and dump them.... (that requires a drawing I am sure)


I like the idea of the scarf joint. I will look at your pictures...
quick question.
Did you put the 1/4 piece ontop or under?

The current way the deck was put together was with a 3" aluminum strip with rivets. It did not do a bad job, but I would need 2 more with the 4x8 sheets....
 
Top